
The Attendees tab provides a dashboard of those who have registered for the selected event. This data can be tracked separately from a parent meeting’s general registration for any event that requires selection by registrants, such as a benefit, tour, meal, networking event or site visit. For meetings with a sponsor event, the Attendees dashboard lists who has purchased a sponsorship. Note that the Attendees tab for a parent meeting’s general registration event shows who is registered for an entire conference or convention, as seen in the next screen shot.
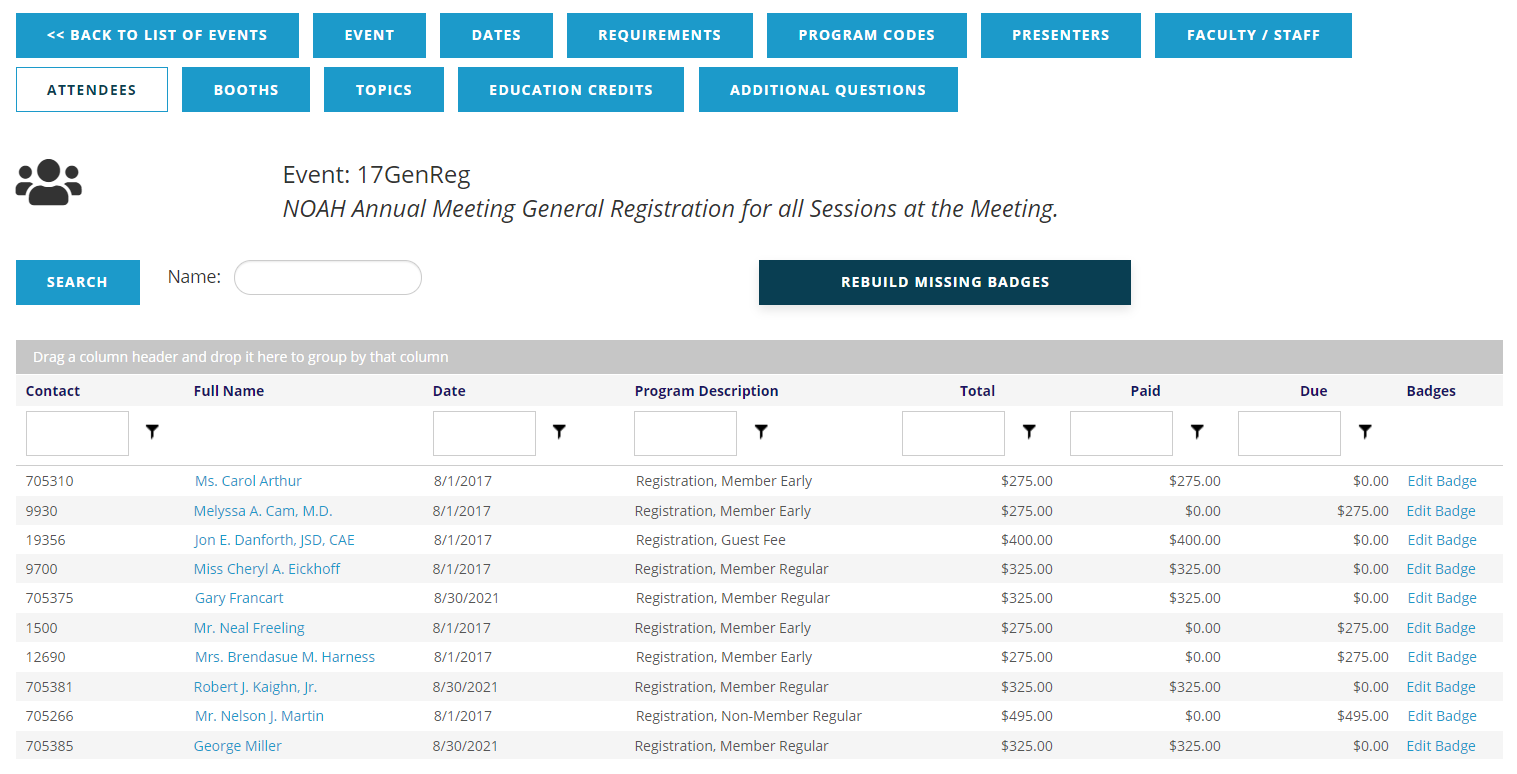
In this view, you can see each attendee’s Contact ID and Full Name, which is also a link to the attendee’s contact record in the AMS. The next two columns display the Date that the attendee’s registration was processed, and the Program Description for the registration that was purchased, including the pricing and/or membership status applied to the fees. The next three columns are all dollar amounts beginning with the Total of all registration fees, followed by the amounts Paid and Due. The final column for Badges allows access to each attendee’s individual name badge, and there is more on that feature later in this section.
If you have more than 25 attendees on file, the display will list the first 25 and allow you to page through by 25 at a time. You may alternatively change the number displayed to 10, 20 or 50 per page, and use the page numbers to move forward or backward to see the other pages of attendees. These page controls appear at the bottom left of the display.

The attendees are listed in alphabetical order by last name. But by clicking on the header of any of the columns you can change the sort criteria, initially in ascending order. You can click the heading title again to sort in descending order. In the next screen shot, the general registration attendee data seen above has been re-sorted by Program Description.
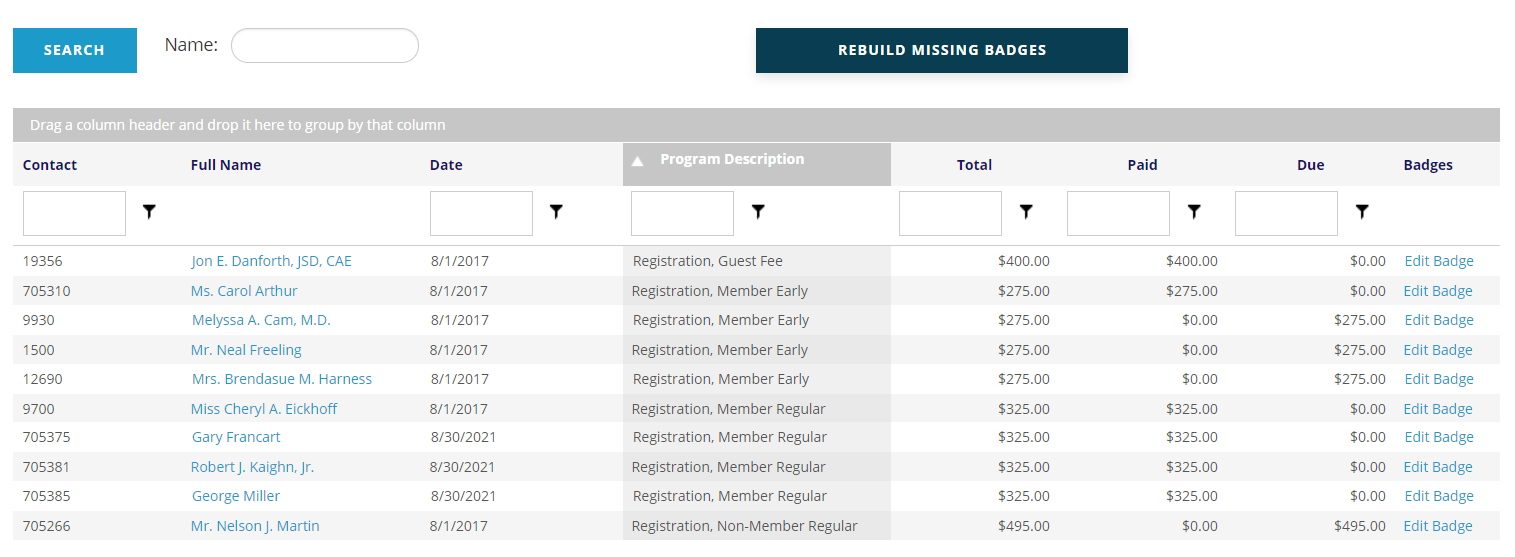
This particular sort choice lets you see types of registration grouped together, such as members who purchased by the Early Bird deadline. If you click on the Program Description header again, that data will be sorted into descending order, reversing the listing. To return to the original sort order, click the same header one more time.
You can use the Search field at the top left of the Attendee grid to search for an Attendee by Name.
Immediately below each of the column headings are white filter boxes. These allow you to further filter the results list. You may enter a value in the white text box at the top of the column and click on the  funnel icon to restrict the list to your value. For example, you can enter the value 0.00 in the white box below the Due column header, click on the funnel and select Greater Than from the drop down list. The list will then be limited to only those attendees who still owe money for registration fees.
To clear any such sort criteria and return to the full attendee list, click the funnel next to the field you used and select No Filter from the drop down menu.
You may also group the results by any of the columns. Click on the column header you wish to group by, then drag the header to the blue bar and drop it when the blue placement arrows appear at the far left of the blue bar. The next screen shot shows the results of such action on the full attendee list example when Program Description is dragged and dropped into the blue bar at the top.
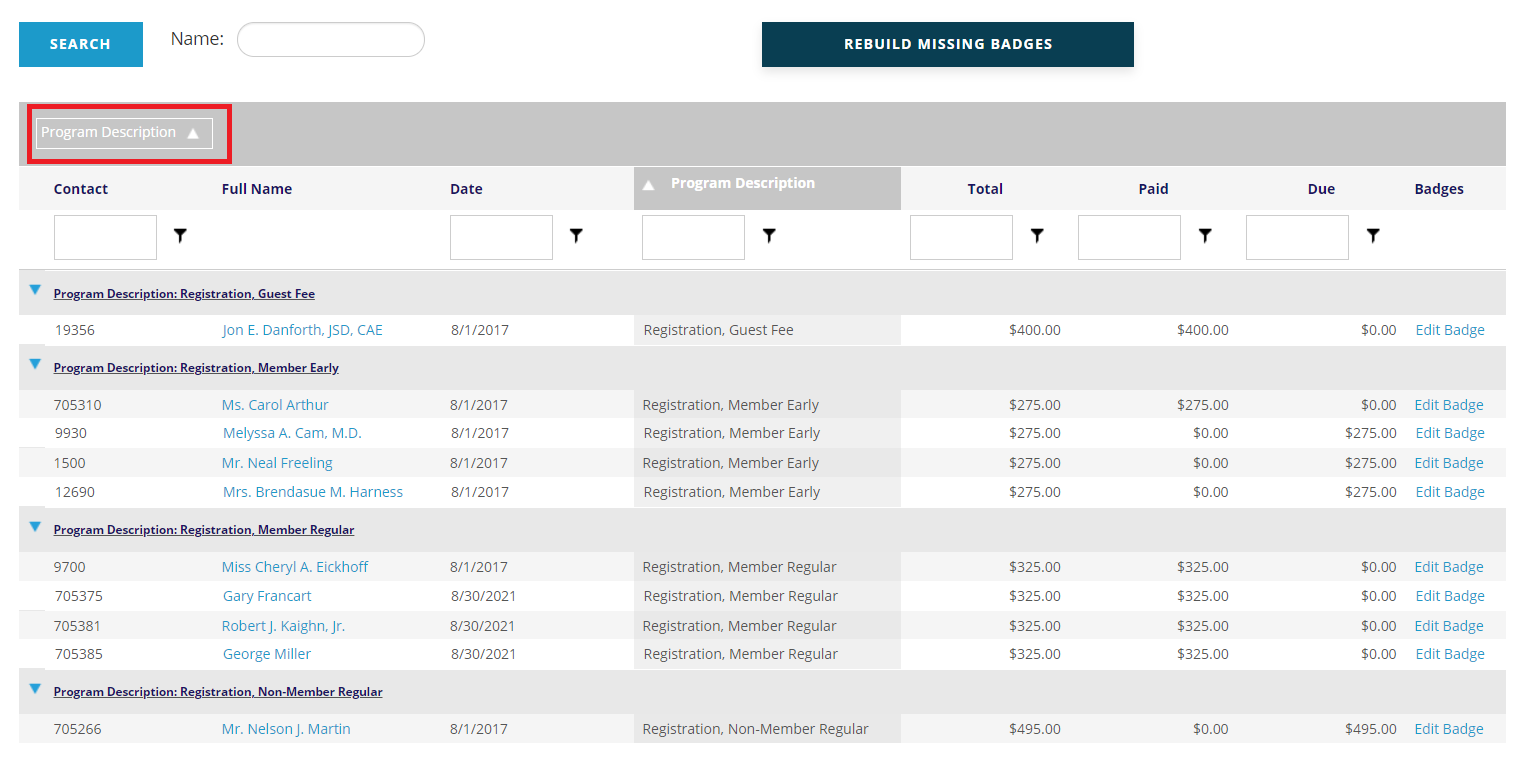
You can now see how many attendees got the early bird rate thus far, how many non-members have registered, and other groupings. You may group by as many columns as you wish at the same time. You can then sort the primary grid by any of the columns within the grouping. To reverse the grouping, drag the white box from the blue bar back to its original place at the head of the column.
Each Attendee’s badge is built immediately after checking out of the shopping cart upon registering, and the Attendees tab is where your staff can edit and reprint individual badges. To edit a badge, click on Edit Badge in the far left column of the grid in the row of the desired attendee record. The next screen shot displays the badge data available to be edited for attendee Jon Danforth. NOTE: you can drag the sides of the dialog box to make it bigger.
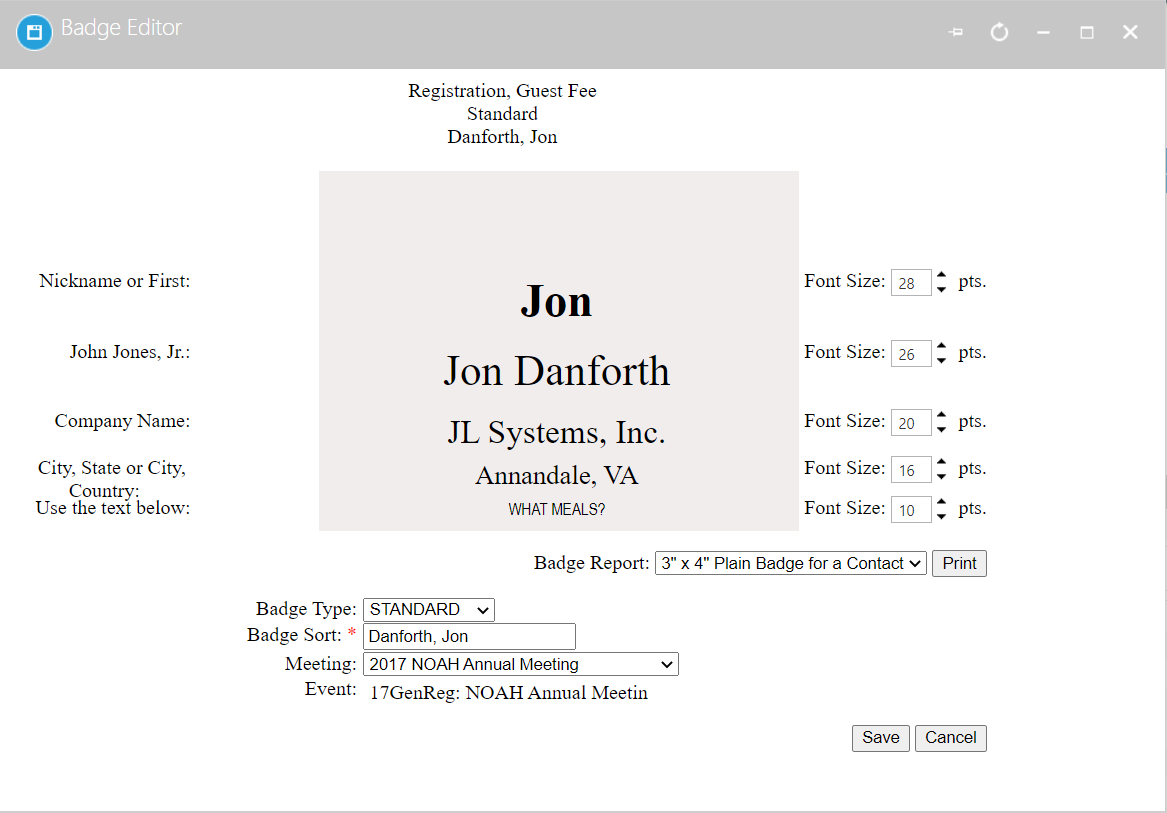
The gray box displays what is currently set to print on the badge, and some of the controls to edit this data are outside this box. The badge fields are able to be edited, but only for this particular badge as neither the original badge template nor the attendee’s contact record will be changed here. In the example in the screen shot, the fields are for Nickname or First (name), Full Name, Company Name, City, State or City, Country and an optional additional text field.
The What Meals? text displayed in the sample badge comes from an optional field in the registration program code. See the section on Program Codes earlier in this chapter for more information on this functionality.
The font size can be changed for each field by using the up and down arrows in the Font Size controls in the corresponding rows to the right of the gray box. The text fields can also be edited by clicking on the row right in the gray box (NOTE: this only updates the badge, no other fields in the database). For example, to change the Company Name field for this person's badge in the example screen shot, click on the space in the gray box for that field.
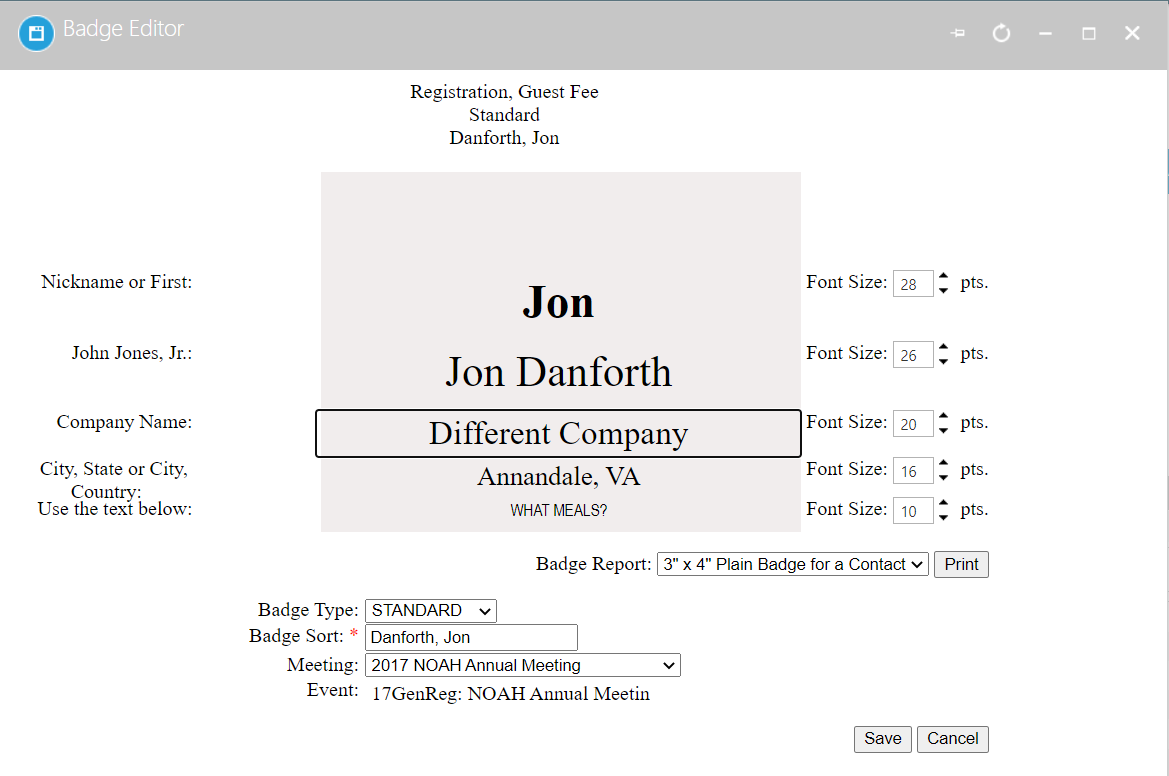
Now you can type in a different Company Name for this attendee, but as previously mentioned, this change will occur only for this particular badge. You will not change the badge template or Jon Danforth’s contact record. When you have finished entering or editing text in the field, check to see if the font size looks good relative to the rest of the badge, and once font size appears as desired, you can click on the Save button at the bottom right, or tab to another field in the badge to make other changes. Likewise, you can click on the Cancel button at the bottom right to discard any changes made.
The Badge Report field directly under the gray box allows you to print the individual badge on view. Use the drop down box to select the badge format if more than one has been made available via the template for this event. There will usually be a default format in this box. Click the Print button. Your print configuration will determine the printing process, but the generation of the badge as a pdf file that then needs to be sent to a printer is very common.
The buttons at the top of the grid for Rebuild Missing Badges and Rebuild All Badges will rebuild the badges based on the Badge Type defined on the registration HotKey, either for those that are missing, or if you have changed badge definition, for all badges.