
The Booth Builder button is where the booths are created. Even though you can create booths one at a time, the strength of the Booth Builder is that you can create a single row or column of booths at the same time.
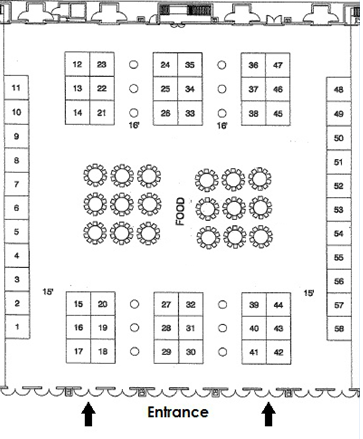 In preparation for building your booths, you should examine your floor plan and determine the size of non-booth features and aisle sizes. These measurements do not need to be exact but accuracy will make the resulting show floor easier to work with.
In this example, we know the widths of the aisles and the size of the booths so we can determine the room is 142 feet wide. If we use a four foot wide wall to demark the outline of the room we now have a width of 150 feet.
Using a 10 foot wide aisle at the top and bottom and adding a 4 foot wide border, the length of the room will be approximately 158 feet.
Every component needs to have a location based on its distance from the top and left side of the work area. On a copy of your floor plan identify for each row or column of booths, the distance from the top and the left of the work area.
The Booth Builder interface needs a few pieces of information:
- Where to start: Top and Left, number of feet from top and left.
- Start #- Starting Booth number.
- By #-Booth number increment. Increment can be a negative number. Use 2 (or -2 depending on direction) if all booth numbers in a row are odd numbered booths or even numbered booths.
- Number of booths. There are two ways to define how many booths to make at a time.
- Supply an ending booth number (To), OR
- Supply the total number of Booths to create.
- Booth size in Depth & Width, and these can use decimal values.
- Direction (Left to Right, Right to Left, etc.)
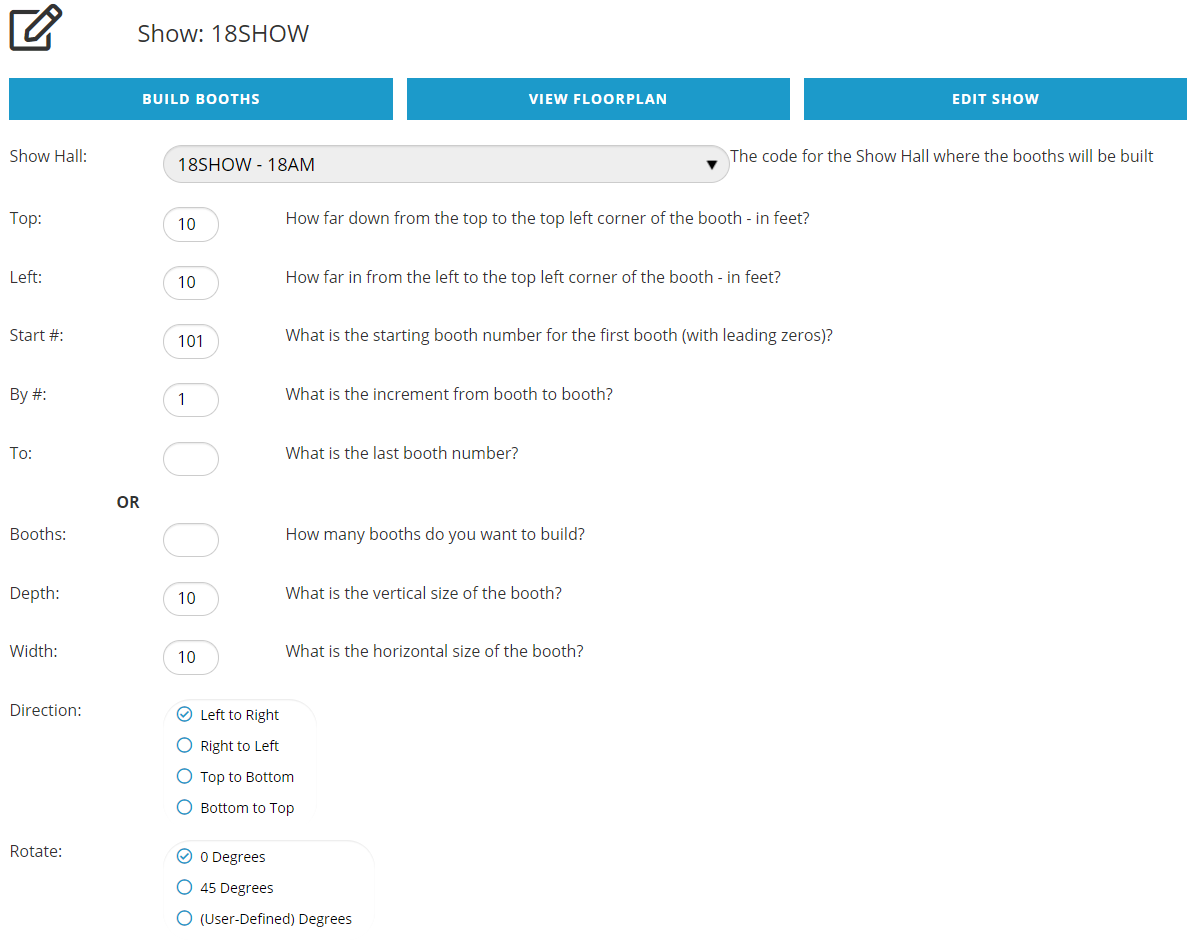
The Rotate options will be discussed in the Booth Edit section.
There are two ways to create the row of booths that include booths 1-11.
Method 1: Top to Bottom
Top: 25, Left: 5, Start #: 11, By #: -1, To: 1, Booths: blank (Depth: 10, Width: 10), Direction: Top to Bottom
Method 2: Bottom to Top
Top: 125, Left: 5, Start #: 1, By #: 1, To: 11, Booths: blank (Depth: 10, Width: 10), Direction: Bottom to Top
A variation on both of these methods would be to make the To: blank and Booths: 11.
The Top and Left fields will always refer to the upper left hand corner of the first booth in a series.
Once the form is filled in, click the Build Booths button to create your booths. Above the Show Hall name there will be a message indicating the results of your submission, such as Finished creating 11 booths, and skipped 0 booths that already exist. If the number of skipped booths is greater than 0 it means at least one of the booths you tried to create had a Top and Left position or booth number that has already been assigned to another booth.
You will need to create “booths” to represent environmental features, like walls and general use areas. Use a range of booth numbers that will not conflict with any actual booth if you need to add booths at a later date (900-999.)
Click the View Floorplan button to view the booths you have created so far in a popup window. Click the “X” in the top right corner of the popup to return to the Booth Builder.
Click the Edit Show button to close the Booth Builder and return to the Show Control page.