
The Demographics tab tracks specific biographical data for both Individual and Company contact records. Both Individual Demographics and Company Demographics are included in the corresponding contact record’s Summary screen. All other List Codes are hidden from the Summary screen by default. The next screen shot is an example of how this data flows to the Demographics box on the Summary screen of an Individual’s contact record. 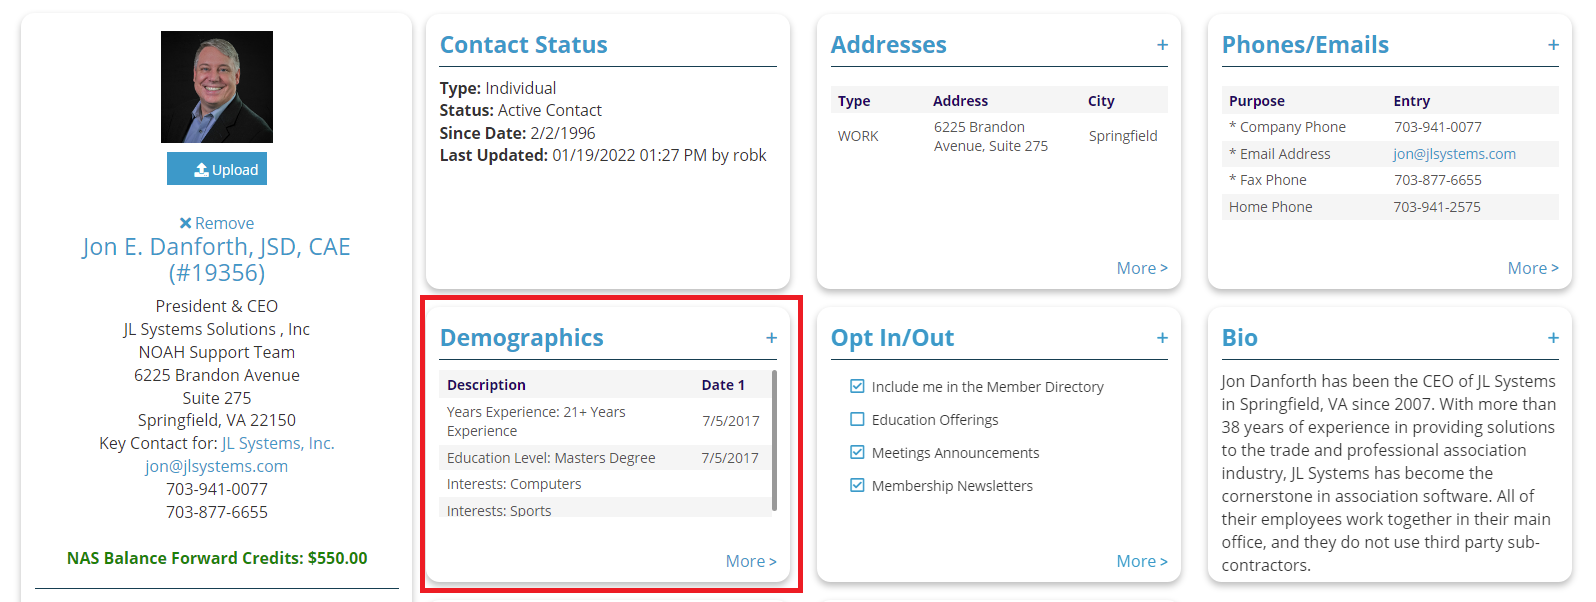
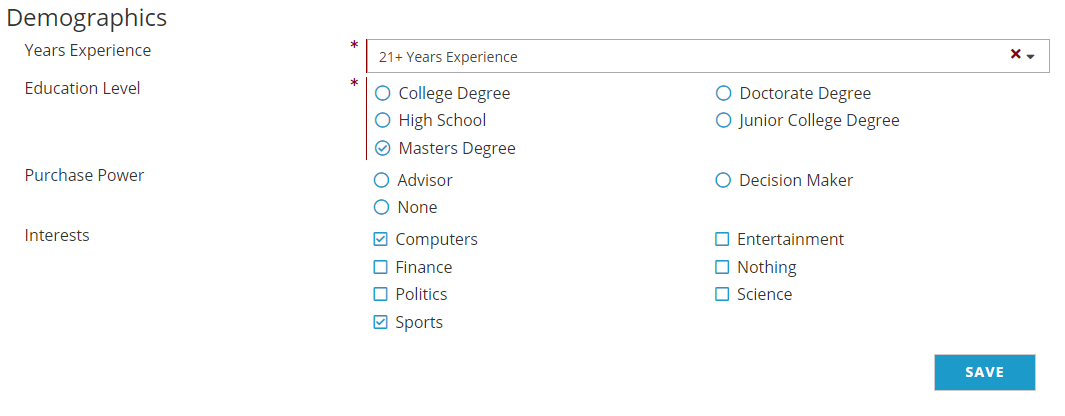
Demographics can be updated on the Demographics tab under the Profile menu option (or using the More link), as seen in the next screen shot.
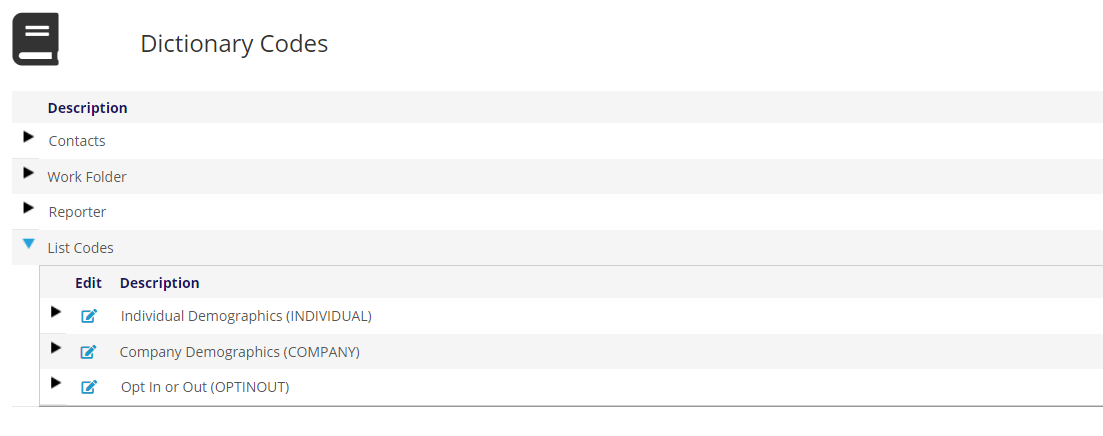
Demographics are designated at the GroupType level by using the same Contact Type to which they apply. Thus an Individual contact record uses the INDIVIDUAL GroupType and a Company contact record uses the COMPANY GroupType, and both are seen in the next screen shot.
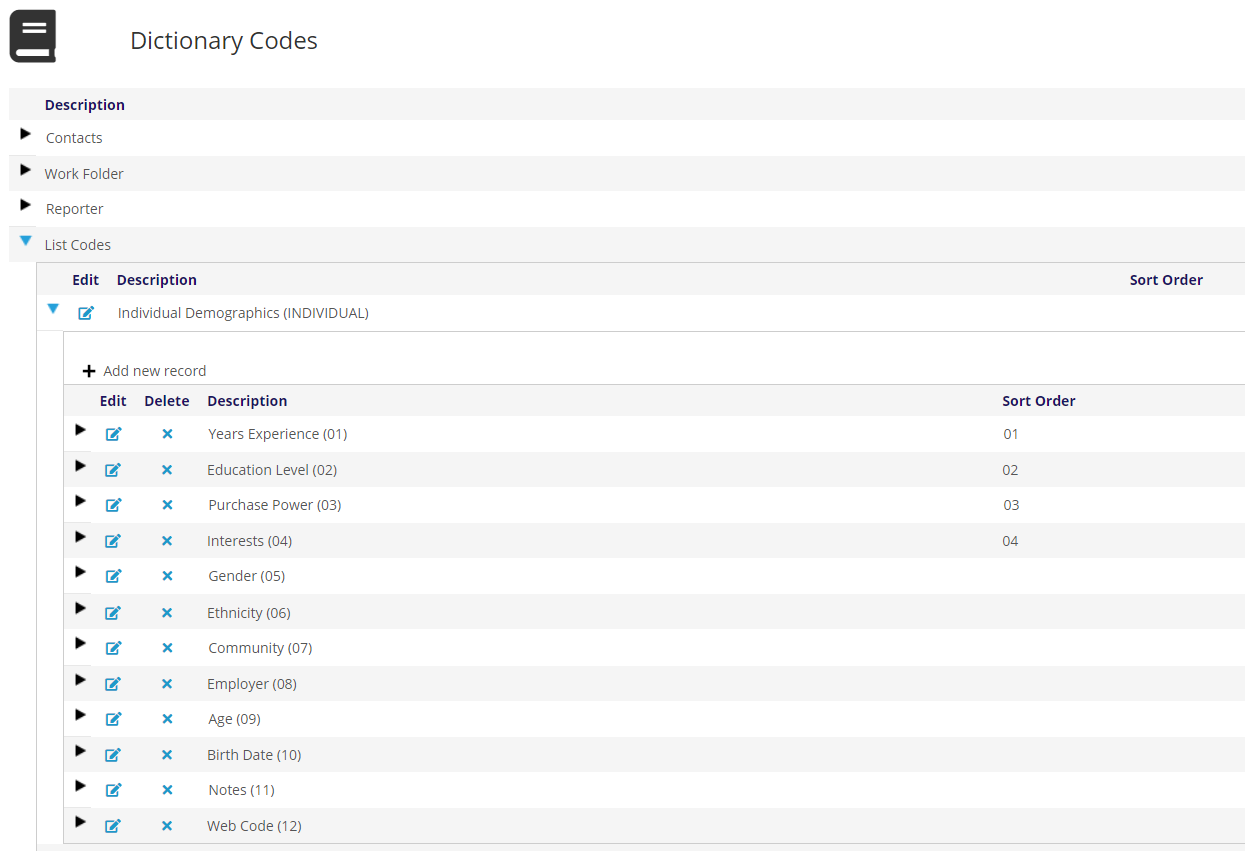
GroupCodes are then used to differentiate between the categories of Demographics. Examples of commonly used Individual Demographics GroupCodes are in the next screen shot.
MasterCodes are then created within each GroupCode to provide a list of values from which to choose. Typical MasterCodes for the Years Experience GroupCode seen in the grid above are in the next screen shot.
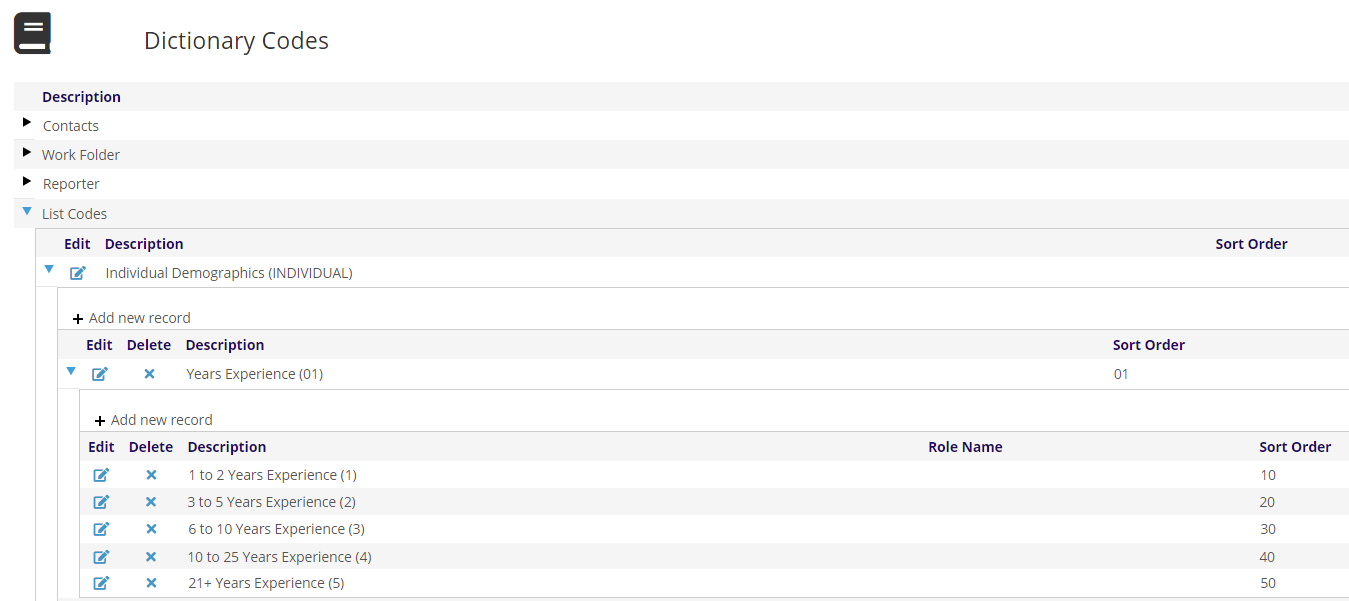
NOTE: the Sort Order controls the order in which responses are displayed; if you do not include a sort order, the options may not appear in the order you wish.
In the Demographics Dictionaries, there is a more extensive use of the Instructions field to control the display method, make a response mandatory, allow multiple responses, limit the number of responses, and to restrict questions to appear only for certain contact records and/or membership types. Most of these Instructions apply to the GroupCode level but some apply to the MasterCode level as well.
We will begin with Control Instructions for Demographics GroupCodes and how they are displayed.
At the GroupCode level you can control the display method for each question that will appear under the Demographics tab. Control Instructions must be entered for every GroupCode in order for the corresponding question or prompt to appear. Control Instructions always begin with CTRL= and are followed by any of the values described below. One example is in the next screen shot.
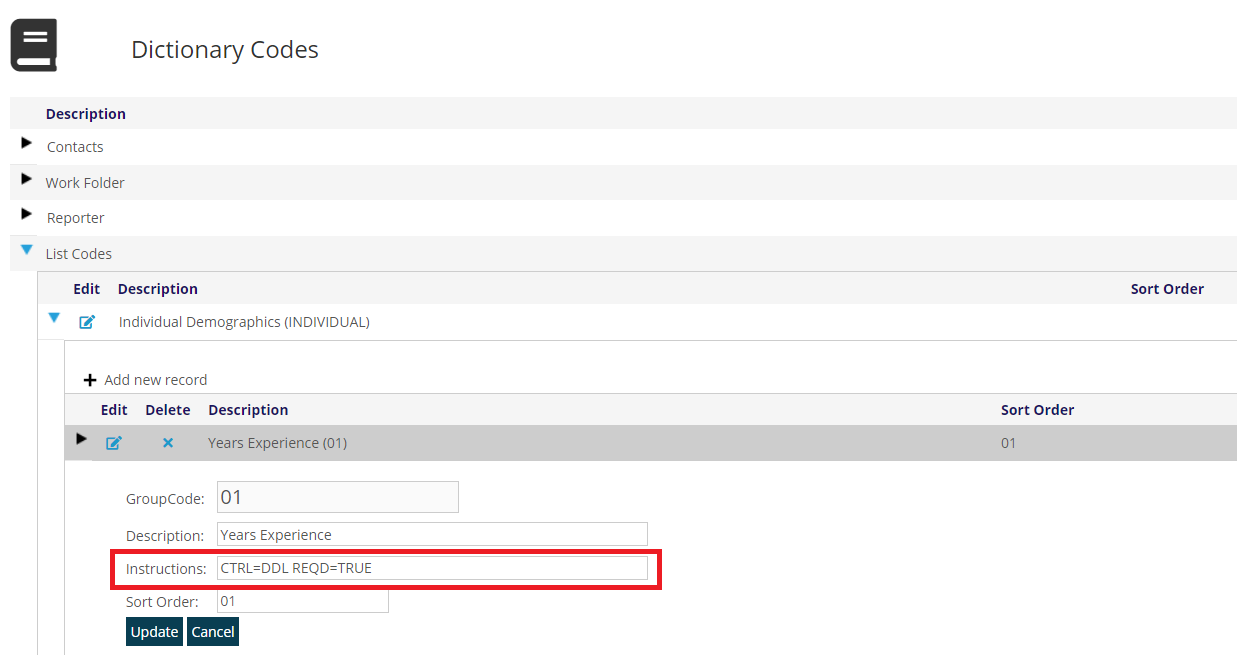
Only one Control Instruction (CTRL) can exist on a GroupCode. Optional Instructions can be used in combination with certain Control Instructions, and will be described later in this section. If multiple instructions are used, they must be separated by a single space.
There are several Control Instructions to choose from for Demographics questions that are answered with Date Related Values.
CTRL=DATE triggers the pop up calendar date picker that allows selection of a month/date/year format.
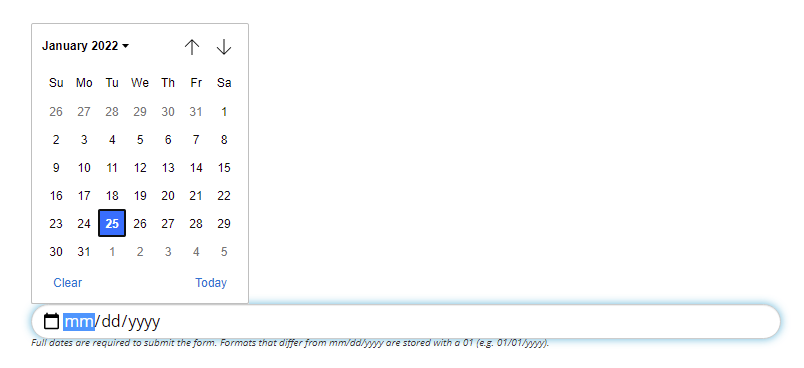
CTRL=DTMY allows selection of a month/year format.
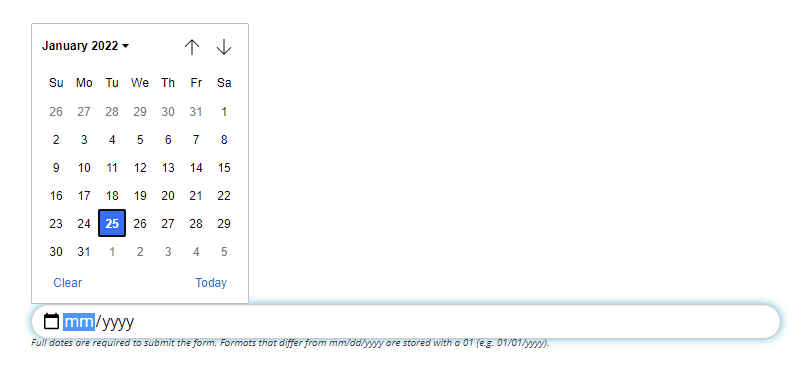
CTRL=DTYR allows selection of a year only format. The pop up looks the same as in the screen shot directly above, but only the year is captured for the answer.
CTRL=MMDD allows selection of a month/day format. This display method is sometimes used by those associations that track an Individual contact’s Birth Date, since exclusion of the year lets an Individual contact maintain privacy regarding their age. The pop up calendar is the same as in the first date related screen shot for CTRL=DATE, but the year is excluded from the answer.
CTRL=DDMM allows selection of a day/month format for answers that need to follow European time notation. The pop up calendar is the same as in the first date related screen shot for CTRL=DATE, but the year is excluded from the answer.
NOTE: as stated below the date control, the full date is required to submit the form, but only the desired date parts are stored in the database, based on the instruction. For example if using CTRL=DTMY the user will still need to enter a full date, like 12/21/2022, but since the day is not part of the instruction, 12/01/2022 would be stored in the database with 01 replacing the day.
The following GroupCode Control Instructions define display methods for answering Demographic questions via a List of Defined Responses. The next three screen shots will show how the different display methods render on the Demographics form for the same sample “Years Experience” GroupCode and the list of answers driven by its corresponding MasterCodes.
CTRL=DDL creates a drop down list from which the user can select just one of the available responses.

CTRL=RBL creates a radio button list from which the user can select just one of the available answers.

CTRL=CBL creates a check box list from which the user can select as many of the available answers as you want to allow. Additional Instructions that can set a minimum or maximum number of responses to be selected are described later in this section (MINR and MAXR).

“CTRL=CMB” CTRL=CMB is a combination of the drop down and check box list display methods described above. It creates a drop down list that allows more than one answer to be selected via check boxes, as seen in the next screen shot.
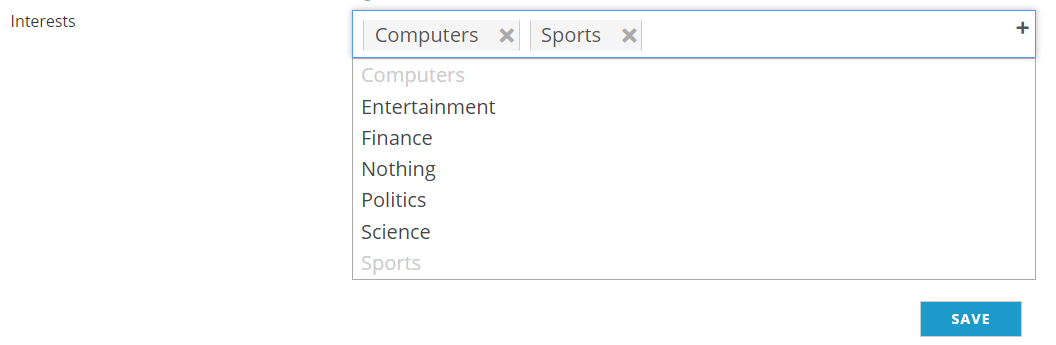
If you have Demographics questions with long lists of possible answers use of this control can save a lot of space on the form.
The following GroupCode Control Instructions define display methods for answering Demographic questions via regular or numeric Textboxes. Later in this section there are Instructions that can be combined with some of these Control Instructions for textboxes that set a minimum and/or maximum number of characters to be used for an answer (MINC and MAXC).
CTRL=TB creates a regular textbox that displays as one line for entry of an answer. Spelling errors are flagged with a red line, but will be saved if not corrected by the user.

CTRL=MTB creates a multi-line textbox where the user can type in a paragraph format. Spelling errors are flagged with a red line, but will be saved if not corrected by the user.

CTRL=NTB creates a numeric textbox where only numbers can be entered for an answer. DECI= is used with the numeric textbox control and allows the answer to include that number of decimal places. MINR and MAXR can also be used to limit what can be entered.
CTRL=EMAIL creates a textbox with a prompt in the box of Please enter an email address (someone@somewhere.domaintype)... There is no validation on this field, only the instructional text.
CTRL=PHONE creates a textbox with a prompt in the box of Please enter a phone number... There is no phone number validation on this field, only the instructional text, and it only accepts numbers from the top of the keyboard.
CTRL=LBL allows the use of HTML in the corresponding Description field which will flow to the Demographics form allowing a customized label to appear. This control can be used to create customized headers or sub-headers for visually grouping different sets of related questions together, in this case the “EDUCATIONAL INFORMATION” header in red.

The Instructions for this example are entered as a separate and distinct GroupCode created just for the header text, as seen in the next screen shot.
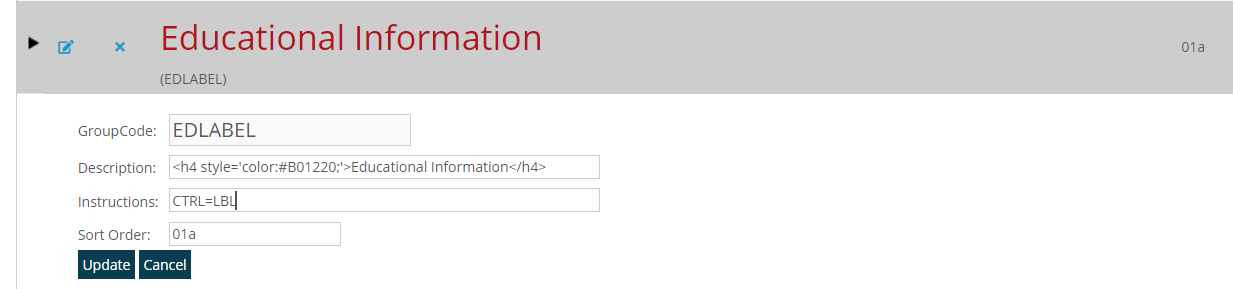
There are no MasterCodes under the label control. If more than one label is needed right after the other, another GroupCode using the label control should be created and positioned to appear next via use of the Sort Order field.
Label controls are also used to add customized instructions for the users to follow as needed when they fill out the Demographics form. The label control can also include clickable links.
There are additional Optional Instructions for Demographics GroupCodes that can be used in conjunction with certain Control Instructions listed above.
There can be more than one Instruction for Demographics questions at the GroupCode level. When more than one Instruction is in use, it is strongly recommended that the first one entered in the Instructions field be the Control Instruction since it is mandatory that one be defined in order to display the question, and this practice will also help the question render more quickly on the Demographics form. Some optional Instructions work with any control code. Those that only work in combination with specific control codes will be described as such on a case by case basis below.
REQD=TRUE makes answering a Demographics question mandatory, as seen in the next screen shot.
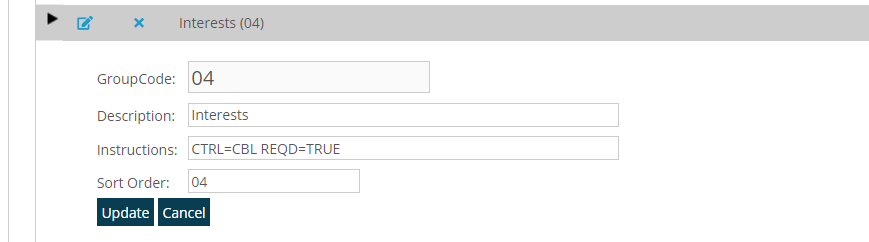
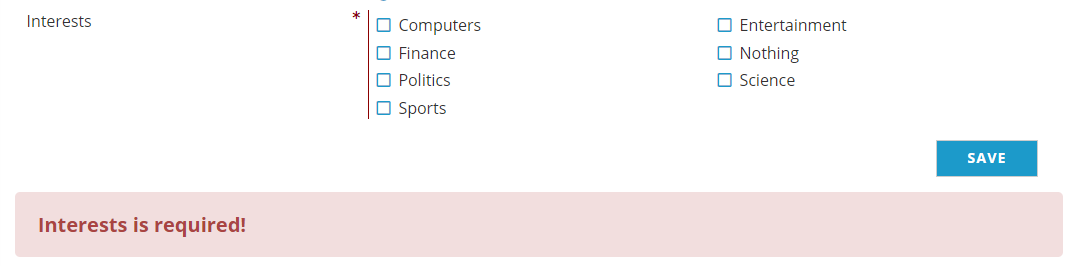
A red asterisk (*) will display to the right of the Description field for each question that is mandatory. If a user saves changes to the Demographics form without answering a mandatory question, an error message automatically appears both under the answer field that needs to be filled out as well as under the Save button, as seen in the next screen shot.
If a question isn’t mandatory, do not use REQD= in the Instruction field, as there is no such Instruction as REQD=FALSE.
ONLY=AMS makes a question visible to the staff user only in your association’s AMS.
ONLY=WEB makes a question visible to the online user only on your association’s website.
The following Instructions set Minimums and Maximums when combined with specific Control Instructions. If a user tries to save an answer that is below a defined minimum or above a defined maximum, unless otherwise noted, a red error message appears to require a corrected answer.
MINR= when followed by a number, sets a minimum number of responses allowed for a question answered via a check box list. Thus, an Instruction entered as CTRL=CBL MINR=2 would require the user to select at least two answers from a check box list.
MINR= can also be used with a numeric textbox to specify a minimum value. Thus an Instruction entered as CTRL=NTB MINR=2 would require the user to enter a value of 2 or greater as the answer to the question.
NOTE: Because MINR sets a minimum required, you should always use it with the REQD=TRUE instruction for a consistent user experience.
MAXR= followed by a number sets a maximum number of responses allowed for a question answered via check box list. Thus a GroupCode Instruction entered as CTRL=CBL MAXR=3 would allow the user to select up to three answers from a check box list.
MAXR= can also be used with a numeric textbox to specify a maximum value. Thus an Instruction entered as CTRL=NTB MAXR=10 would let the user enter a value of “10” or lower as the numeric answer to a question.
MINR= and MAXR= can be used together in combination with a check box display to set a range for the number of answers to be selected. For example, if a mandatory question has ten possible answers and the user must check off no fewer than two yet no more than eight boxes, the following Instructions would enforce that range.
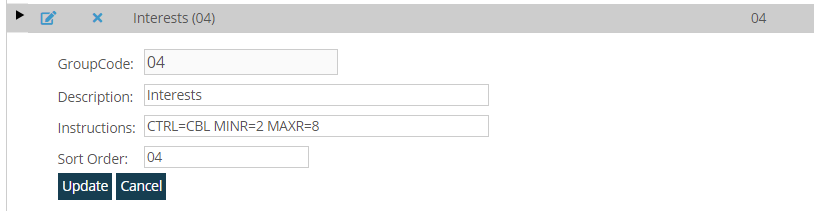
MINR= and MAXR= can also be used together in combination with a numeric textbox to define a range for a numerical answer. For example, if a question is required to be answered with a number no lower than twenty and no higher than thirty, the following Instructions would enforce that range.
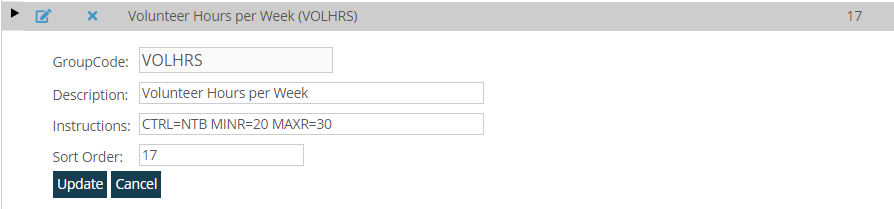
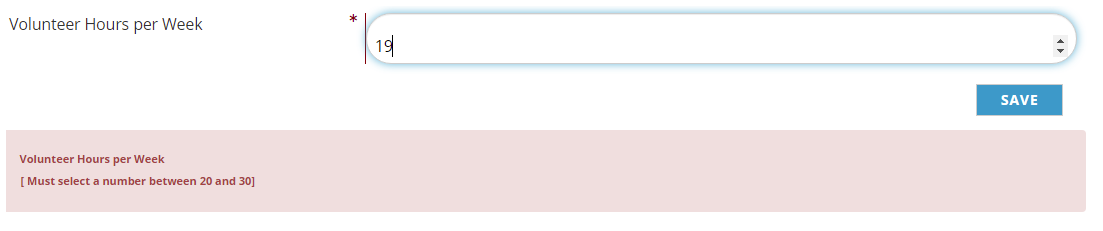
The resulting control in Demographics is in the next screen shot; including the warning message that the entered value is not in the correct range.
MINC= followed by a number specifies a minimum number of characters required to be entered for an answer, and thus is only used with text boxes and multi-line text boxes.
NOTE: Because MINC sets a minimum required, you should always use it with the REQD=TRUE instruction for a consistent user experience.
MAXC= followed by a number specifies a maximum number of characters to be entered for an answer, and thus is only used with regular and multi-line text boxes.
MINC= and MAXC= can be used together in combination with a regular or multi-line regular text box to define a range of the allowable number of characters required in an answer. This Instruction can keep written answers from being too short to give enough information, such as a biography, or too long to fit on reports or your website, such as presentation history or advocacy experience. For example, if a question needs to be answered with no fewer than five and no higher than twenty characters, the following Instructions would enforce that range.
VMSG= is used only on questions that have a validation control that automatically posts an error message if the validation fails, and allows a customized error message to appear instead of the system’s default message. The value to enter after VMSG= is the desired version of the error message, composed of alphabetical characters with no numbers and minimal punctuation, and use of an “_” underscore instead of a space between the words.
For example, if a question has REQD=TRUE and MINR=2 in its Instruction field at the GroupCode level, you could override the default error message by adding VMSG=Select_at_least_two_answers_to_proceed. to the same Instruction field. As a result, when a user tries to skip the required question, your system will display Select at least two answers to proceed. in place of the default message. The underscores are replaced by spaces for display purposes.
The following optional Instructions allow you to make questions visible only to certain Member Types and/or SubTypes.
MBRT=CUR:MEMBER limits the users who can see and answer a question to those whose contact records have a current membership.
MBRT=NON:MEMBER limits the users who can see and answer a question to those with contact records that are non-members.
MBRT= when followed by the code for a Membership Type limits the users who can see and answer the question to those whose contact records have that same member type.
MBRT= can also be used to make a question visible only by those whose contact records have a particular Membership SubType. The value that follows MBRT= must begin with the code for the top level Member Type, followed by a “:” colon, and then the code for the targeted Member SubType.
For example, if there is a question that should only be answered by contacts with a current Student Membership (STU), the Instructions highlighted in the next screen shot would need to be included, in accordance with our sample Member Dictionary codes.
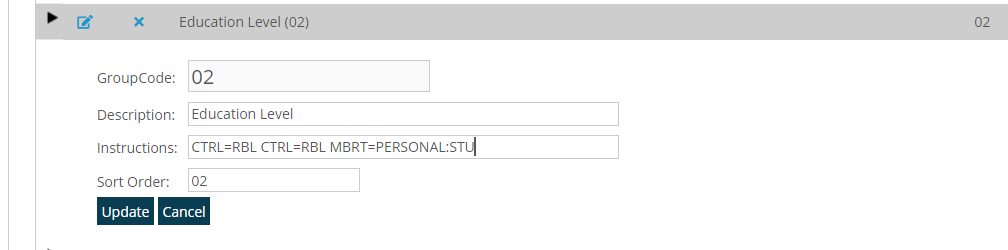
If the same question needs to be answered by more than one Member SubType, you can add as many as you need. You must list the codes as Type:SubType for each targeted SubType as seen above. Each pair must then be separated by a pipe “|” with no spaces or commas. Continuing our example, to also include the Regular Membership (REG) the instructions would be
CTRL=RBL MBRT=PERSONAL:STU|PERSONAL:REG
HSGC= is used in the Instruction field of a question that is only to be made visible once another question has been answered (Hide/Show Group Code). The follow up question can be triggered to be visible once one or more other questions have been answered. The HSGC= instruction must be entered in the Instruction field belonging to the MasterCode that opens the follow up question. The value that follows the HSGC= is the GroupCode that corresponds to the follow up question.
NOTE: currently the follow up question must use the CTRL=CMB control.
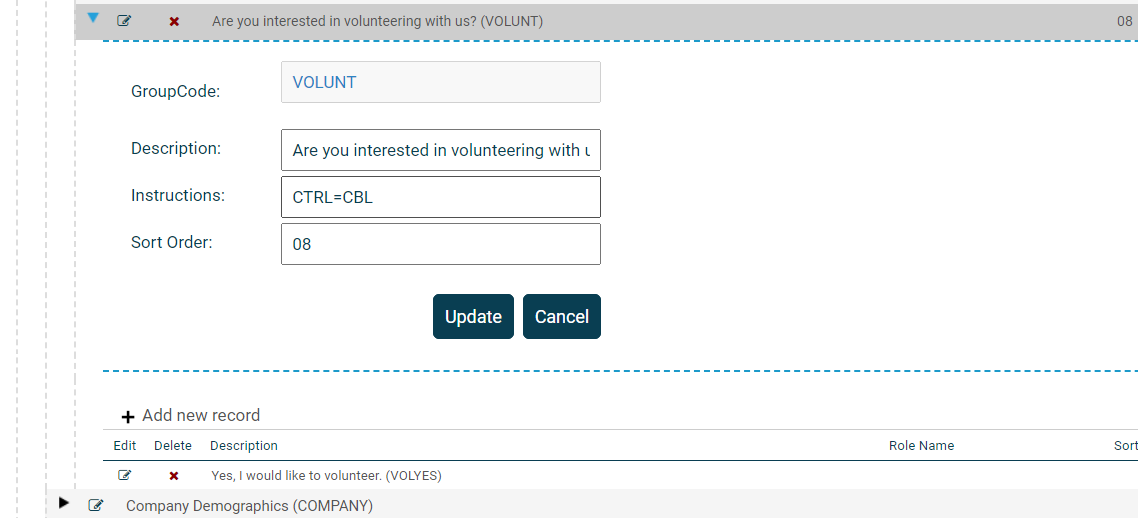
For example, there could be a question that asks the contact to check a box to declare interest in volunteering with your association, as seen in the next screen shot.

For this example, the GroupCode and it’s only MasterCode were created in the dictionary as seen in the next screen shot.
A question could appear only for those contacts who check the box that lets them choose areas of interest for volunteering, as seen in the next screen shot.

For this example, the follow up question uses the HSGC instruction on the VOLYES check box to then show the related GroupCode, VOLCHOICE.
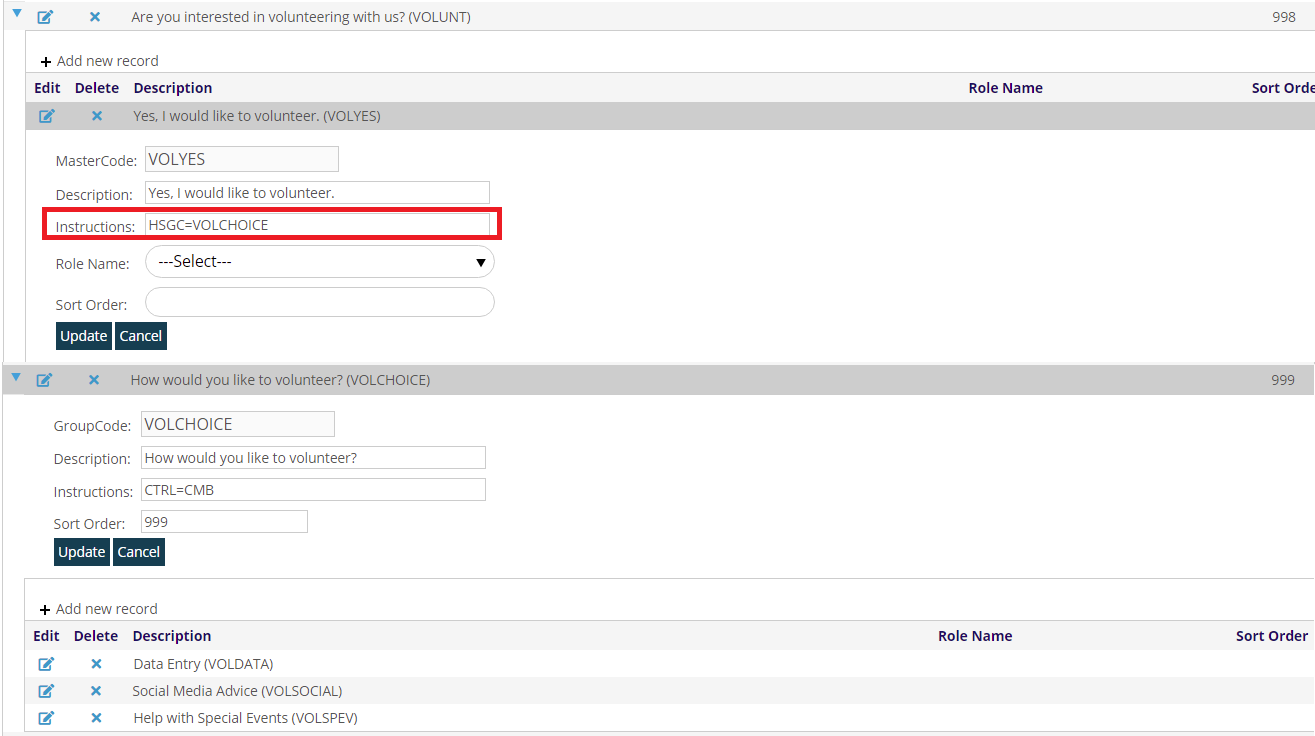
Once this VOLCHOICE GroupCode and its three MasterCodes are created as seen above, the corresponding question and answers from the first screen shot on this page will only appear to a contact who has answered the VOLYES question under the VOLUNT GroupCode.
More than one GroupCode can be entered after HSGC= to trigger the appearance of a separate question, so long as in the Instruction field the GroupCodes are separated by a "|" pipe with no spaces or other characters between them.
To make any question mandatory using HSGC you may also include the REQD=TRUE instruction.
There are some other Instructions for Demographics MasterCodes as well.
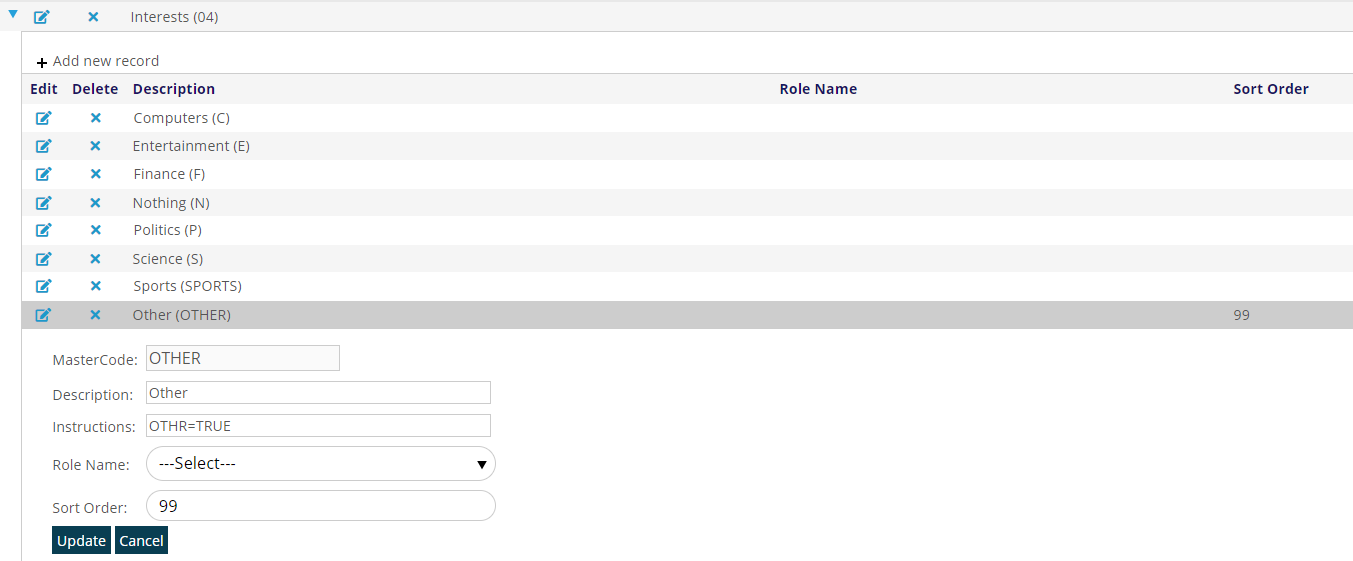
OTHR=TRUE allows the user to select Other as an answer to a question that has a list control at the GroupCode level, and allows the user to type an answer in a textbox, as seen in the next screen shot.

In this example, the Other MasterCode and Instructions are created under the corresponding Interests GroupCode per the next screen shot.
RETD=TRUE allows the corresponding question to be retired and hidden from view without deleting it from your system. If it has been used, deleting it would corrupt the data collected, which could be needed in the future.
More information on Demographics is in the Profile section.