
This is where you can view, edit and add Program Codes, also known as HotKeys, that are associated with the Exhibit Event you created earlier. The program codes associated with this event are primarily booths, but can also include other products, like booth personnel registrations or booth add-ons and accessories. Each program code represents a variation of each product. There should be a coinciding booth product for each show floor status that represents a “sellable” booth.
When you access the Edit the HotKeys control page you will see 4 distinct areas below the name of the show.
- Program code tree: This runs down the left side of the page and is the same tree that appears under Money>Dictionary>Program Codes or the Program Codes tab of any event with program codes. The tree is a structure you control using the Program, Category and Type fields in each program code. The purpose of the tree is to organize your program codes for your convenience. With this tree it is easier to find program codes when adding to the AMS shopping cart to create a manual invoice.
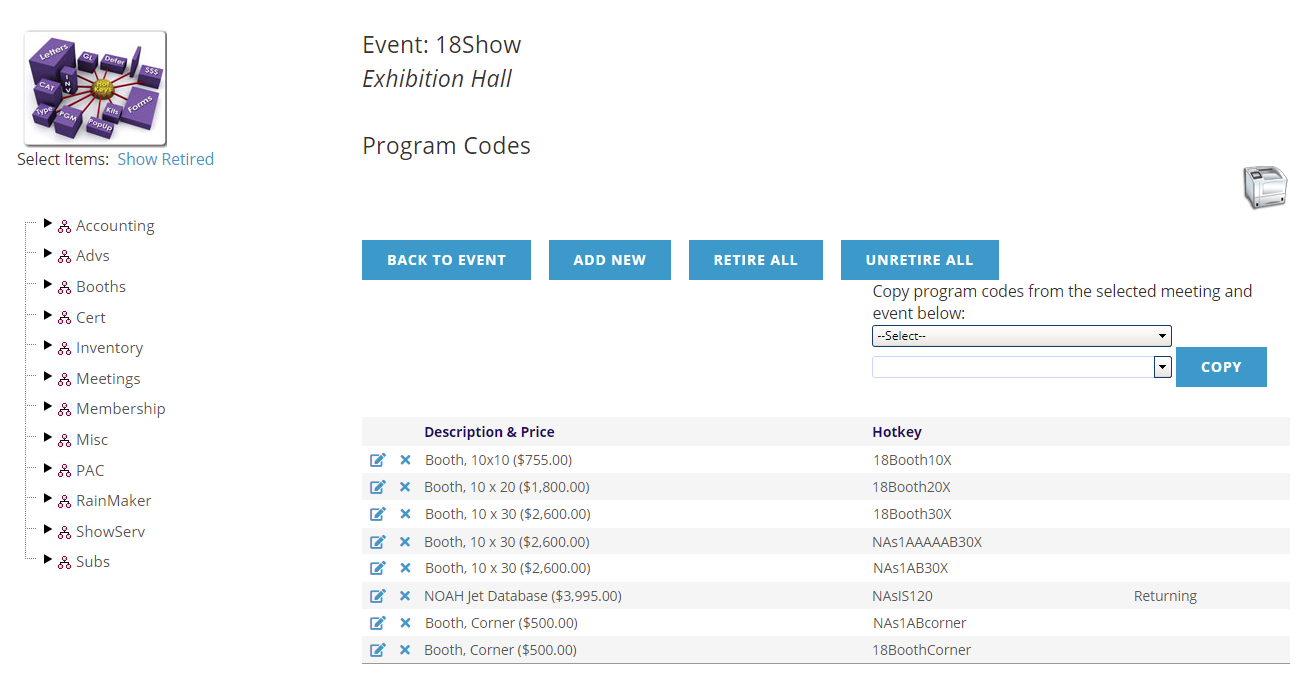
- Four blue buttons:
In this case, the blue Back to Event button will return you to the Show Control page. Click the Add New button to add a new program code. Please refer to the Meetings chapter of the NOAH User Guide for assistance. The Retire All and UnRetire All buttons are unique to the event view into program codes. It is advisable to retire all of the program codes for a meeting or event once it has taken place so that staff do not accidentally use those program codes for a different meeting. Each program code can be retired individually within the program code settings, however these buttons allow you to quickly retire them all, or un-retire them all. - Copy Button:
This allows you to select program codes from a different “expo” event and copy them into this event. In the first drop down, select the meeting you want to copy from, then the second drop down will populate with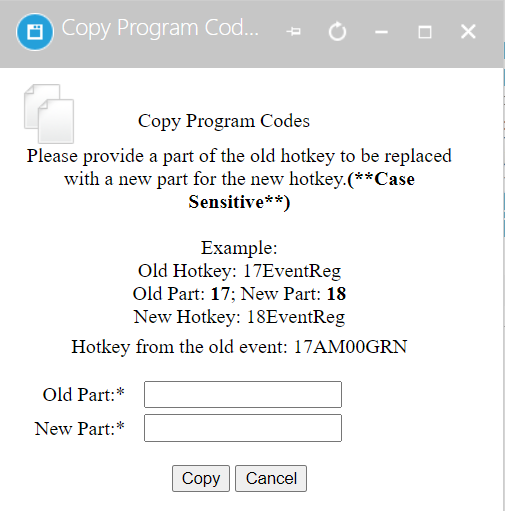 events from that meeting. Select the expo event. When you click on the Copy button, the COPY PROGRAM CODES popup appears. Here you can modify the HotKeys of the program codes as they are being copied. Copying will copy “all” the program codes from the selected event. If the program codes are identified by year, which is recommended, you can indicate that you want the “17” in the selected HotKeys should be changed to “18” when copied. Be careful not choose more characters for the “New Part” than you selected for the “Old Part” because if the resulting HotKey is more than 13 characters, it will not be created.
Above the Copy area is a printer icon. Click on the printer icon to access the standard Program Code Reports. For example, the “Program Codes by Program, Category & Type” export will allow you to compare the settings of all or some of your program codes in a spreadsheet.
- Program code Grid:
This area displays all of the products (program codes) associated with the expo event. Use the edit icon to edit the program codes as needed.
More information on Program Codes can be found in the Money section of this knowledge base.