
There are seven different Output Products in the Reporter that you can choose from once you have run the job for the Library Card you are using. The output product you select will depend on what you need to accomplish with the contact data, but the two most commonly used are blast Emails and Exports. Each of the output products are described in this section, but first we will explore the output landing page.
When you are ready to pull data, click on the Outputs button from the Library Card View page, the Go to Outputs button from any criteria page, or the Save button from the And/Or’s page. Note that if you add or change any card’s criteria, you must go to the And/Or’s page first to make any edits needed there and then run the job before using or creating output. The Output Product landing page is the same for each of three paths and is in the next screen shot. 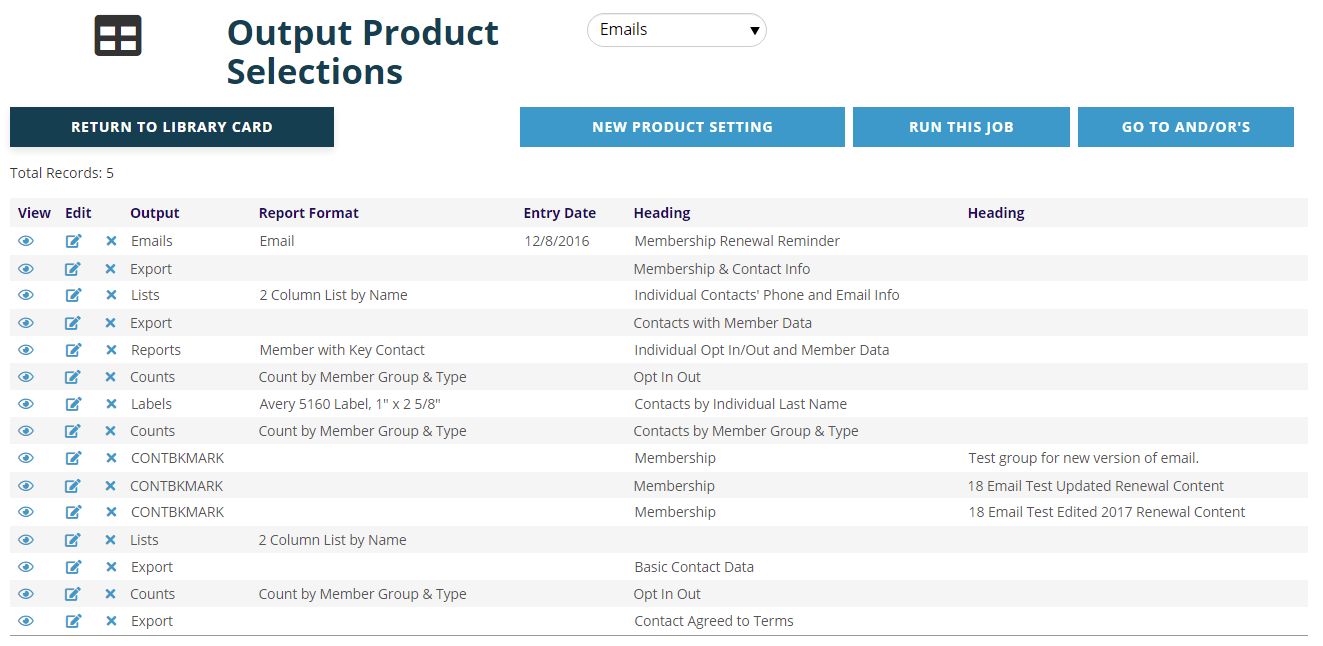
This page contains a grid which lists all output products previously created with the selected Library Card. Note that these are not the resulting data, but rather the output products created to produce data within certain parameters. You can create as many different output products as you need for a Library Card, as well as multiple versions of the same kind of output product. In the sample grid above, seven different output products have been created for the same sample library card.
The Output page has a drop down menu at the top left for Output Product Selections where you select which kind of output product to create. The options are Emails, Counts, Labels, Lists, Reports, Export and Contact Bookmark.
Across the top are four buttons:
Click on the white button to Return to Library Card to view or edit the Library Card. This action is necessary if you discover that you need to add to or edit the card’s criteria, or to edit the card itself.
The New Product Setting button is used in combination with the Output Product Selection drop down menu and will be discussed in each of the next seven sections that cover each of these output products.
The Run this Job button is discussed in the previous section of this chapter, but it bears repeating here that it should be clicked if you have made changes to any criteria, made changes to the And/Or/Not operators, and if you want to refresh the data returned by the query to reflect these changes. If you want to freeze your group and not update based on current data, then do not run the job again. If the number you get seems wrong, you need to revisit the card criteria and And/Or/Not operators and run the job again before creating any output products.
Click on the Go to And/Or’s button at the bottom right if you need to modify the “And”, “Or” or “Not” operators for your card criteria.
To View any output product listed in the grid, click the  view icon that is to the far left of the row of the output you want to examine. The resulting page will differ depending on the kind of output produced, and the fields seen in view mode are described on a case by case basis in the next sections of this chapter on each kind of output.
To Edit an output product in the grid, click on the  edit icon in that product’s row, found in the second column from the left. The resulting pages and their corresponding fields are described in the following sections for each kind of output product. Note that this edit button does NOT allow editing of the Library Card, its criteria or the And/Or settings.
To Delete an output product from the grid, click on the  delete icon in that product’s row, found in the third column from the left. A pop-up box will appear to ask if you “Are sure you want to Delete?” the product from the grid. Click on the box’s “OK” button to delete the product or click on the “Cancel” button to close the pop-up box without deleting the product.
There are five more columns for Output, Report Format, Entry Date and two Headings. Each of these headers are action links that cause a change in the grid list when clicked. If you click on a column name once, the list will be sorted in ascending order by the values in that column. Click again and the list will be sorted in descending order.
The Output column lists the kind of output product created.
The Report Format column lists the report format used, but only for those output products that use that field.
The Entry Date is the date the output product was created, but only for email output products.
The two Heading columns are for a 1st and 2nd heading, when that field is populated. These headers do not appear on your output products, they only appear here in the output product grid for the Library Card you are using. Since the products you create can be used more than once, you should create at least one header for each that describes the purpose of the output, thus making it easier to find it in the grid in the future.
Note that all output shown is only for the currently logged in user. You may see other user’s Library Cards, but any results you retrieve are for you alone, and you can’t see others results. This way you can continue to use these results without concern that others will modify or overwrite them.
The following sections discuss each kind of output product.