
Emails are sent for all purchased in the AMS, as a receipt or invoice for the contact's records. You may also want to sent a more personal or specific message when select items are purchased, like a donation, membership, or registration. You may add a custom email message to each Program Code that will automatically be sent. You may also limit this to Only send email when paid in full using the check box under the email selected.
On a Program Code, there is an area to select Email To Send from your library, or you can click the button to Add/Edit Email.

You may use the drop down to choose an existing email, or click the Add/Edit Email button to edit that choice or create a new email from scratch or from and existing email. Clicking the Add/Edit Email button will open a pop-up where you can do this.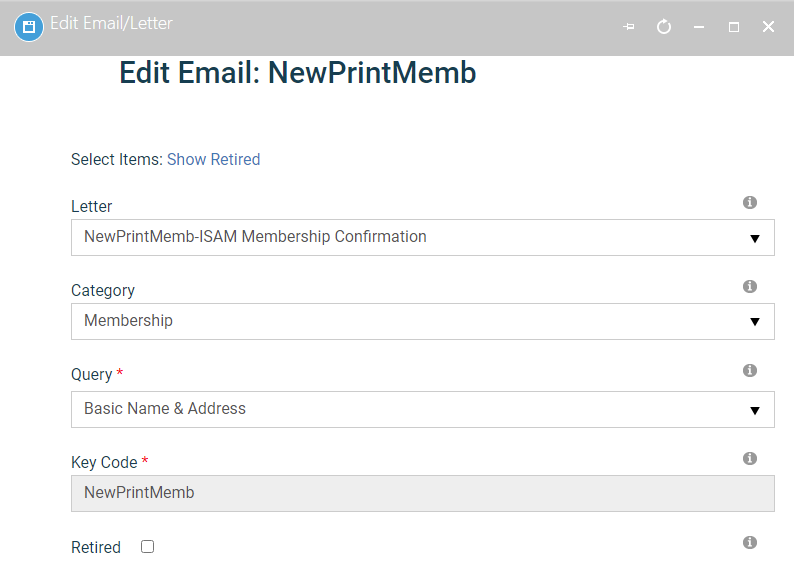
This will load the email selected on the Program Code page; if one was not selected, you will be adding a new one. NOTE: If you change can existing letter, it will change everywhere that it is used.
The Letter drop down will have the existing letter selected, but you can choose a different letter, or choose the option to Add New.
If you choose to Add New, a new drop down will appear for Copy content from the selected letter: where you can choose a letter to copy from. Clicking on the Import button will pull in the settings from that email.
Category has two main purposes. First it is used to categorize this message when looking at all your email messages. Second, and more important, it will determine which Custom Tokens are available to be merged into your email message. Choices are
- Events- for messages related to meetings
- Jobs- for messages related to your Job Board or Career Center
- Membership- for message related to memberships and other purchases
When In doubt, or choose Membership as it will have the basic Custom Tokens needed for most needs.
Next is Query which is an option related to the Category above and will determine the set of Custom Tokens in the message.
Key Code is a 10 character code that must be unique and is used to identify this message. Your organization will want to come up with a scheme for creating Key Codes so the messages are easily identifiable.
The Retired check box means this message is no longer in use. You might have several Retired messages that you can use as templates to copy from, but never use. In this case you would use the Show Retired link at the top to include retired messages in the Letter drop down.
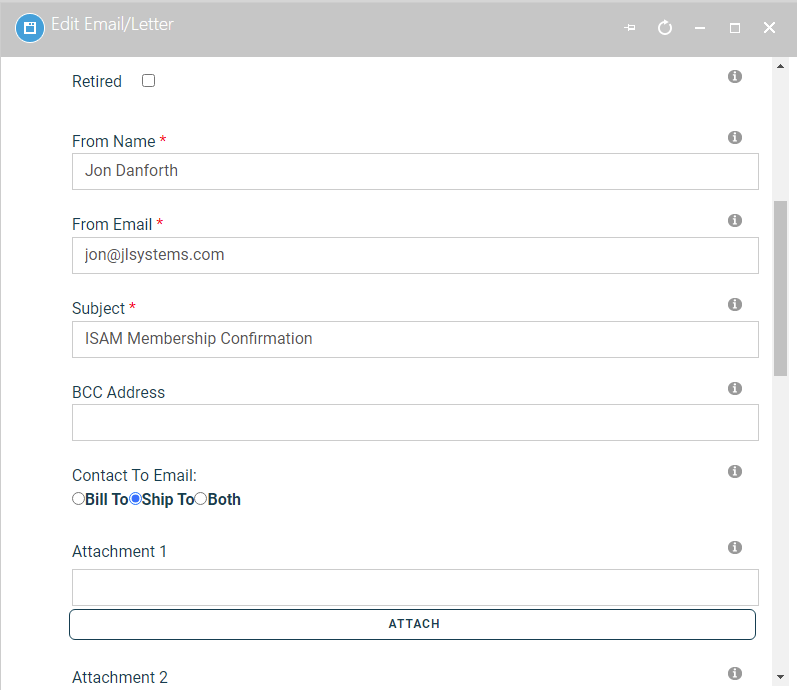
Scrolling down, you will see fields for the message header: From Name, From Email, Subject, BCC Address (emails separated by a semi-colon; and these will be copied on every sent message) . The red asterisks (*) indicate required fields.
The Contact To Email determines who this message is sent to, the Bill To contact, the Ship To contact, or Both the Bill To & Ship To contacts. If you have instances where the Ship To does not have an email address but you still want someone to be notified of a purchase, you should select Both. This is a common scenario with meeting registrations where one person is registering others, who may not have email addresses in the AMS.
NOTE: all email intended for the Bill To goes to the email on the payment screen, which defaults to the Bill To contact's email, but can be changed when entering payments. If the Bill To email on the payment screen is missing (either the contact doesn't have one, or a staff person removes it on the payment screen) no Bill To or Ship To emails will be sent; this is to allow no emails to be sent if invoices are being created after the fact and you don't want these messages to be sent. If the Bill To does not have an email, but you still want the Ship To then you must enter an email (it could even be yours) on the payment screen.
Next there are fields to add up to four Attachments to this message. This could be a meeting agenda, or a PDF copy of a document purchased. You will want to keep these small as they can affect the deliverability of a message.
Scrolling farther, you can edit the Body of the message.
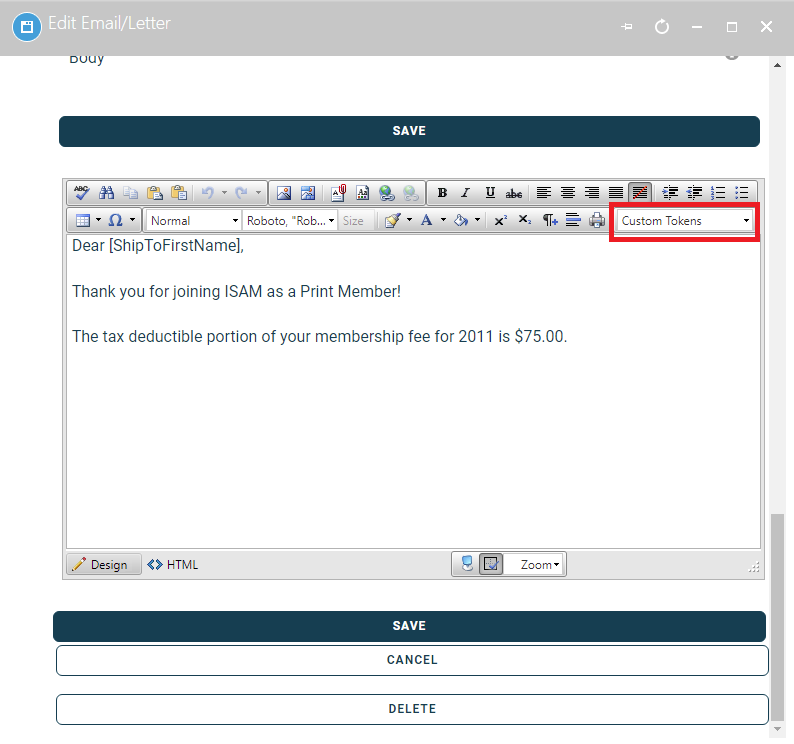
Buttons at the top of the editor can be used to design your message. The Custom Tokens drop down at the top right can be used to merge database fields into your message. If a desired Custom Tokens is not visible, make sure you have selected a Query above, which is what populates this drop down.
NOTE: When working with Custom Tokens make sure the ones you are using appear in the drop down. The available ones can vary based on the Query. Also avoid using brackets ([ & ]) in your message as these are reserved for Custom Tokens and will be interpreted as such; these can come from content pasted from Word and other programs.
You can also use the Design and HTML buttons at the bottom left to see the HTML code or a design view of your message.
Click to Save, Cancel or Delete when you are finished with your message. This will bring you back to the Program Code page with your message populated into the Email To Send.