
Once you have finished creating a submission document in the AMS you need to create a page in your association’s website that includes the Repository module in order to begin accepting submissions. It is recommended that you leave the page out of the website menu and restricted to either administrators or staff so that only you can execute it while you are testing your submission form.
Once you have added the Repository module to a page in the website, go into “EDIT” mode and select to change the settings in the Repository module. You will find a breakdown of all the settings that are available in the module in the Appendix of this document. Certain fields in the module settings are required and they are marked with a red asterisk (*). There are many available settings due to the wide range of possibilities in how the Repository module can be used. Don’t worry if you end up using only a few of them as that is common in each instance for a specific submission document. This first section of settings are the most critical to getting the page to begin executing the submission process.
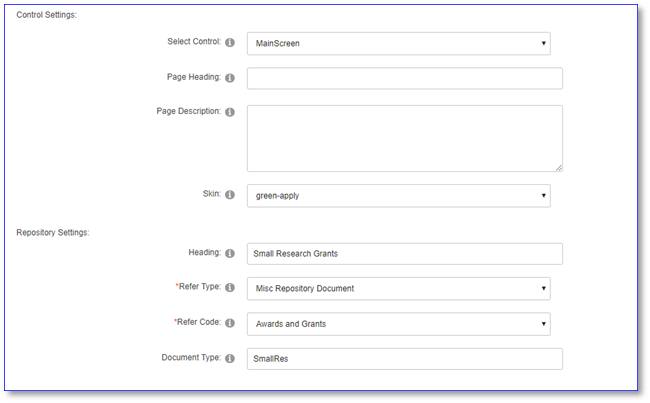
Within the Select Control drop down menu you will find a simple setup for the type of module you are initiating. For most screens with which users will be interacting for submissions, the MainScreen setting is the best. Note that for screens to be used by reviewers you should choose a reviewer screen.
Page Heading and Page Description are optional fields for placing heading labels at the top of the module display.
The Skin drop down menu will allow you to try different pre-set options for color and features based on what is available in your association’s website. The skin choice can also change the layout and labels of the command buttons, and in some cases lets you override the button labels.
Heading is recommended to be used to give the submission template a heading that reflects the type of document they are submitting.
The Refer Type and Code fields are mandatory, and must match the GroupType and GroupCode settings that you used in the Submission Document Categories configuration for the document type you specify next.
The Document Type is the code of the submission document that you wish to use for this submission activity. It needs to exactly match the Document Type created in the AMS that is to be activated on the corresponding web page if you wish for the module to be used for a single submission document. If you leave this blank you can use fields lower in the list to allow for a drop down list to appear for the online user to choose the type of document they wish to submit. If your document is an award, grant or scholarship application or similar, it may be easier for the online user if there are separate pages for each, with the module repeated on each page and set to the exact document type for that page. If your intention is to allow for contributions to a library, such as research documents, technical documents, minutes or agendas, then you may wish to not restrict the module to a single document type but let them choose from multiple types on the same page.
Many of the remaining controls are not critical but allow you to configure the behavior of the submission process exactly as you wish. They are relatively self-explanatory, and a description of each one is found in the Appendix of this chapter.
There are a couple of important check boxes under the Search and Menu settings Controls, seen in the next screen shot.
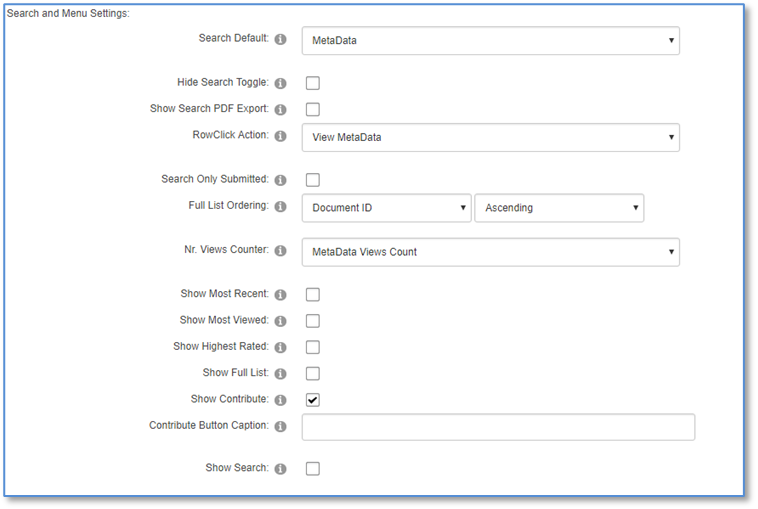
If the module has been set up as a viewer for multiple documents, checking the Show Full List check box will allow the user to see all of the documents that have been set up for this particular document type.
You must check the Show Contribute check box to allow the user to contribute answers into the web version of a submission document.