
Start by expanding the Presenter Center Statuses (PCSTATUS) sub-section of the Presenter Center in the Meetings Dictionary.
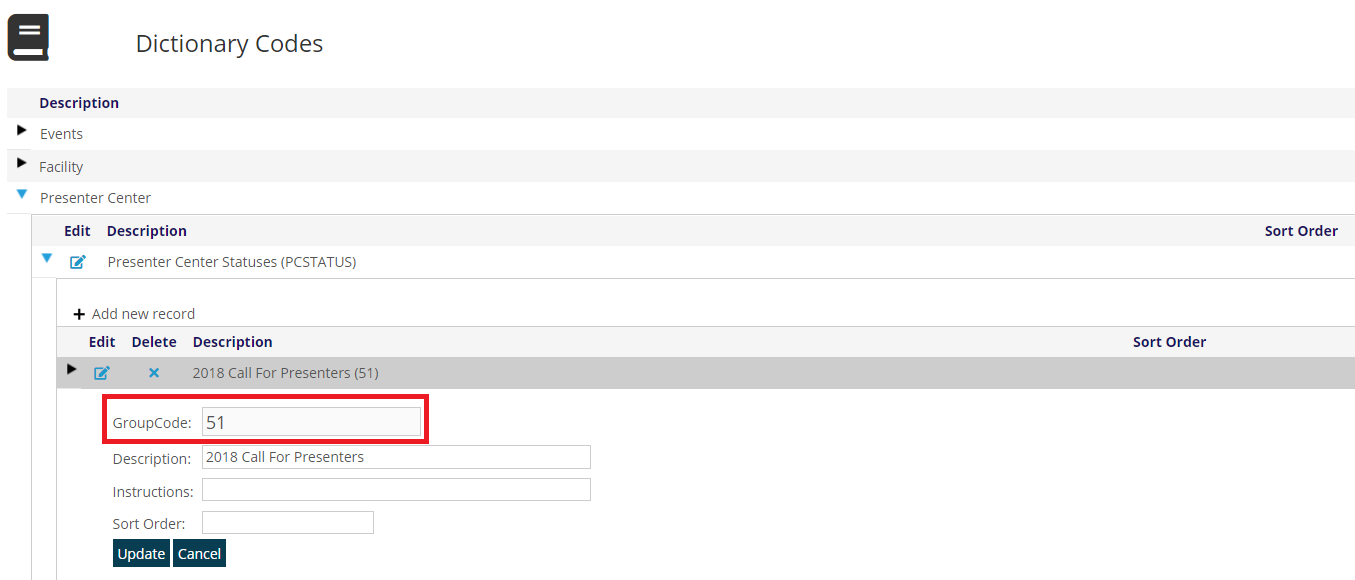
Click on + Add New record. For the GroupCode, enter the Event ID of Presenter Center event for this meeting. (51)
The Description should be a brief description of the Presenter Center event. (2018 Call For Presenters). There are no instructions at this level and the sort order is optional. Save.
Now we can start adding statuses. At the very minimum, a CREATE, APPROVE and DECLINE status are required. A REVIEW status is very common so we will include it as well as the FINALREV status.
CREATE Status
Expand the event you just created. You should see the option to Add a new record. Click on + Add New record.
For the MasterCode, enter CREATE, and it must be in ALL CAPS.
The Description should describe the current state which is created but unsubmitted. (Example: New Proposal).
Instructions are one or more 4 letter codes followed by an “=” and an appropriate value. They can never contain any spaces.
CREATE instructions include:
NEXT=XXXXX where XXXXX is the MasterCode of the next step after submitting (CREATE), and specifies the status the presenter folder should move to next (Example: NEXT=REVIEW). In this case after submitting online it will move to the REVIEW status automatically. You may wish to review submissions prior to assigning them to reviewers, in which case we recommend adding a status for SUBMIT, and set that as the next status after CREATE when a person submits their proposal online.
DARL=XXXX where XXXX is the default presenter role to assign to the submitter/Author.
DATE=99/99/9999 is the last date to submit a proposal, in MM/DD/YYYY format. (Example: DATE=04/30/2018). Submissions will be accepted until 11:59:59 PM that day.
MDOC=XXXXX where XXXXX is the Repository Document Type used to collect the submissions. (Example: MDOC=2018CFP, where 2018CFP is the submission document created in the Repository. This is explained later in this chapter).
Additional CREATE instructions:
COMX=999 - Where 999 is the maximum number of co-authors allowed per presentation. (Example: COMX=2).
COAR=OFF -This will disable the Co-Authors tab. (Example: COAR=OFF).
COCH=ON - This will allow the Author to modify or change Co-Authors after the presentation has been submitted. (Example: COCH=ON).
CEDT=ON – This allows Co-Authors full edit permission of the presentation. This includes deleting if the presentation is not submitted. In order to allow editing on statuses other than CREATE, the EDIT=ON instruction has to be included. (Example: CEDT=ON).
FRMS=OFF - This will disallow the uploading of forms in the Download Forms area. (Example: FRMS=OFF). HIDE – Turns off the entire tab. When not OFF or HIDE, the PCFORMS repository document is used to manage these documents.
REQD=XXXXXXXX Where XXXXXXXX represents a feature that can be made required. (Example: REQD=CV). Multiple requirements can be piped, using the | character. (Example: REQD=CV|DOC|COCOI).
Options:
- COI – Conflict of Interest for the Author
- DOC – Main document uploaded
- COCOI – Conflict of Interest for all Co-Authors
- DISCLS – Disclosure Document (if not using COI) for the main submitter/Author
- CODISCLS – Disclosure Document for all Co-Authors
- CV – CV Document
- FRM# - Minimum number of supporting files to upload
- BIO – Bio Statement for author
- COBIO – Bio Statement for all co-authors
MAXC=999 – Where 999 is the maximum characters allowed in the submission title. This is used in the CREATE status only. (Example: MAXC=20).
QEDT=HIDE – Hides the presentation status from the Quick Edit screen. By default status is included on the Quick Edit form. Only on CREATE status. (Example: QEDT=HIDE).
APPROVE Status
Add a new record. Click on + Add New record.
For the MasterCode, enter APPROVE, which will be used for proposals that have been approved for inclusion in the meeting and are to be made available to the meeting planner module.
The Description should describe the status which is submitted and approved. (Example: Approved).
There are no specific instructions for this status. However, use can use EDIT=ON to allow the presenter to edit their submission after it has been submitted.
DECLINE Status
Add a new record. Click on + Add New record.
For the MasterCode, enter DECLINE, which will be used for submissions that are not approved for inclusion in the meeting. You can later delete submissions in this status if you wish via the admin module.
The Description should describe the current state which is submitted and declined. (Example: Declined).
There are no specific instructions for this status.
REVIEW Status
Add a new record. Click on + Add New record.
For the MasterCode, enter REVIEW, which is the status necessary to be able to assign a submission to a reviewer.
The Description should describe the current state which is submitted and ready for review. (Example: In Review)
REVIEW Instructions include:
NEXT=XXXXX where XXXXX is the MasterCode of the next step after the reviewer submits their review. (Example: NEXT=FINALREV). This is only used if you want an additional step after the reviewers have submitted their reviews, such as for a final review by a staff person or committee in addition to the reviewers. Otherwise, you can update the status of a submission to Approve or Decline directly in the admin module.
DATE=99/99/9999 where 99/99/9999 is the last date to submit a review. (Example: DATE=04/30/2018).
HIDE=XXXXXXXX where XXXXXXXX is the section which should be hidden during review. (Example: HIDE=UFORMS to hide the upload forms section). Multiple requirements can be piped, using the | character. (Example: HIDE=UFORMS|AUTHORS|COI).
Options:
- UFORMS – Upload Forms Section
- AUTHORS – Author/Co-Authors Section
- COI – Conflicts Section
VREV=TRUE - Specifies if reviewer can view all other reviewer’s responses. By default a reviewer cannot view other reviewer’s responses. (Example: VREV=TRUE).
HREV=TRUE - Hides reviewer names if able to view all other reviewer’s responses (VREV above must be included in instructions also). (Example: HREV=TRUE).
FINAL REVIEW Status
Add a new record. Click on + Add New record.
For the MasterCode, enter FINALREV.
The Description should describe the current state which is ready for final review. (Example: Final Review).
Instructions are one or more 4 letter codes followed by an “=” and an appropriate value. They can never contain any spaces.
FINALREV Instructions include:
FDOC=XXXXXXXX where XXXXXXXX is the Repository Document Type used to upload the presenter’s final presentation document. (Example: FDOC=18FINDOC).
DATE=99/99/9999 where 99/99/9999 is the last date to submit a final document. (Example: DATE=04/30/2018).
HIDE=XXXXXXXX where XXXXXXXX is the section which should be hidden during review. (Example: HIDE=UFORMS). Multiple requirements can be piped, using the | character. (Example: HIDE=UFORMS|AUTHORS|COI).
Options:
- UFORMS – Upload Forms Section
- AUTHORS – Author/Co-Authors Section
- COI – Conflicts Section
- FSNR – Final Review Summary: Number of Reviewers
- FSTR – Final Review Summary: Number of Total Reviews
- FSSR – Final Review Summary: Number of Submitted Reviews
- FSUSR – Final Review Summary: Number of Un-Submitted Reviews
- FSAVG – Final Review Summary: Presentation Average Score
- FSSUM – Final Review Summary: Presentation Score Total
FSTS=TRUE can be added to any status that needs to display among the Final Review statuses.