The Additional Questions tab, also known as event questions, is where to create specific questions that need to be asked of all attendees at the time they register for a meeting, or questions that only apply for a particular event. When you create each question you also set the control as to how the registrant is to answer, whether by a textbox, a drop down menu, radio buttons, selecting a date or any other method available. The presentation of questions on the website is the same in both the Conference Module and Simple Events modules and responses are saved on a contact's record as a List Code.
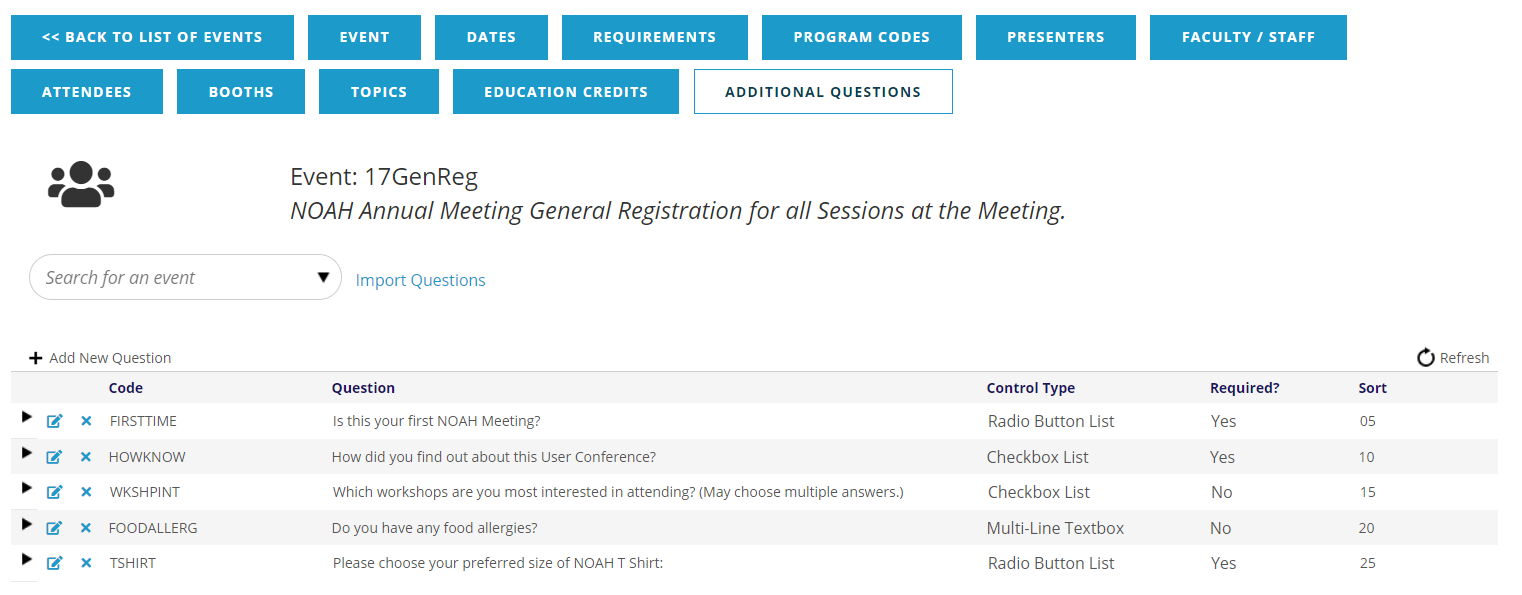
In this view, for each question the grid displays Edit and Delete icons, but note that you cannot delete questions and responses if attendees have already selected them.
Other columns in this grid display the data for the Question Code, the Question itself and the Control Type; whether or not the question is Required? for every registrant and its Sort order among all questions. If the Sort field is not used, the grid displays data in alphabetical order by the Question text field. You can click on the “Code” and “Question” column headings to sort the grid alphabetically by the Code or Question data. Clicking on the heading a second time switches the sort order to reverse alphabetical. And a third click restores to the default sort order.
Additional Questions can be used to collect a variety of information from registrants. Logistical needs can be assessed by asking for Emergency Contact information or types of Special Needs Accommodations. Marketing questions such as being a first time attendee, number of conferences attended and desire to meet with exhibitors are common.
The Additional Questions fields appear in the same manner whether you click on +Add New Question or click the  edit icon at the far left of an existing question’s row to make changes, as seen in the next screen shot for adding a question.
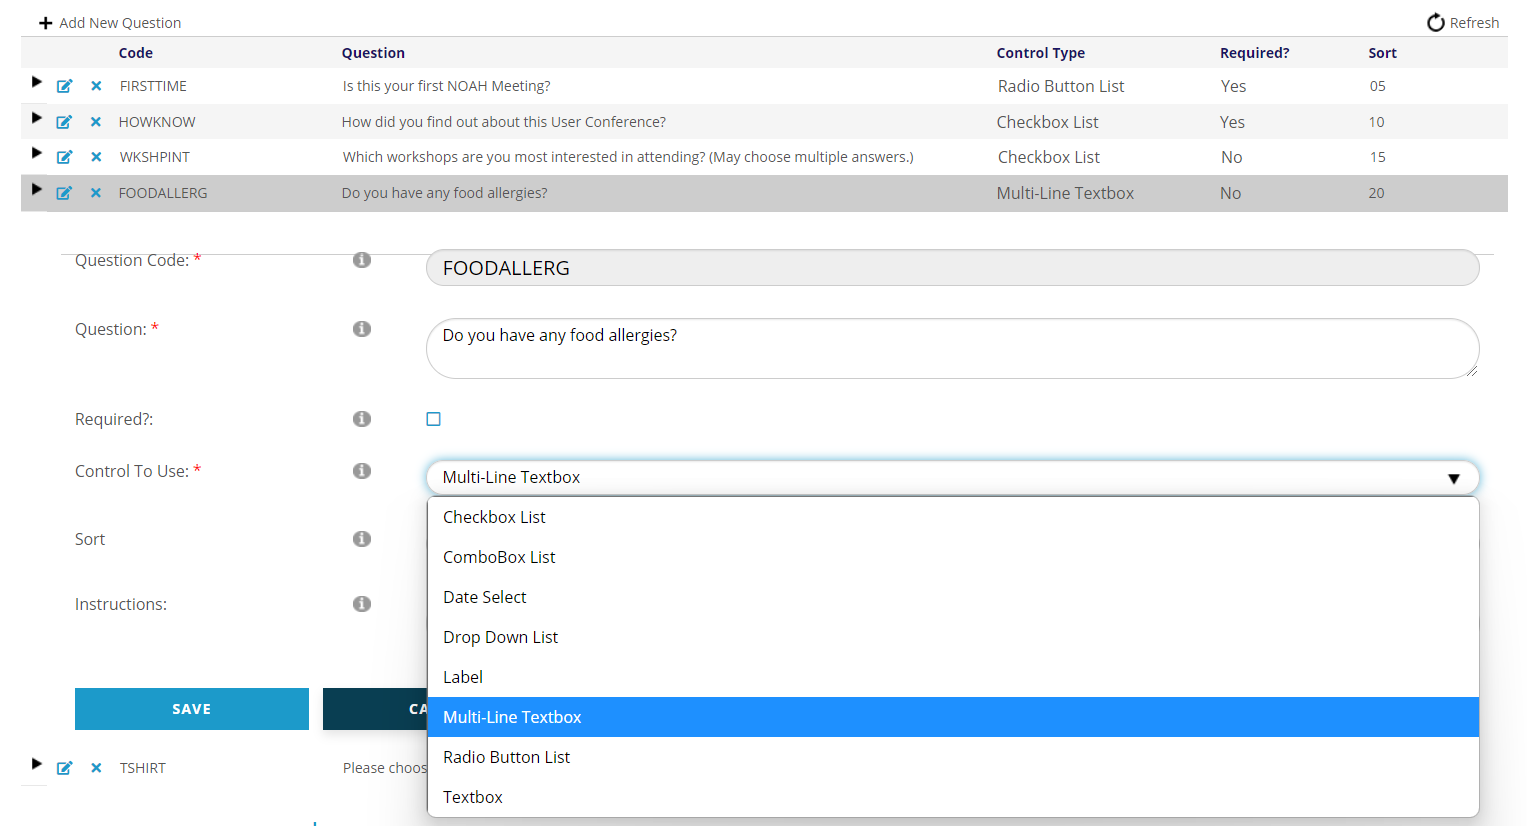
Question Code is a required field of up to 10 characters, without spaces, that you create. Once you create it you cannot change it, so it is important that staff use the same format within an event or meeting. In the example above, only text in all capital letters has been used, spelled as an abbreviation of the question in order to follow the format already in place for the three existing questions seen on the screen shot on the previous page. The Code can be all numerical, or a combination of letters and numbers. An example of the latter assigns Codes 17Q1, 17Q2, 17Q3 and so on, where the first two characters represent the year the conference is taking place, followed by Q for question and a number that changes for each question. Be sure to choose a format that works for your staff needs, and be consistent within the meeting.
Question is a required textbox field where you type out the question exactly as it should appear to the registrant. You can change this text at any time.
Required? is a check box field where you can designate whether or not this additional question must be asked of all registrants. If it is required, check the box and every registrant will have to answer it in order to complete the registration process. If this question is optional, leave the box unchecked. The registrant will still see the question but won’t have to answer it to proceed with the registration process.
Control To Use is a required field where you choose how you want the registrant to answer the question:
- Checkbox List- a selection of checkboxes where a user can select more than one option
- Radio Button List- a selection of radio buttons where a user can select only one option
- Drop Down List- a predefined drop down list a user where a user can select only one option
- ComboBox List- a predefined drop down list a user where a user can select more than one option
- Date Select- a date picker to allow a user to select a date in response to a question
- Label- a text label that can be used to separate/group questions or add a heading
- Textbox- a single line of text; this does not limit the amount of text that can be entered, but only shows one line
- Multi-Line Textbox- a larger textbox to show multiple lines
For all options except labels you also must create the possible answers here, as seen in upcoming screen shots. This is true even for single and multi-line text boxes, even though the person will be typing in the text. The answer record is needed to then store their text.
The Sort order for all questions can be manipulated in this field. For our food allergy example, placing 4 in this field will cause this question to appear fourth on the list of additional questions when the registrants see them. If you will have a large number of questions leave gaps in the sort order in case you need to insert new questions later. Use 05, 10, 15 and so on for sort order to leave space for inserting future questions.
Instructions auto-fills as needed based on your entries above. Generally, you should not need change this field directly.
Once you have filled or edited each field as needed, click on the Save button to add a new question or save changes to an existing question. Click on the Cancel button to discard the question and any changes. Saving the question from the example above send you back to the Additional Questions landing page, where the new question will now appear.
Not all questions are best answered by the registrant typing in a textbox. You will likely want some questions to be answered via selection from pre-defined answers you provide. For example, there could be a need for each registrant to select a size for a conference T Shirt. After clicking on the +Add New Question text above and to the left of the question grid, fill out the fields described above to create a question about T Shirt size, but in this case making the question required. The next screen shot shows an example of how to approach this issue.
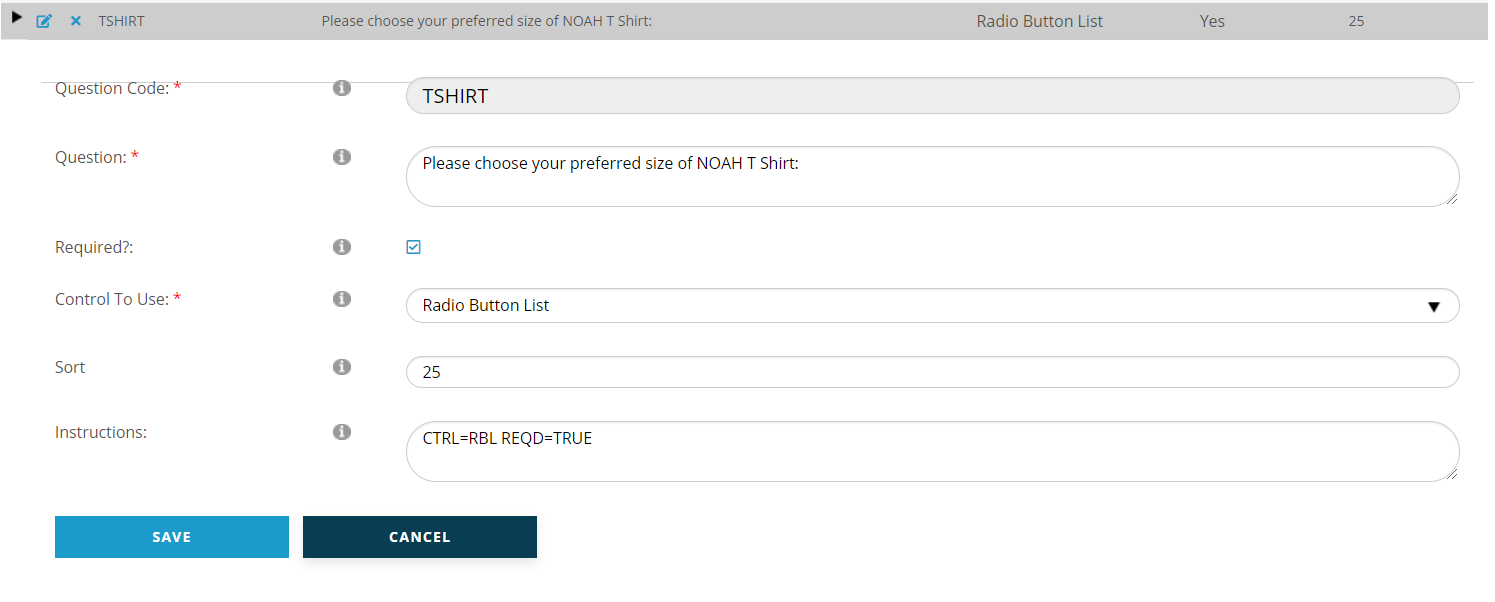
Once the new question has been saved, the answers must be created in a separate step. NOTE: all questions must have at least one response; if you do not see any of your questions in your registration process, this is a likely cause.
From the Additional Question landing page, click on the arrow to the far left, in the same row as the TSHIRT question code. This will expand the question to give access to the responses, as seen in the next screen shot.

Click on the + Add New Response text below and to the left of the selected question. You will then be able to enter a new response, as seen in the next screen shot.
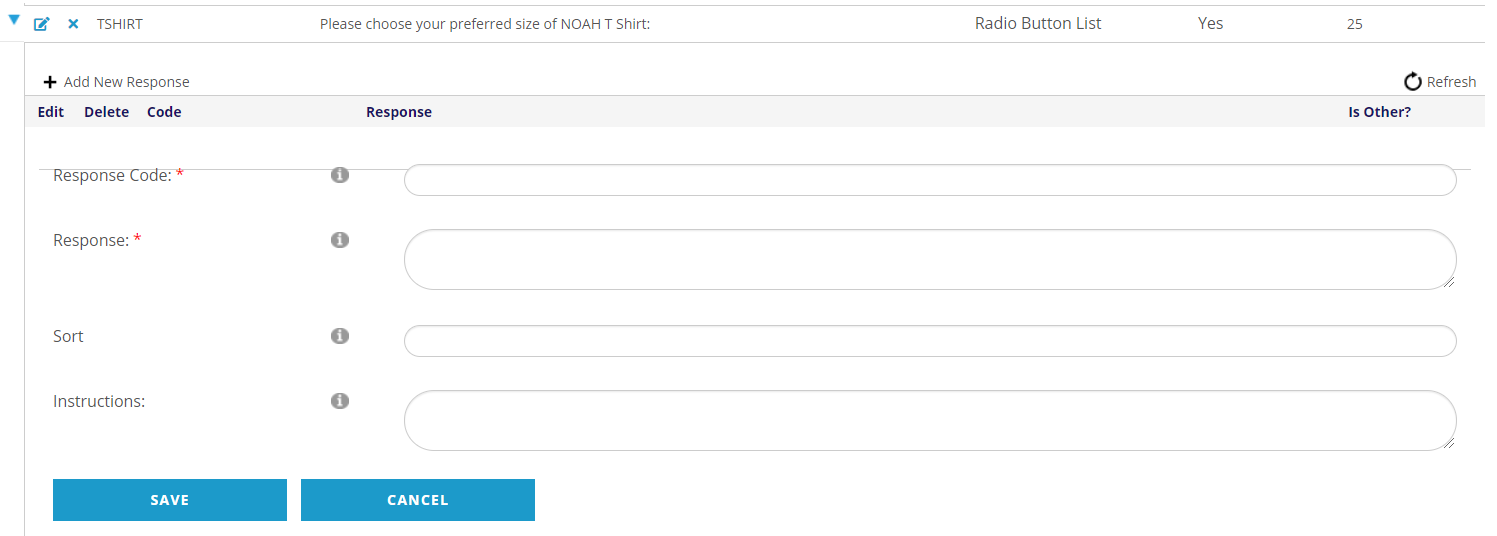
Response Code is a required field of up to 10 characters, without spaces, that you create. Once you create it you cannot change it, so it is important that staff use the same format within an event or meeting. The Code can be all letters or all numerical, or a combination of letters and numbers. Be sure to choose a format that works for your staff needs, and be consistent within all of the responses to a question.
Response is a required textbox field where you type out the response exactly as it should appear to the registrant. You can change this text at any time.
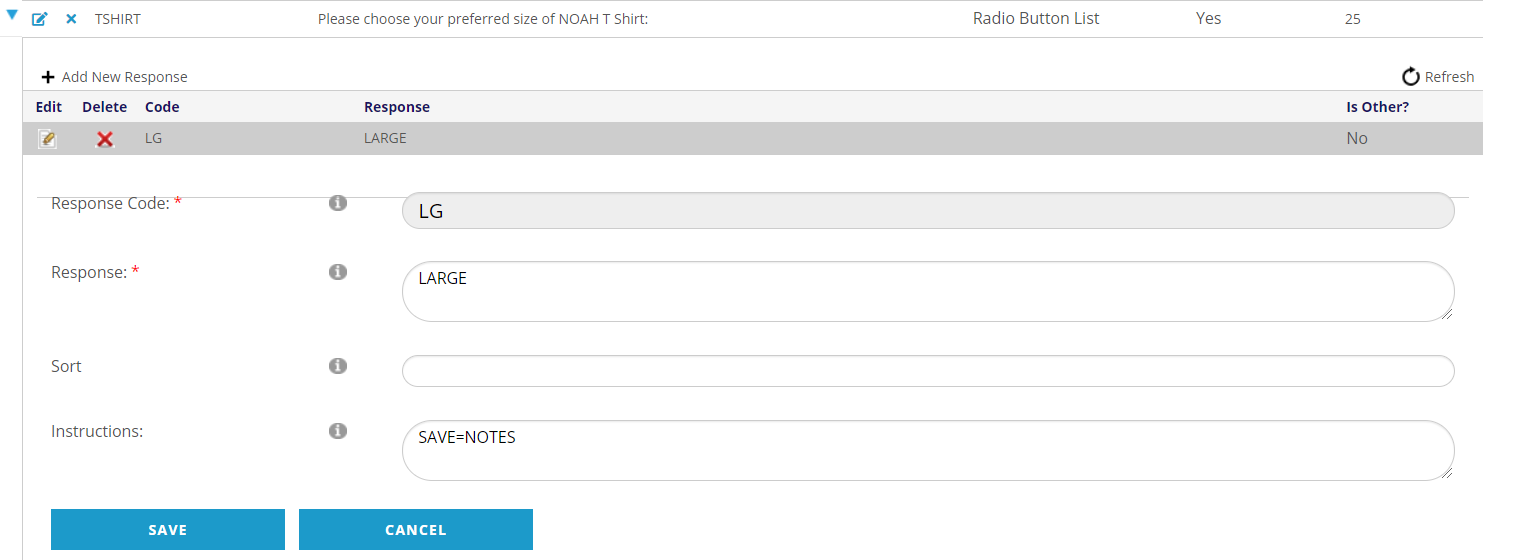
Instructions can be manually added to questions and responses to control how they act; some are added automatically based on your selections. Below is a listing of some instructions for questions and responses:
- RETD=TRUE retires the question so it is no longer shown.
- ONLY=AMS set the question not to be shown on the website when registering.
- VMSG=message_with_underscores overrides the standard required message (overridden by any MIN/MAX instructions below)
- MBRT=
: limits the question to be shown to certain member type and subtype; pipe can be used to add different member types and subtypes - MBRT=PERSONAL:STU|PERSONAL:REG would show to those with Personal Student membership as well as Personal Regular memberships; ALL can be use used to include all subtypes.
- MBRT=CUR:MEMBER show to only current members
- MBRT=NON:MEMBER show to only non-members
Several Controls can also have instructions to control their use.
- DATE -Date Picker (default range set to 1/1/1900 to 12/31/2900)
- MIND=Minimum date (makes field required) ex: MIND=12/31/2025
- MAXD=Maximum date: ex: MAXD=12/31/2025
- DDL - Drop Down List
- OTHR=TRUE - goes on the Response Code to allow a different (other) response from those defined
- SAVE=QTY - goes on the Response Code to save OTHR to quantity instead of notes
- CMB - ComboBox List
- MINR= the minimum number or response that can be selected (makes field required)
- MAXR= the maximum number or response that can be selected
- OTHR=TRUE - goes on the Response Code to allow a different (other) response from those defined
- SAVE=QTY - goes on the Response Code to save OTHR to quantity instead of notes
- RBL - Radio Button List
- OTHR=TRUE - goes on the Response Code to allow a different (other) response from those defined
- SAVE=QTY - goes on the Response Code to save OTHR to quantity instead of notes
- CBL - Check Box List
- MINR= the minimum number or response that can be selected (makes field required)
- MAXR= the maximum number or response that can be selected
- OTHR=TRUE - goes on the Response Code to allow a different (other) response from those defined
- SAVE=QTY - goes on the Response Code to save OTHR to quantity instead of notes
- MTB - Multi-Line Textbox (set to 4 rows)
- MINC and MAXC for character counts; these make the field required
Once you have filled or edited each field as needed, click on the Save button to add a new response or save changes to an existing response. The new response will now be connected to its parent question, and will display so long as the question is in expanded mode, as seen in the next screen shot.
Click on the Cancel button to discard the response and any changes. Continue in this manner until all of the responses for the question have been entered.
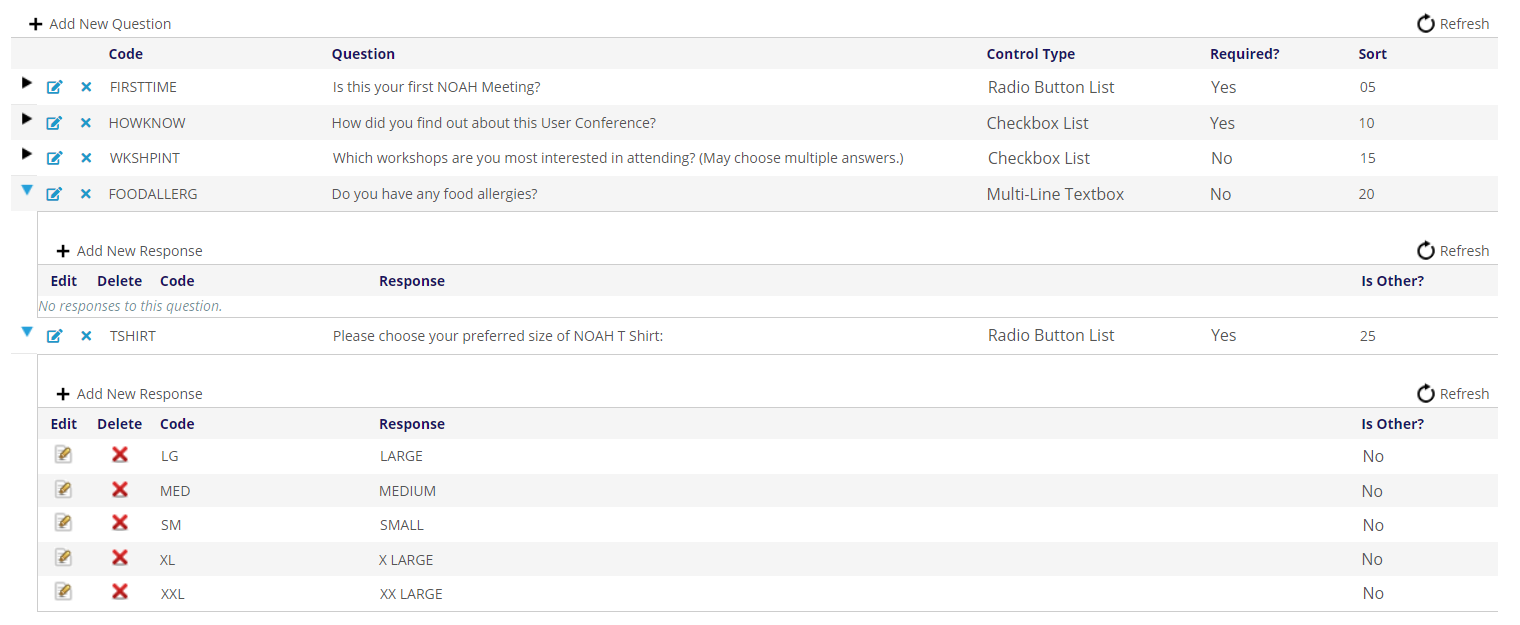
The responses appear in alphabetical order by Response. Click on the  down arrow in the question’s far left column to hide the responses.
You can also use the Additional Questions tab to create questions for a particular event within a meeting. For example, if there is a golfing event, a question can be added to the golf event rather than the meeting’s registration event that asks each participant their handicap, using a single line textbox answer.
The AMS has an additional feature called Import Questions in this tab whereby you can import all of the additional questions and their respective responses from a prior meeting. This can be particularly useful for annual meetings and conferences which can use many of the same questions from one year to the next. You can add to, delete or edit imported questions and responses as needed to reflect current needs.
Once you have created the registration event for the meeting that needs the questions from a prior meeting, select that registration event and go to the Additional Questions tab. Right above and to the left of the meeting grid click in the drop down box and select the event with the questions you wish to import.
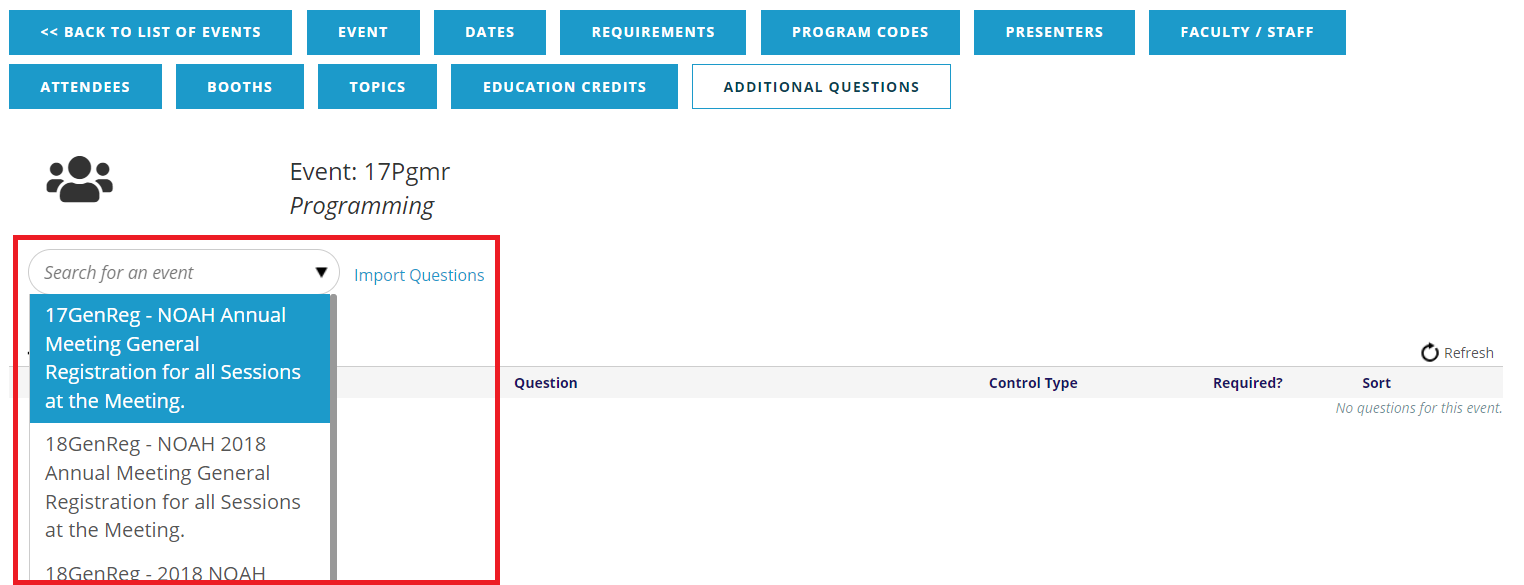
Then click on the blue Import Questions to the right of that box. The AMS will then import all the questions and their responses into the Additional Questions grid. Then you can edit or delete questions or responses, and add any new questions and responses.
This feature is another reason why it is a good idea to leave gaps when assigning sort numbers to the questions, thus leaving room to insert other questions in the future without having to renumber the entire list.
Registrant responses to an event's Additional Questions are stored as List Codes on the contact's profile under the Type Questions for the Event's Search 1.