
Contact Bookmark is a feature in NOAH that can be used to store a List Code on selected contact records within your selected group. This allows you to flag the group so that you know who was in your group at that specific time, since their data will change over time and you may no longer be able to create this exact group. It also allows you to track the group historically, so that each year you know who was in the group and met your specific criteria at that time.
You can also use it to include or exclude subsets of contacts in your group from blast emails or labels for physical mailings that would otherwise go to the whole group. You can use the random number field to flag an exact number of records in order to build test groups for different messages, so that they are excluded when your finalized message is sent.
You start the process after running the job for the Library Card by selecting Contact Bookmark from the output product drop down menu, then click on the New Product Setting buttons. 
Then the Contact Bookmark output page will load.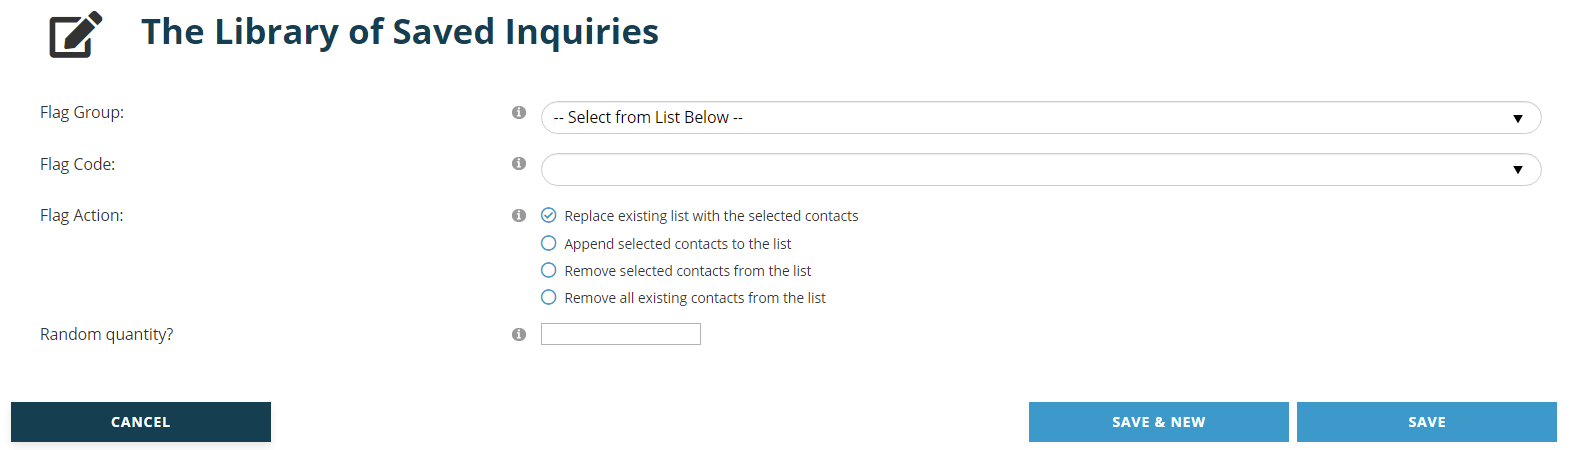
Flag Group and Flag Code are drop down menu fields where you can select existing codes or create new ones as needed without having to go back to the Dictionary.
You can create Flag Groups to manage the types of flags you create. For example, you may wish to have a group of Membership flag codes as well as a group of Donations flag codes.
Flag Codes are the children of Flag Groups. Each Flag Code is ten characters long and is used to define the actual bookmark value. Examples are “18Renew”, “18Holiday”, “18DonA”, “18DonB”, etc. These would correspond to 2018 renewal members, 2018 holiday card recipients and testing letter A and letter B to two subgroups for the 2018 donor campaign. The best use is to start with the two digit year and then add values to differentiate the actual purpose of the flag as compared to others.
Flag Action is a radio button field that defaults to Replace existing list with the selected contacts, but your choice here needs to be carefully considered before you submit a flag code. When you execute the bookmark process itself, by this first default option the selected Flag Code will be removed from all records in the database and added only to those contacts in your Library Card. For all four options, list refers to all of the contacts that already have this flag on their record. For a new flag code there won’t be any yet, so the default to replace an existing list is fine. The next time you use the code to flag records you might need to change this field to one of the three other options.
If you use more than one Library Card to select various records to then assign the same Flag Code to all, be sure to select “Append selected contacts to the list” in edit mode each time before you flag the records in view mode.
If you want to remove the Flag Code from all contacts in a Library Card, leaving it on any records flagged via other Library Cards, be sure to select Remove selected contacts from the list.
Finally, if you wish to remove the tag from all records in the database, usually to start over in case you tagged records erroneously, then select “Remove all existing contacts from the list”. You would need to update this field to another value when in the future you wish to assign the flag code to contacts.
Random Quantity is an optional numerical field where you can enter a number of contact records to be randomly selected from all of those that meet the Library Card’s criteria. It is used for purposes similar to our first example below in this section where the goal is to send two different emails to two different subsets of the same overall group of contacts that have memberships that are about to expire. When using this field, make sure you have run the job for the Library Card first so you can pick a number that you know is less than the total number of contacts selected.
In order to help you better understand Contact Bookmark, this section will use two different examples to lead you through the steps to take. Having a specific goal in mind is key to maximizing the use of Contact Bookmark.
Contact Bookmark Example 1 – Working with subgroups of an overall group:
In our first example, we’ll imagine your 2018 membership renewal season is opening. You use a Library Card to find out there are 2,332 current members that are expiring, and you want to send them a blast email solicitation to renew. Before emailing all 2,332 of them, you want to send a test email with completely updated content to 100 of them. You also want to send a comparative test email that uses last year’s content, with the dates edited to reflect this year, to another subset of 100, with no overlap in these test groups. The following month you want to send the more successful version to the remaining 2,132 members who didn’t receive either of the test emails.
To follow along using our Membership emails example, two new Flag Codes need to be created under an existing Flag Group for Membership. Once you have selected Membership from the Flag Group drop down menu and then selected Add New for the Flag Code field, one additional Flag Code field will appear, as seen here.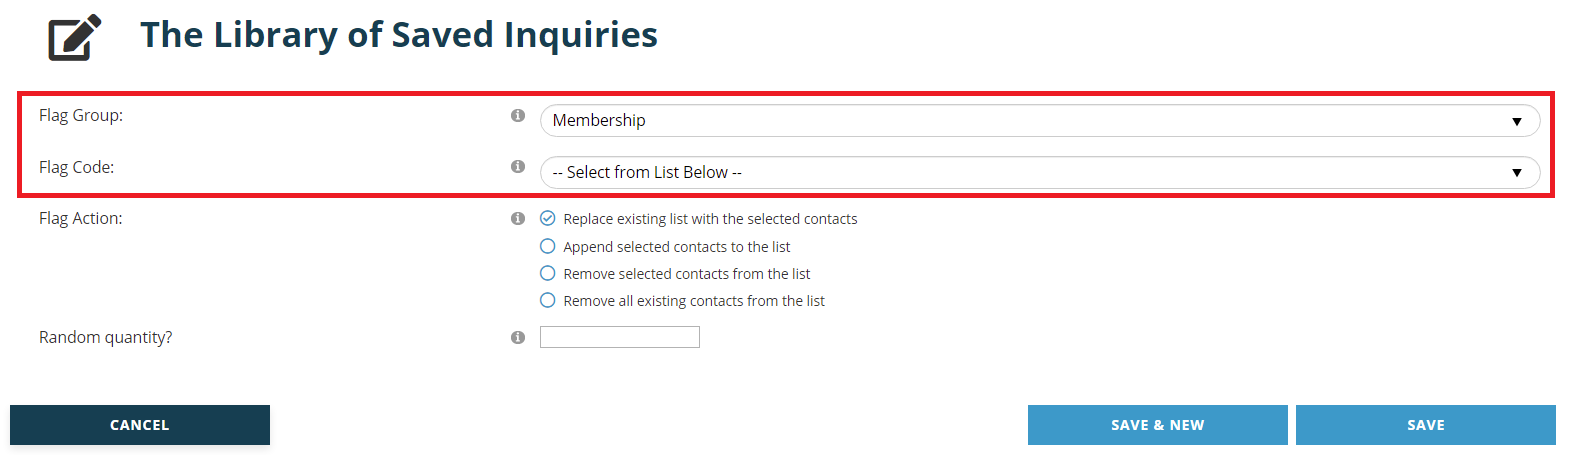
Since the first new Flag Code is to be used in conjunction with the email that has updated content, “1801RenewU” works since it is for the 2018 renewal campaign, and the “U” can stand for Updated in order to distinguish it from the other flag code that will be created for the other version of the renewal email. Placing the “01” after the “18” leaves your options open in case another flag code is needed to send the same email again, in which case flag code “1802RenewU” could be created.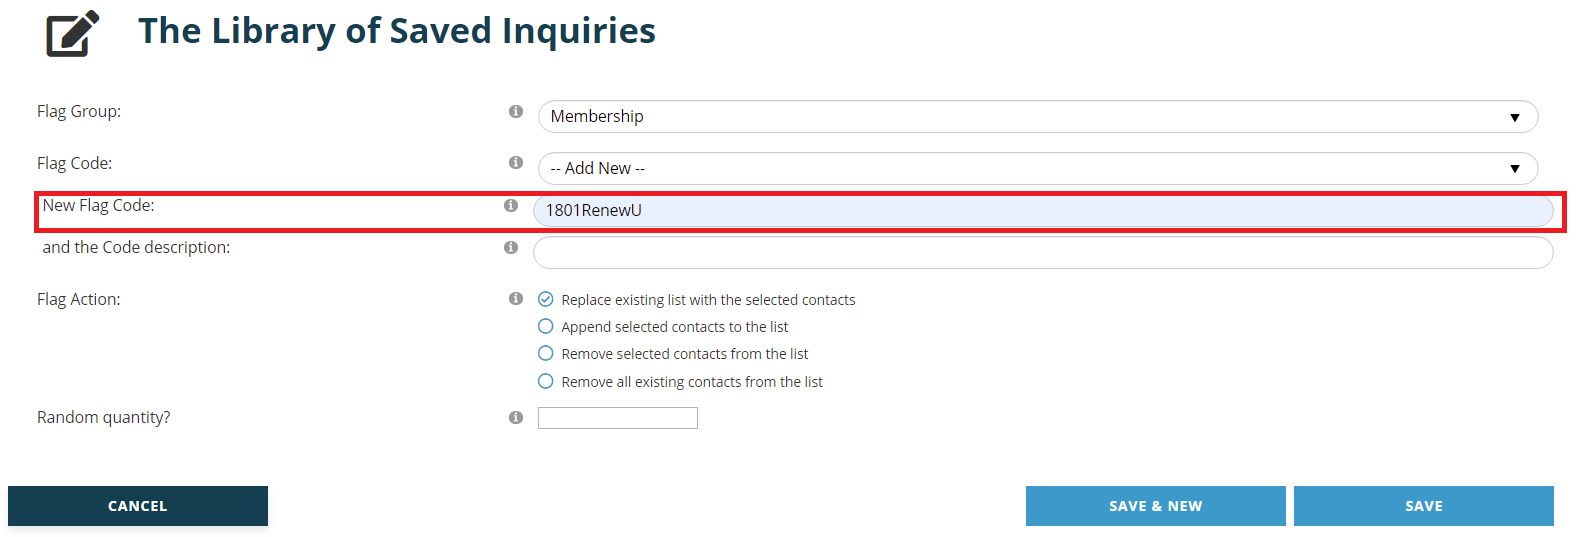
The next step is to create the Flag Code description for “1801RenewU”. This description will appear throughout the system in place of the code. Make sure the text you enter here reflects the code’s purpose as seen here, as that will make it easier to find it amongst others later on. The description also appears without the code in the List Code tree for Library Card criteria.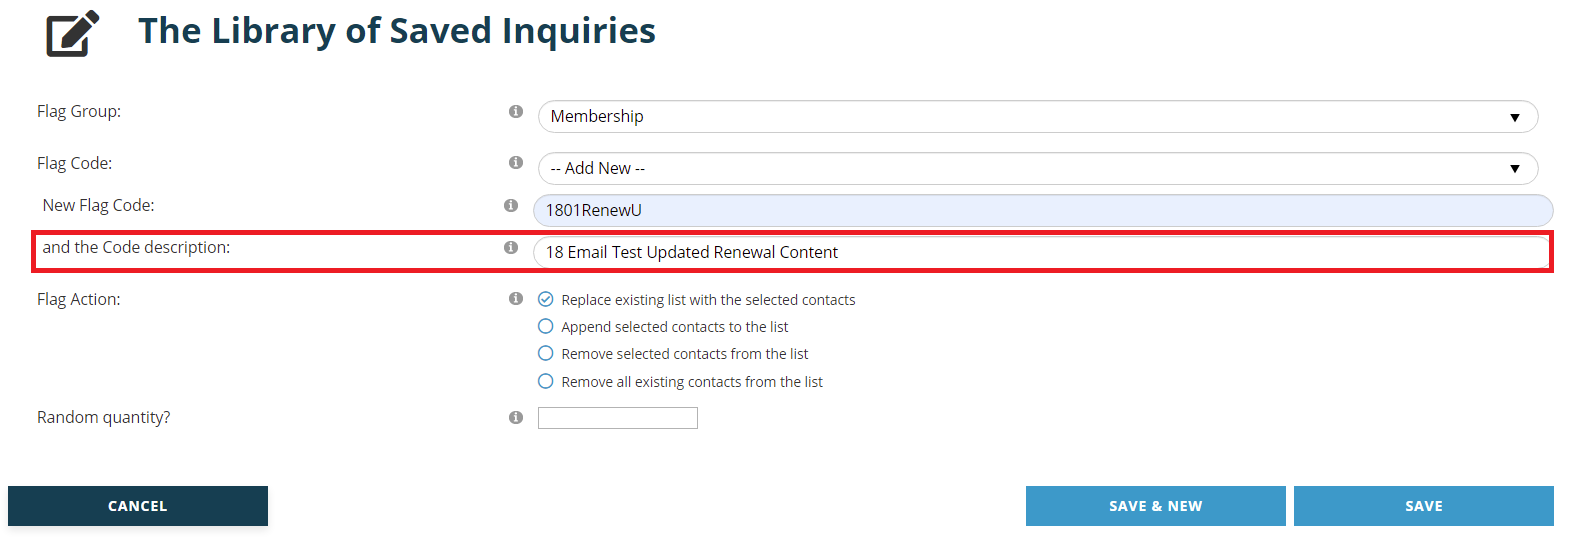
No change is needed in this case for the Flag Action field, so the last step is to enter “100” in the Random Quantity field, since that is the number of records we want to randomly select to receive the new version of the renewal email. Before saving this new code, make sure the entries for each field are correct. We recommend you write down the new Flag Code as well as its description for future reference.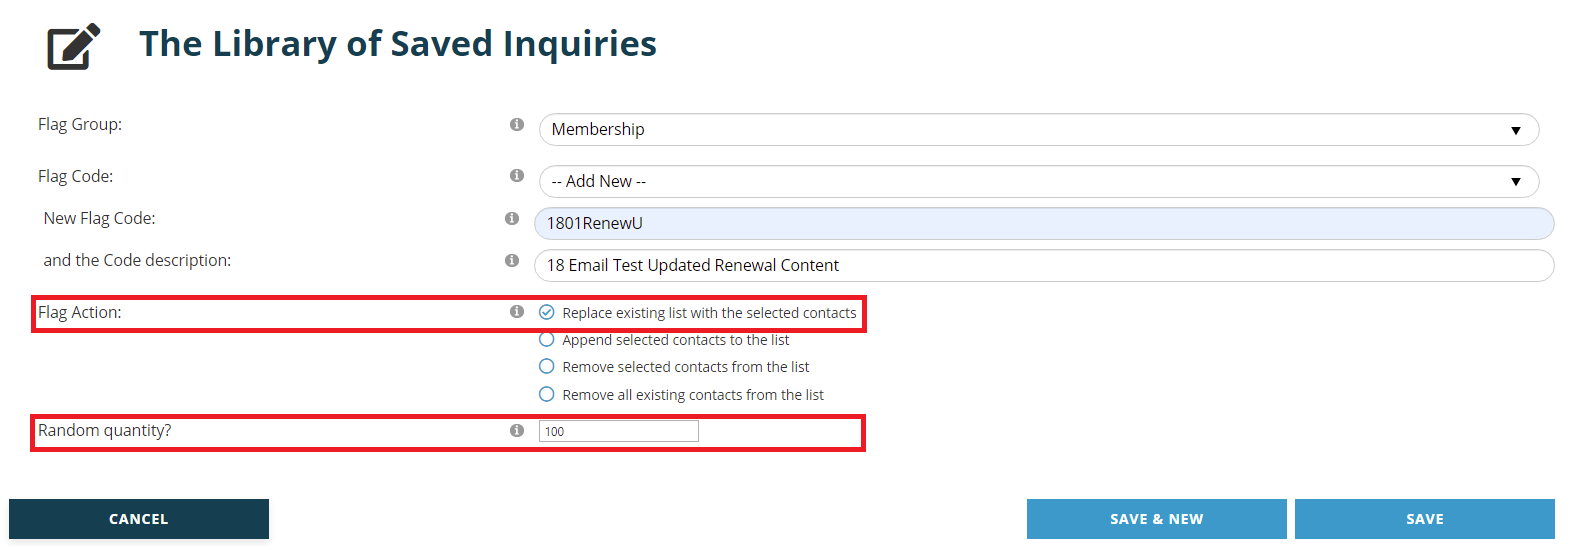
When you click on the Save button, the AMS adds any new group and new flag codes to the dictionary so they will be available for later use. It has not yet flagged your group, you do that in the next step below. Saving takes you to the View page for the Flag Code you just added, and you can check for any errors.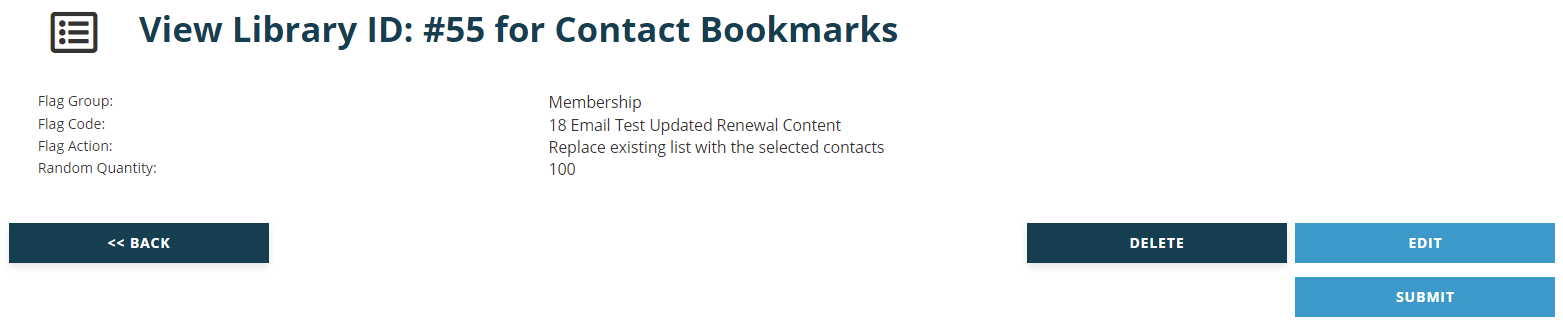
Click on the Edit button to make any changes necessary. You can select a different Flag Group or Flag Code, and you can create new ones, but once you have saved you cannot edit the existing codes and must delete them if you added them in error. You can only delete a Flag Code if it has not already been assigned to a contact.
If you want to wait until later to submit the job for the flag code, click the Return to the List button. If you are ready for NOAH to randomly select the 100 contacts and flag their records with this flag code, click the Submit button. At that point the list codes are saved to each contact selected corresponding to the flag code.
In order to send the second version of the test email to a different subset of 100 contacts than those who received the first version, you need to return to the Library Card and add a List Code criteria for the 1801RenewU flag code.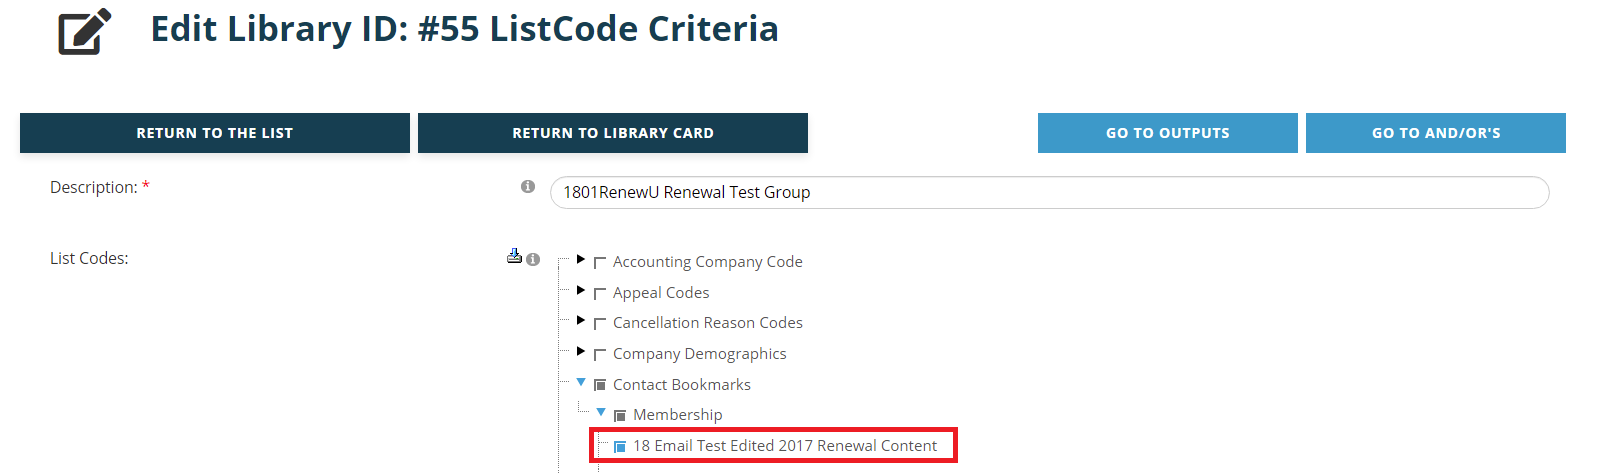
Once you save this new criteria, click the Go to And/Or’s button so you can change it from an “And” to a “Not” operator.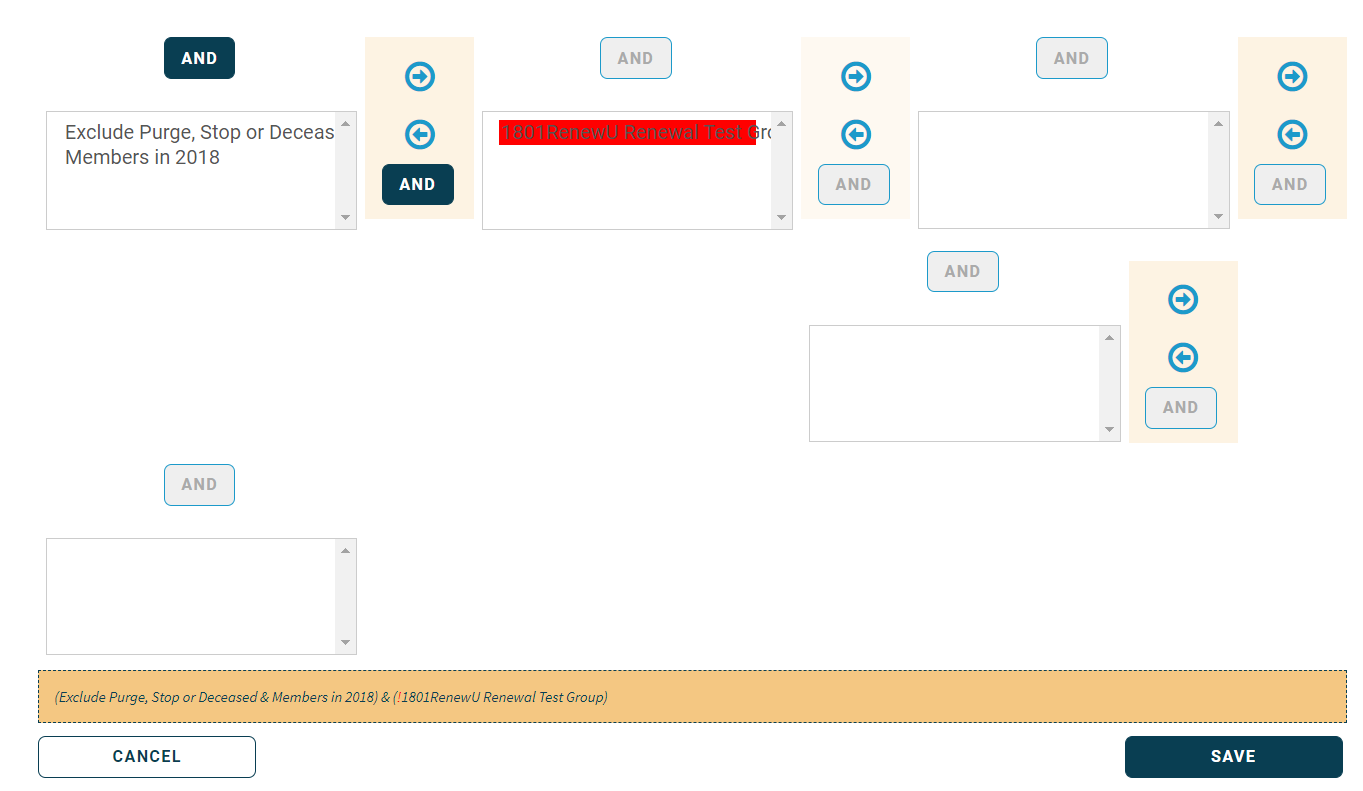
This is the only way to ensure that the contact records flagged with “1801RenewU” will not be randomly selected by the new bookmark we are about to create, so make sure you click the Save button. Then the output product landing page will load. Be sure to click Run the Job to refresh your group to omit those in the first subgroup. Since this is re-running your underlying selection criteria, you should always build your subgroups as soon as you create your primary group if you wish to keep your group static and not updated by new data.
As before, select Contact Bookmark from the drop down menu, then click the New Product Setting button. For the new bookmark, create a different Flag Code under the Membership group for the second test email group, and since they are receiving the edited version of last year’s email, in our example the code is “1801RenewE”. Enter “100” in the Random Quantity field to flag 100 people.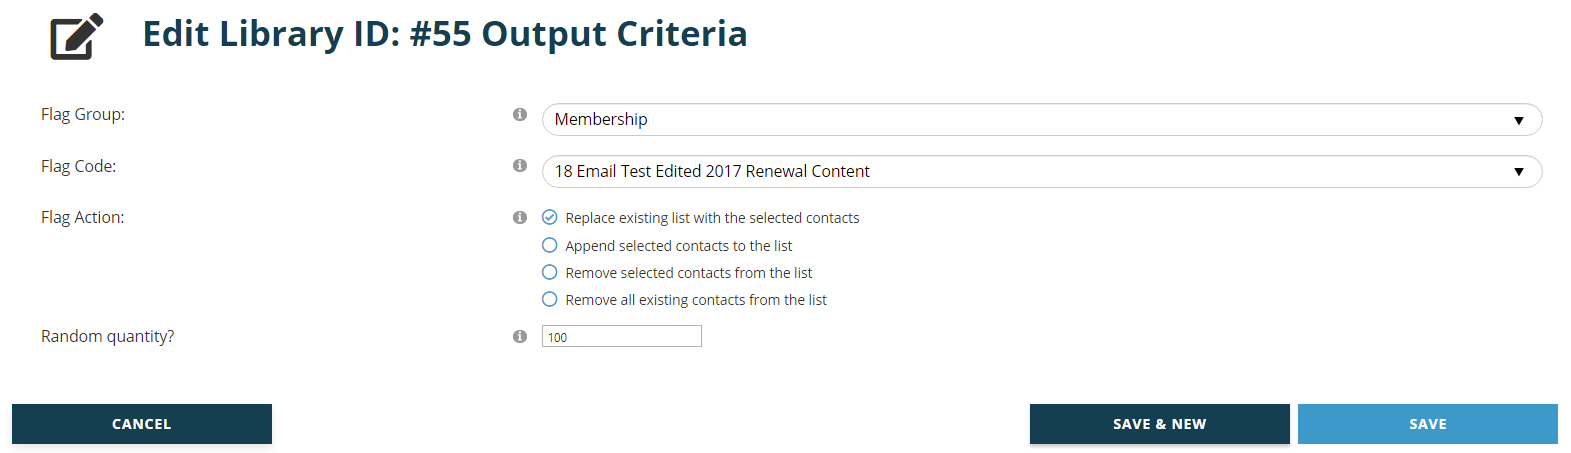
Click the Save button, check your work on the View page and when you determine there are no errors, click the Submit button to create the bookmark tag on each of the contacts.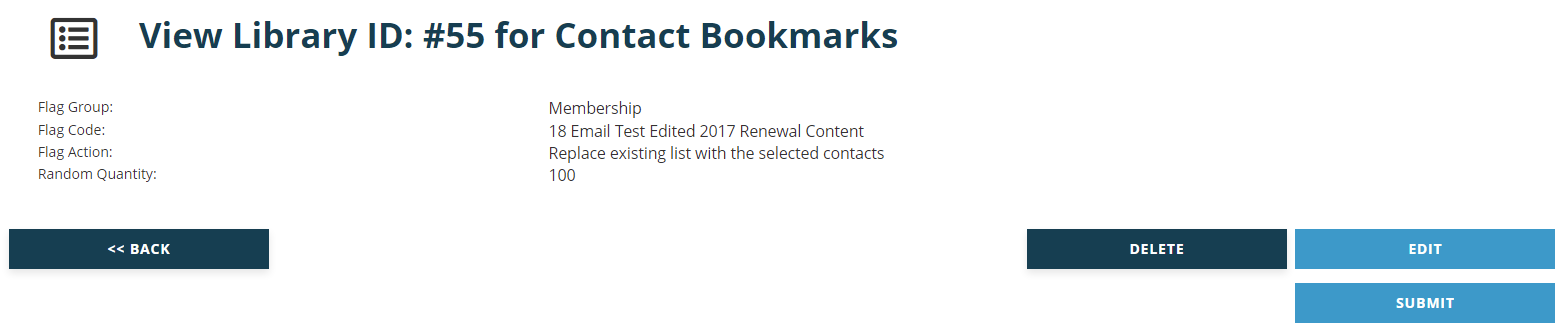
At this point you have not sent any emails, you have only created the subgroups that will be sent each of your two emails. You will then create two new Reporter Library Cards and create a single List Code criteria in each in order to select each group of 100, selecting the Flag Code for “1801RenewU” for one card and “1801RenewE” for the other. You would then create an email output in each to send the specific email for the test group in each Library Card.
When it is time to email the remaining 2,132 individuals that were not tagged as part of your two subgroups, add an additional List Code criteria to the original Library Card for the second subgroup to omit the subgroup exactly as you did for the first subgroup.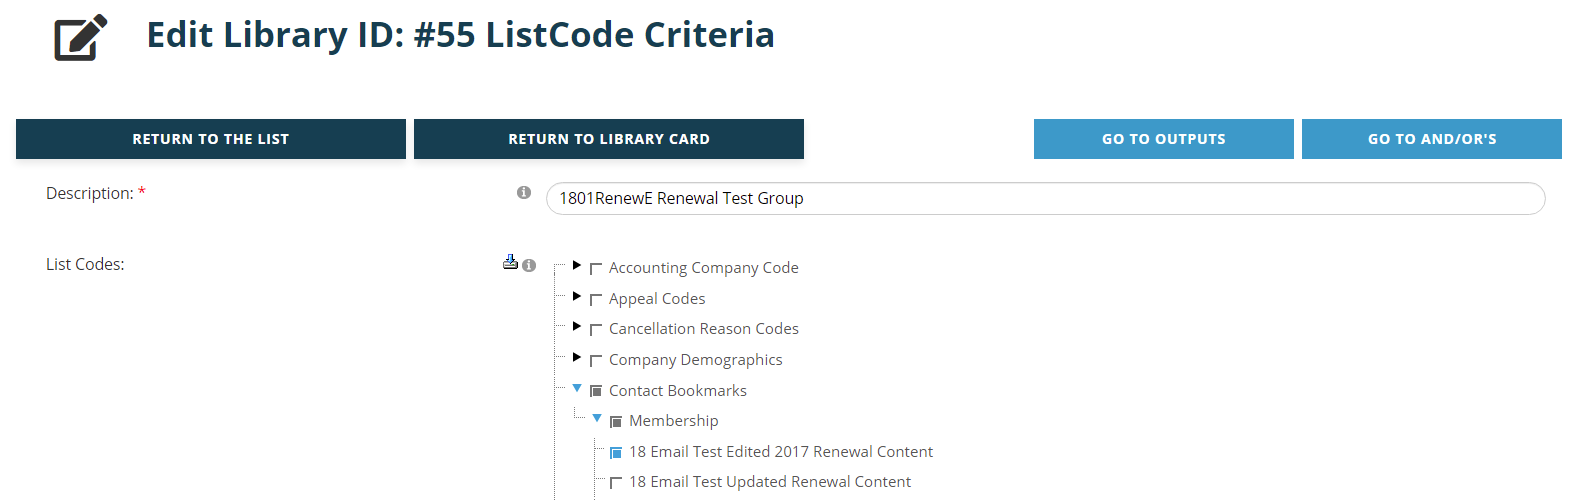
Make sure you select the correct Flag Code from the List Code tree, which in this case is the second one we created for the edited content test group. A wrong selection here can have unfortunate results, so that is why Flag Code descriptions should be written to clearly reflect the purpose of the flag. Make sure you enter a Description that makes it clear which Flag Code is on this criteria to avoid confusion during the next step.
Then go to the And/Or’s to include the new criteria in the same box with the first, setting it to NOT in the same manner.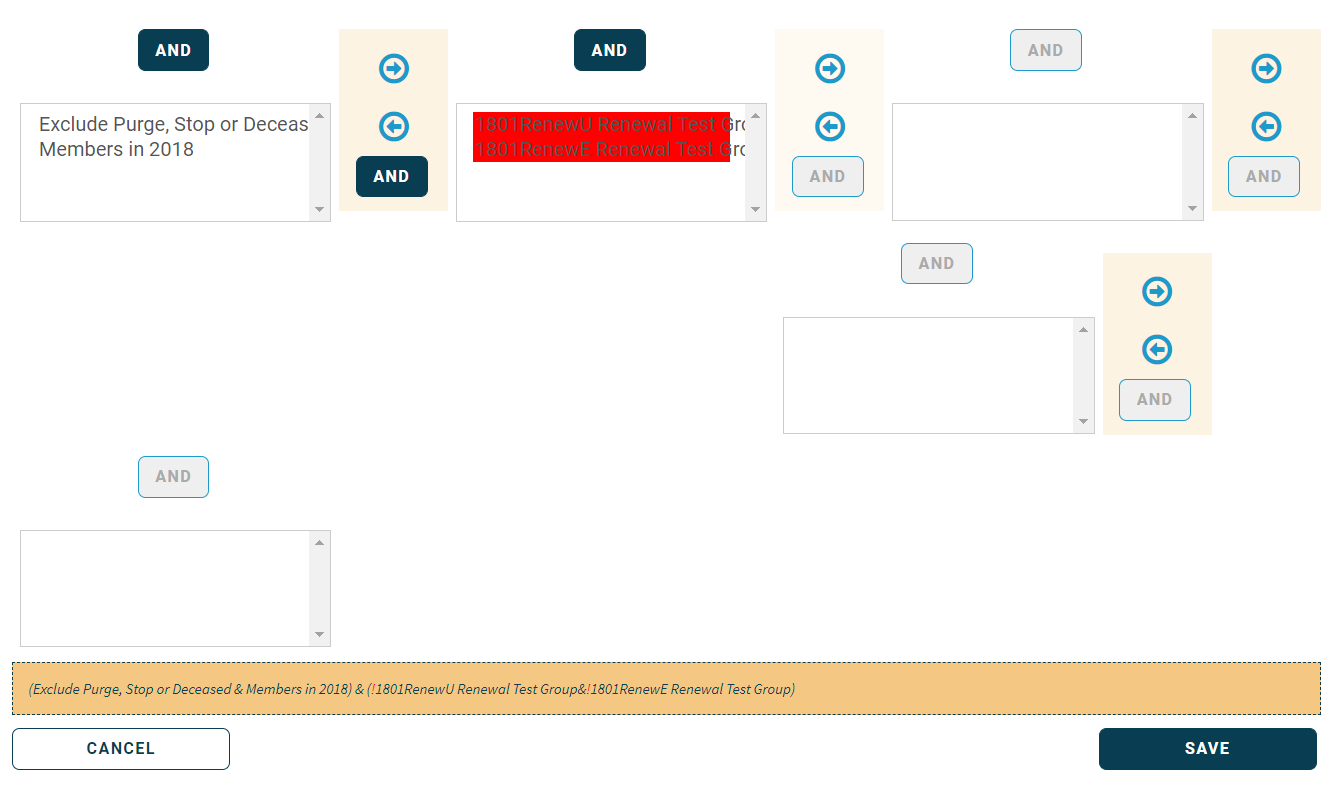
Then Run the Job from the output landing page to update the contacts on this Library Card, which in this case should be 2,132 after factoring out the 200 contacts excluded by your NOT operators above, plus any new records that may meet your criteria based on updated data. If the number is off by a factor that doesn’t make sense, check your And/Or/Not operators and criteria and fix any errors. Make sure you run the job each time you make these changes. Once the number returned is correct, use this Library Card to send the version of the email that was more successful at generating renewals in the testing round.
If you do not wish to omit one of the subgroups, then remove its Flag Code List Code criteria in your Library Card criteria. You may wish to send the final letter to the other group that did not receive it originally, or you may wish to send it to the those in either subgroup that have still not yet renewed. You can add/remove the subgroup criteria from the Library Card at any time to target the desired contacts. Removing both criteria will give you the entire group originally selected. Keep in mind, this refreshes the results each time, thus anyone that is newly expired will be added to the group, and those that have renewed will be removed from the group.
Bookmark Example 2 – Simple tag of the selected group:
In our second example, we’ll imagine you want to mail holiday cards to a select group of contacts. It could get complicated to try to pull all of the desired records with one Library Card if there are multiple criteria involved. In addition, if you use a Library Card and rerun it, the number of records will change as often as the data does for your criteria. The use of Contact Bookmark in this case gives you a definitive group so at any point in the future you can use Reporter to see who got the holiday card.
In this example we will begin the holiday card bookmark process with current and former board members by creating a Library Card with specific Folder criteria. In our example, seen in the next screen shot, one Folder criteria can cover this need if “Board of Directors” is chosen as the folder type and the “Currently Active” check box is left blank. If you don’t enter a date in the “Start” field, anyone who has ever had this folder will be included, and that may not be the best choice. For this example, we have entered a start date of “1/1/98” and left the “Thru” field blank to capture board members from the beginning of 1998 through the present. Leave the through date blank unless you want to exclude any records which are assigned this folder beyond a particular date.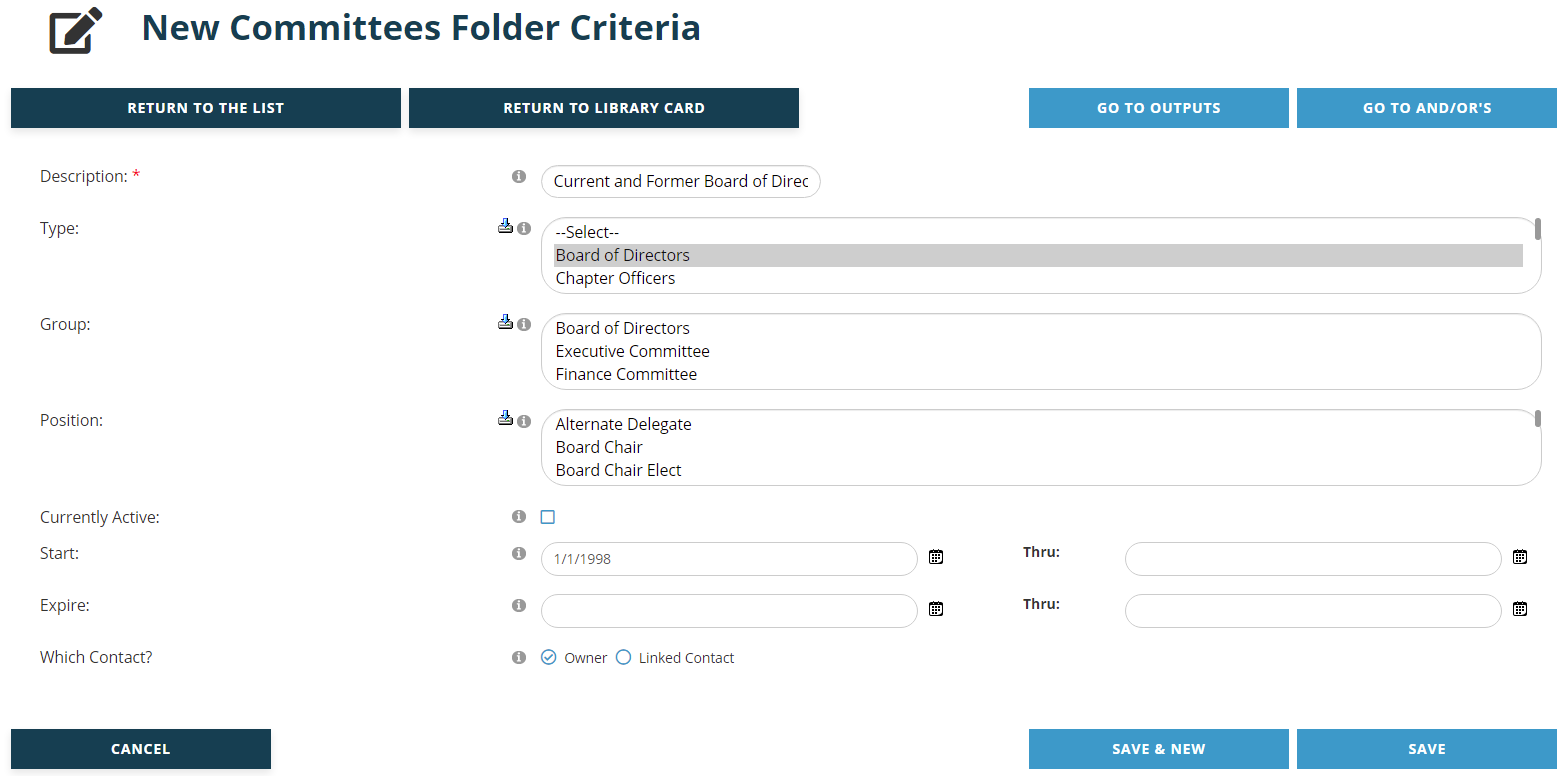
Save the criteria, check your work in View mode, then Go to And/Or’s. Remember that even when your Library Card has only one criteria on it, it won’t return records until you have clicked the Save button on the And/Or’s page.
Then Run the Job and see what number of records you get. Remember that NOAH will de-dupe the list of contacts for those that have more than one work folder that meet your criteria.
If the number of records returned seems right, select Contact Bookmark for your output product and click on New Product Setting. Then create a new Flag Code for the holiday card mailing. Since in this example we won’t send these cards out more than once, we don’t need another two digits after the first two that signify the year. “18Holiday” will work for our new Flag Code.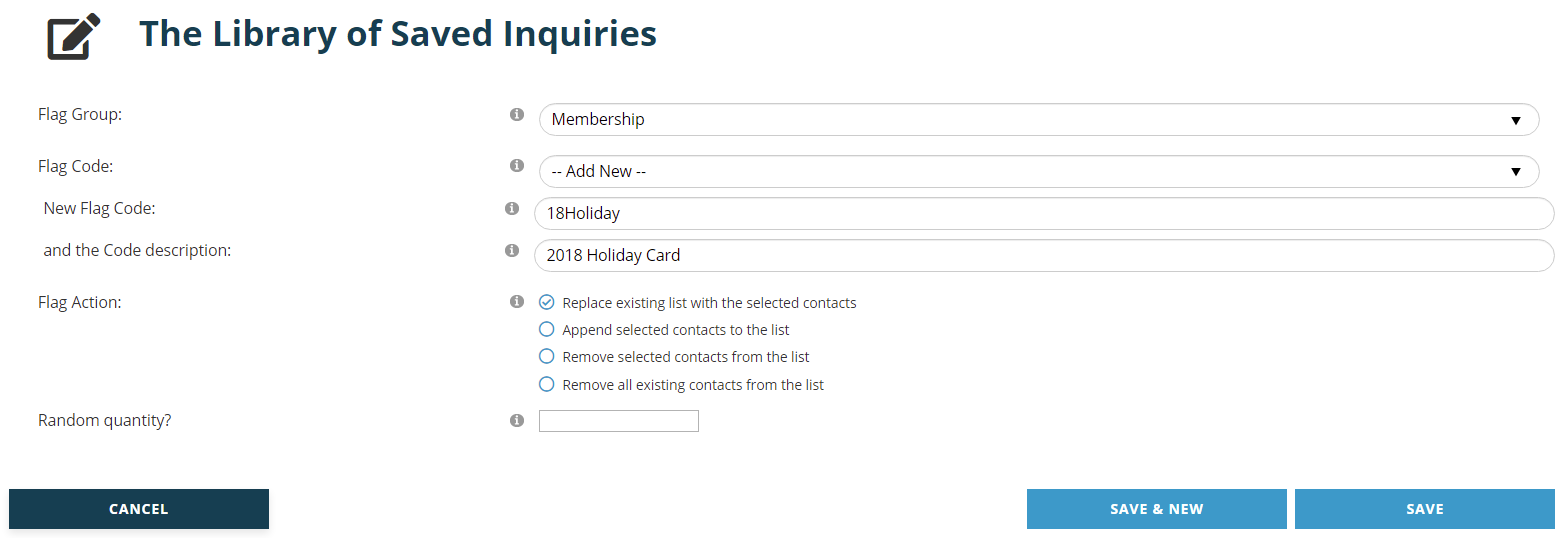
Click on the Save button, and if all looks correct in View mode click on the Submit button to add the “2018 Holiday Card” Flag Code to the contact records on this Library Card.
You can add this same flag code to other contact records via other Library Cards if you want other groups of contacts to get the card. If, for example, you have an existing Library Card for those who sponsored your annual meeting and you want them to also receive the holiday card, open that Library Card, doublecheck your criteria and And/Or/Not operators saving any changes you make along the way. Then Run the Job to pull the contact records based on the most recent data in your system. Select Contact Bookmark for your output product and click on the New Product Setting button.
Select the “Membership” for the Flag Group, and then find and select “2018 Holiday Card” from the Flag Code drop down menu. Make sure you change the Flag Action field to “Append selected contacts to the list”. This will flag the records from this Library Card without removing it from the contacts you already flagged, growing the list of those to whom you want to send the holiday card.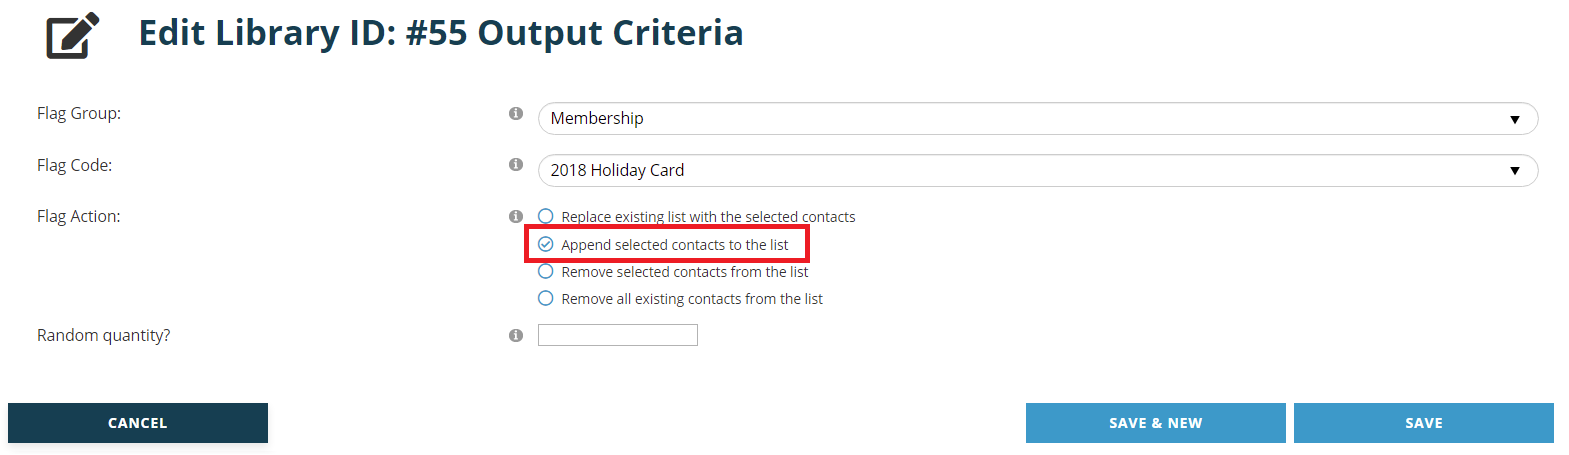
Then click on the Save button and check your work in view mode. If all looks correct, click on the Submit button to add the flag to this group of contacts, your meeting sponsors.
You can continue to add the same Flag Code to other contact records in the same manner.
Once you have flagged all of the contacts you want to get the holiday card, create a new Library Card that will be dedicated to pulling all of these flagged contacts into one group. Add and save a List Code criteria for the “18Holiday” found under Contact Bookmarks in your List Code tree.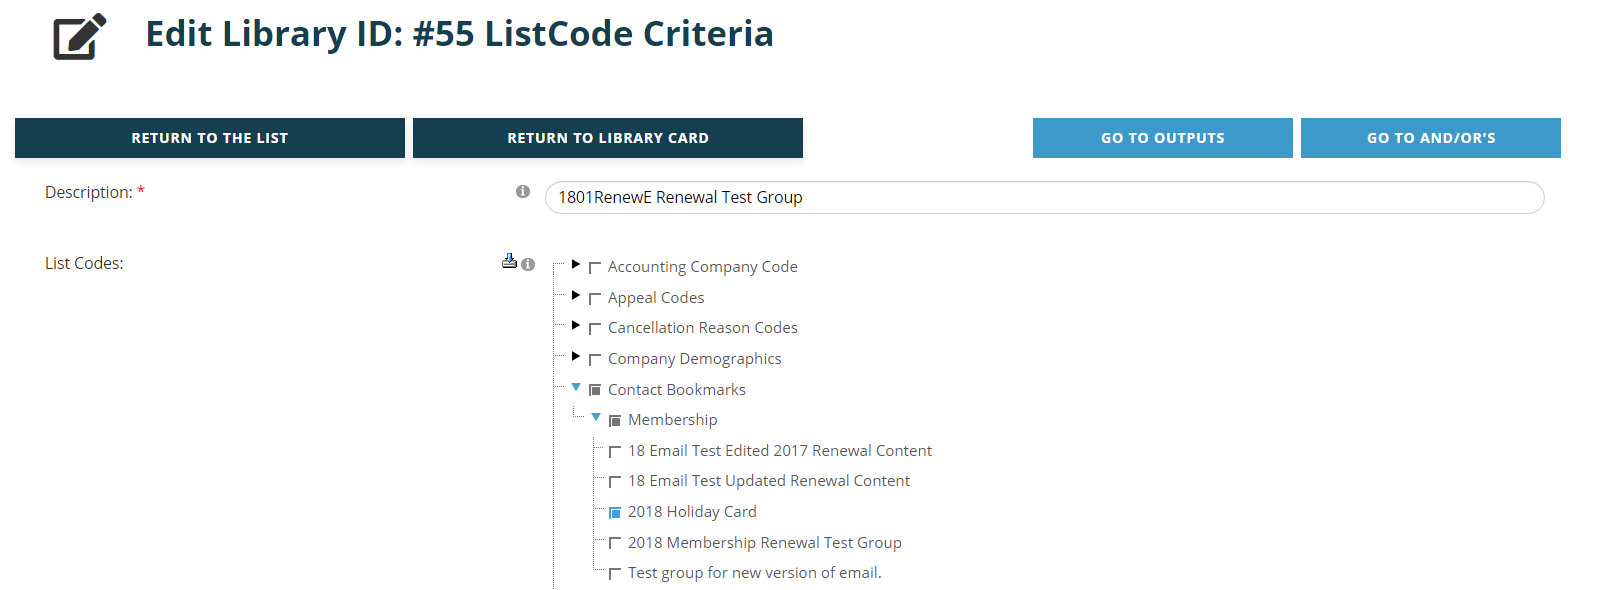
Once you have gone to the And/Or’s page and made the correct settings for each criteria, even if you have just one for the List Code, click Save. Don’t forget to Run the Job on the output product landing page, since the contact records with this List Code won’t be pulled until you do. Plus you can see the final count of contacts that have this flag, and decide how many cards and stamps you need.
Then create the output product you need to send out the physical cards or a blast email from the same Library Card. You can print labels for envelopes or you can print a list to use if the envelopes are to be hand addressed or sent to a printer.
More information on Output Products is found in other sections.