
You can use Library Cards in the Reporter to send blast Emails to highly targeted groups of contacts to help meet specific organizational goals, such as driving membership renewals, fundraising, meeting registration, participation in governance or any other areas of interest. You can create the content for a blast email and then use it as many times as necessary.
If you want refreshed results from your query make sure you have clicked the blue Run this Job button. If the number returned seems correct, select Emails in the Output Product Selections drop down menu, then click on the blue New Product Setting button.
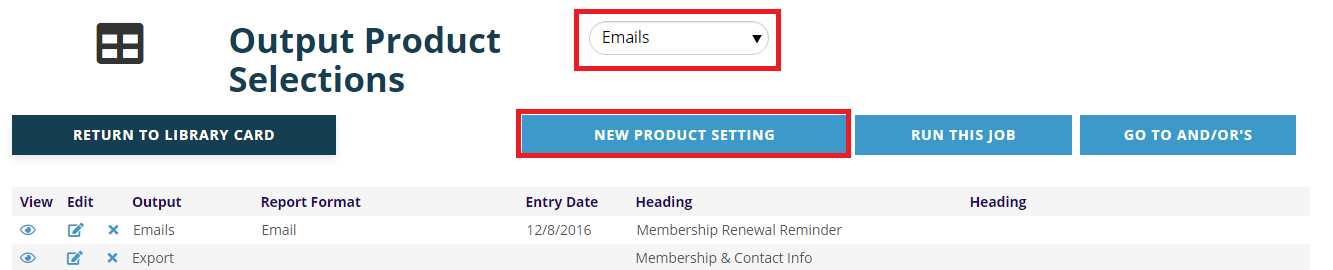
Then the output page for Email will appear.
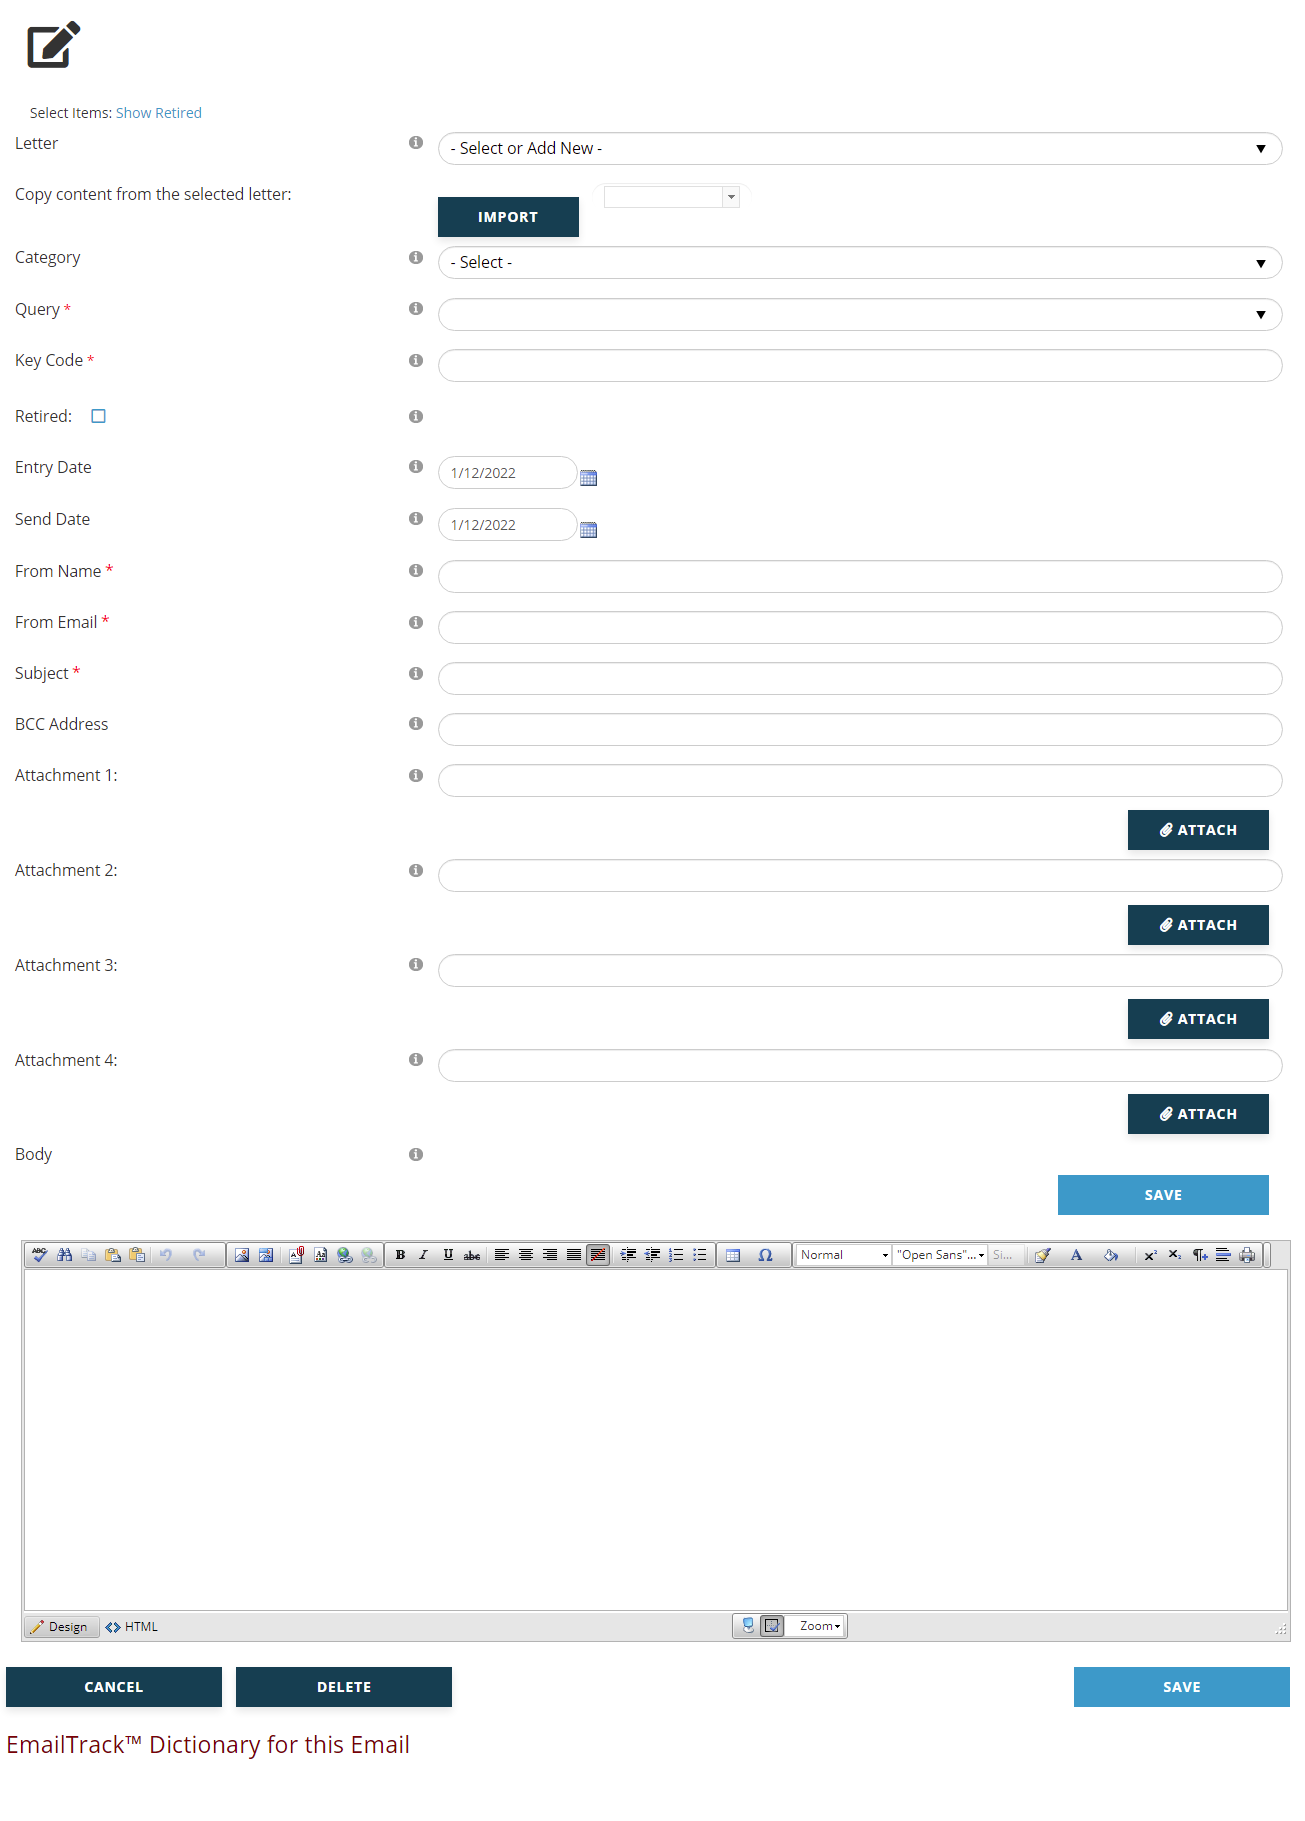
Since this page is longer than other output product pages, we will discuss these fields in three sections, beginning at the top in the next screen shot. EmailTrack Dictionary, found at the very bottom of the page, is discussed in a separate section of this chapter.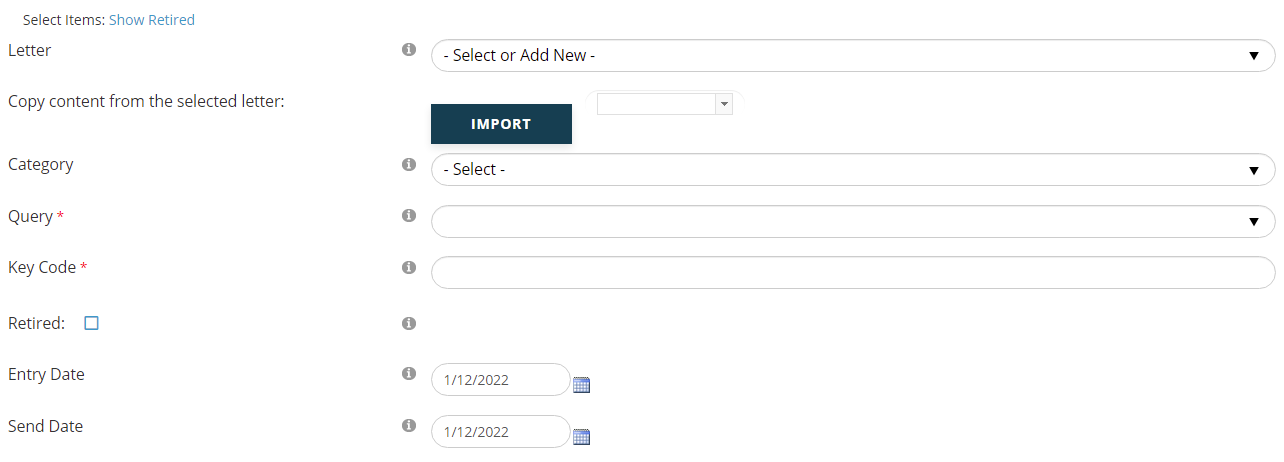
All email messages are stored in a library for repeated use and for use as templates. If you wish to directly modify an email previously created, select it from the Letter drop down. Any changes you save will overwrite the current version of the email.
If you prefer to create a copy of an existing email to preserve the original email, select it from the “Copy content from the selected letter” drop down and then click on the blue “Import” button.
If you need to access a retired letter, click on the blue “Show Retired” link found above the Letter field. All retired letters will then be included in the drop down menus. To hide them again, click on the “Hide Retired” link that appears in the same location once the Show Retired mode has been selected.
The Category and Query fields are mandatory drop down menus where the category is a parent, and its children are the queries. The choices you make in these fields determine which of the library’s pre-defined data sets you will get back in your output. You have access to options that are standard in the AMS, as well as any that were custom created for your association. For email output, the selected Category and Query will determine the library of tokens you can use to personalize the blast email’s content.
Key Code is a mandatory field where you assign a unique code to the email. The key code can be up to 15 characters and it can be helpful to create a consistent approach, such as always beginning with the two digits that represent the year the email is being sent or the year of the meeting for an email about that meeting.
If you are going to use EmailTrack, bear in mind that EmailTrack codes must begin with the corresponding email’s Key Code, followed by additional characters. For these cases, keep the Key Code shorter, about 9 or 10 characters at most.
Retired is an optional check box. When checked and saved, this Letter will no longer be accessible for selection or copying, unless the “Show Retired” link at the top of the control page is selected. We recommend that you retire letters when they are no longer likely to be used in order to keep the “Letter” drop down menu from becoming too long.
Entry Date and Send Date fields default to the current date. Entry Date refers to the date the letter was created. The Send Date records the email’s send date for the record, but it is not a scheduler so it won’t send the email on a date you enter here. The Send Date will update to reflect the date the email actually goes out, which happens when the blue “Send” button is used later in the output process. If you need to change either date, click on the calendar to the right of each date field and select the desired date.
The next screen shot covers the middle of the Emails output page.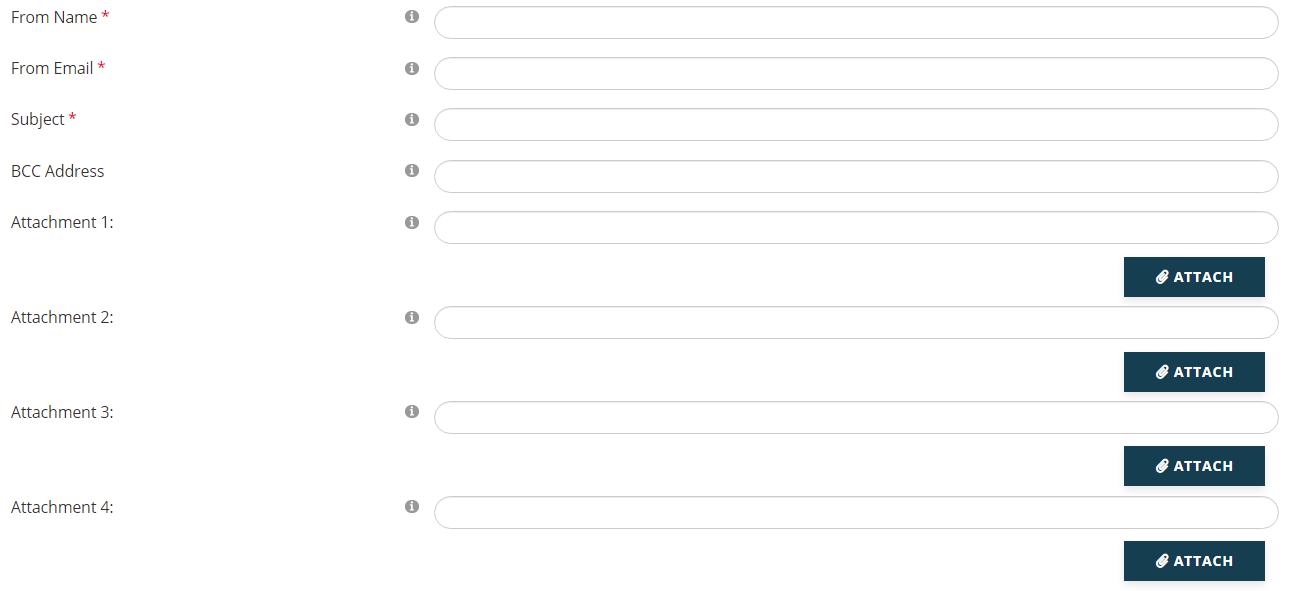
The From Name field is a mandatory text field that will display within the sent email as the “From” sender.
The From Email field is a mandatory text field that will display within the sent email as the sending email address. There can only be one email address assigned here and replies to the email will go to this address, including out-of-office messages and bounce backs from bad addresses.
The Subject field is a mandatory text field that will display as the Subject line of the email.
The BCC Address field will be phased out with the next version of the Reporter. We strongly recommend that no one use this field, as any email address entered here will be copied on every single email sent out by the batch. For example, if you send out a blast email that goes to 3,240 recipients, anyone BCC’d in this field will get a copy of each of the 3,240 emails in their Inbox! If you need someone else to see the content as it went out to recipients, use the email Test function described later in this section to send it to yourself and then forward it to that person instead of blind copying them in the blast email.
The Attachment 1 through 4 fields allow you to attach up to four documents to the email. Click in the first available Attachment field, then click the blue “Attach” button to the right of that field and your CMS Documents Manager will open. You can select any document that has been uploaded there to be attached to your email.
It is recommended that you consider the following before attaching files to system email:
- File attachments increase the file size of the email and may put stress on our servers.
- Email Service Providers (ESPs) may delay, limit or block email because of their attachments.
- Individual email programs may block or redirect email with attachments.
- Antispam software at ESPs or the individual level may block or redirect email with attachments.
- Some work environments will not allow the delivery of email with attachments.
The best way to give individual email recipients access to additional information is to include links to files from your portal within the body of the email.
There are two blue “Save” buttons on this page, and the first is found below the Attachment fields. The second is found below the box where the body of the email is created and edited. Clicking on either button saves work done anywhere on the full page. It is recommended that you click this first blue “Save” button once you have set the fields above it, before working on the body of the email.
The Body field, seen in the next screen shot, is where you compose the message or body of the email. This field is created with the Content Management System (CMS) editor and includes an HTML editor toolbar.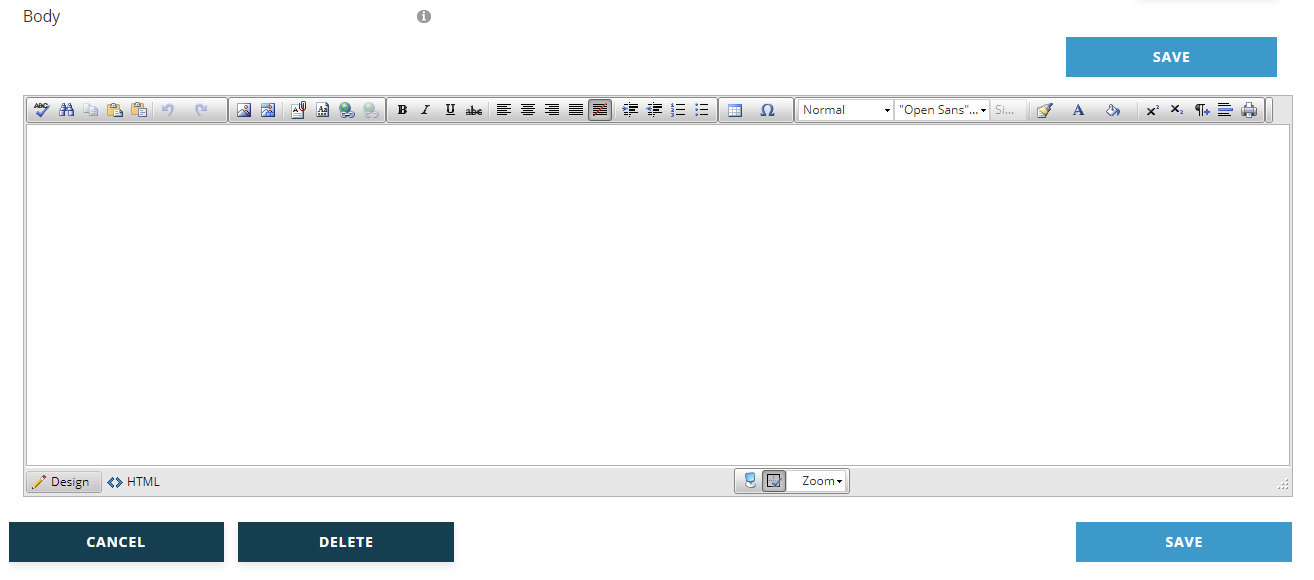
You can use the CMS editor to enhance the body of your email by including graphics, text and links. For example, you could include a link to your website that is activated when the email recipient clicks on your logo. You can edit the email in Design mode or in HTML mode by using the icons at the bottom left of the email body.
If you want to copy and paste existing text into the body of your email, that is an option in many cases. If you are bringing text over in html from Dreamweaver or any other html format, you can paste it into the email body when it is also set to html mode, as it won’t paste properly in Design mode. Some users bring over email templates from Constant Contact by copying and pasting the html for each one into a separate email output product.
Note that you cannot cut and paste text into email content directly from a Word Document. Word uses hidden control characters that can mess up the body of your email. There is a way around this problem. Simply cut and paste the text from Word into Note Pad, then cut and paste it from Note Pad into the email body, then apply styles as needed.
The email body does not have the same style sheets as your website so there will be no conflict when you copy and paste html from other sources here.
Custom Tokens allow you to use data to personalize content in the body of your blast email. The selections made for the email’s Category and Query determine which tokens are available for use in the email. In our example, we chose “Contact” as the category and “Admins Name, Addr, Phones & Member Data” for the query. Click on the down arrow at the far right of the Custom Tokens drop down box to see which tokens you can use. You can use the scroll bar on the left to see all of the tokens that are available.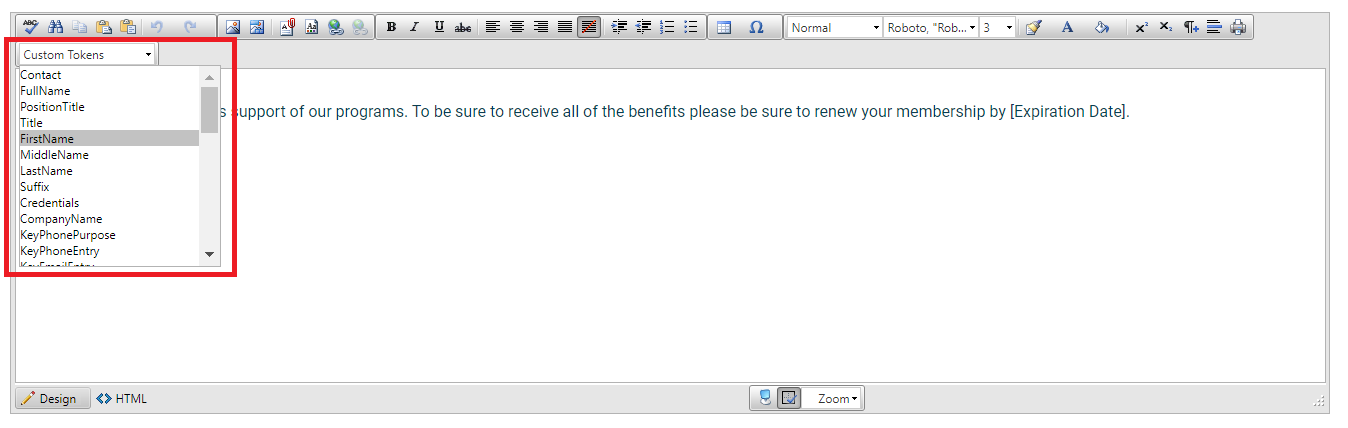
First make sure you are in Design mode, as tokens aren’t available in HTML mode. Then place your cursor where the token belongs in the email body. Then select the token you need from the drop down menu. In the email product’s edit and view modes, tokens always have [ ] brackets around them in the body to distinguish them from regular text. Those brackets will not appear in the email when sent to recipients, they and the token will be replaced by actual data for that field.
For example, you could edit a salutation written as “Dear Member,” to use the member’s first name instead by replacing “Member” with the FirstName token.
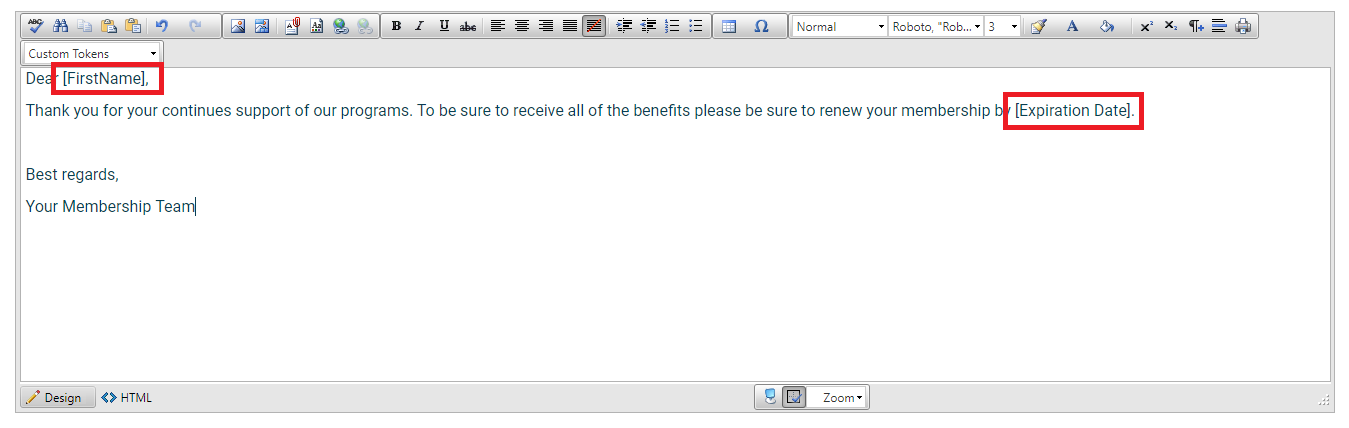
When the email is sent, it will use the data on file for the member’s first name. A recipient with the first name Helen will see “Dear Helen” at the beginning of the email. There is another token in the above example for the expiration date of the recipient’s membership. Use of this token allows you to send renewal requests as blast emails rather than one at a time. These are just two examples of the many options available to customize the email with tokens.
PLEASE NOTE: You cannot use square brackets “[ ]” anywhere else in the body of the email. They will be interpreted as tokens and fail during parsing. If you test your email and never receive the test, it is most likely because you have square brackets in the body that are not tokens of data from the database.
When you are finished creating or modifying the email body, click on one of the blue “Save” buttons, and the page will reload in view mode, which is discussed next in this section. Clicking on “Save” does not send the email to anyone. If you wish to start over completely, click the blue “Delete” button. This will delete the email no matter how many times it may have been saved. To discard changes and return to the last saved status click the blue “Cancel” button.
Once you have hit the blue “Save” button the page will reload in View mode so you can review your work before sending the blast email. This View page can also be accessed via the output landing page grid when you click on the  magnifying glass icon found to the far left in the row of the output product you want to see. The View page for our sample blast email is in the next screen shot.
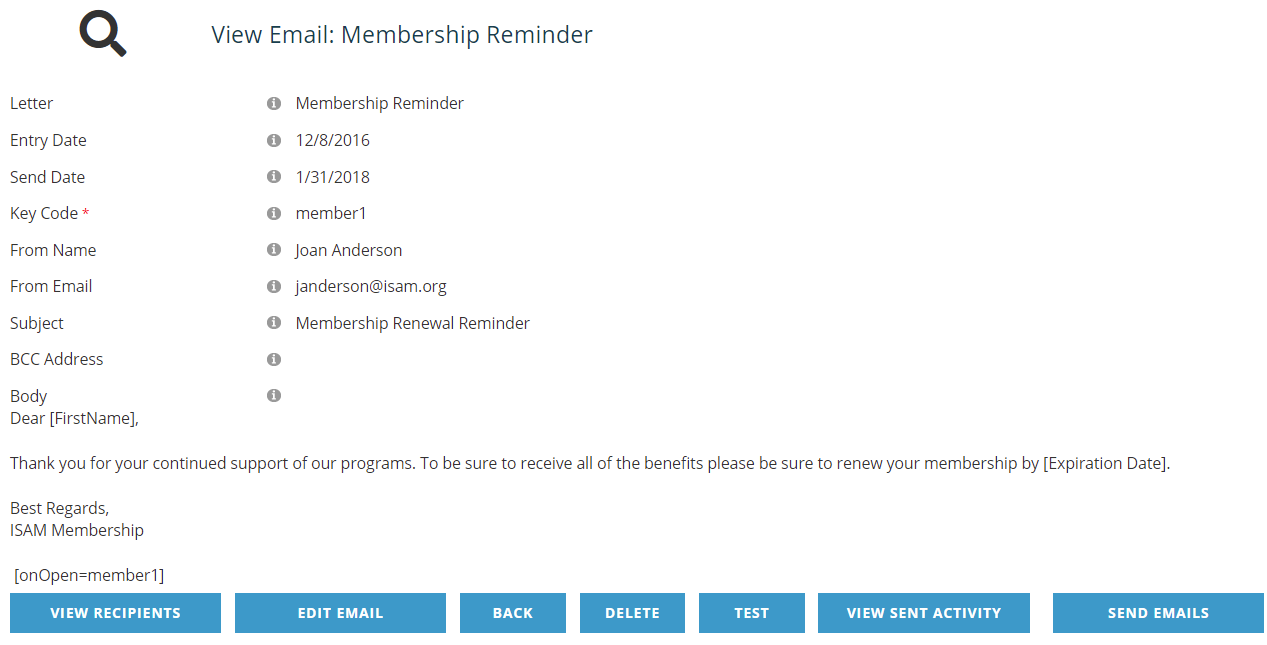
Note that the email Body is not filtered through an email reader in View mode, but you can review the content for potential errors. The Test function described later in this section will allow you to see the email body exactly as it will appear to the recipients.
The blue “View Recipients” button lets you view a grid of the records pulled when you ran the job, and these contacts will be the recipients of your email. After the email has been sent out you can still use this function to see who received it. You should always click “View Recipients” before sending the blast email to check the records for potential issues. There is a count of the records at the bottom right of the resulting grid where you can make sure it matches the number you got when you ran the job. Or for example, if you didn’t include Library Card criteria to eliminate records without an email address, you could catch that and other problematic issues before it’s too late. A sample grid of recipients is in the next screen shot.

This view opens in a separate tab in your browser, and there are more fields than will fit in one screen, so those seen above are the first of many that can be viewed by using the scroll bar at the bottom of the screen. The fields available are dependent upon the Category and Query you set for your email.
Immediately below each of the column headings are filter boxes. These allow you to further filter the list, but for viewing purposes only. This process does not prevent any records from receiving the blast email. You may enter a value in the white text box at the top of the column and click on the funnel icon to the right of the box to restrict the list to your value. This approach is useful when you are viewing a lot of records. You may need to make sure a particular contact was included. For example, you can enter the value “Post” in the white box below the Last Name column header, click on the funnel and select “Contains” to see if any records with that last name were included. You can also use this view to scan the list to make sure that the criteria are properly defined for the Library Card. For example, in the sample view above, there are records that are not check marked as “OK to Broadcast”, which is the setting that allows contacts to opt out of blast emails. At a glance, one could catch this oversight and correct it before sending the email.
In this view you may also group the records by any of the columns. Click on the column header you wish to group by, then drag the header towards the narrow bar at the top of the grid and drop it when black placement arrows appear to the left of the reminder message to “Drag a column header and drop it here to group by that column”. For example, you could group the records by Member Type when that field is part of the view. The groups appear in ascending alphanumeric order, and this order can be reversed to descending by clicking on the up arrow to the right of the field name you dragged to the top of the bar, which is highlighted in this screen grab. 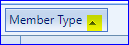 To reverse the grouping, hover over that same field name box in the top bar, and when you see a popup box that says “Drag out of the bar to ungroup”, click and drag the field name down to any location in the main grid view and then unclick.
To close out the view of results, close the tab it appears on in your browser. The email output page will still be open in a separate tab if you haven’t closed it.
There are several other blue buttons on the email output page.

The blue “Edit Email” button switches the page to edit mode for the email output currently on view.
The blue “Back” button returns you to the Output landing page for the Library Card in use.
The blue “Delete” button only deletes this particular email output product. The Library Card remains intact as is, as well as any other output for that card. If you want to remove an email output that has been used to send any blast email, we recommend retiring it instead of deleting it. Use the “Retired” check box in Edit mode, described earlier in this section, to remove it from both the output grid and the email letter drop down menu. You can unretire it in the future if you need to see what was sent or if you want to use it again. We recommend you only delete email output products that were created in error.
You can click on the blue “Test” button to test your email before sending it to all recipients. For this test function, the system uses the first five records pulled when you ran the job for the Library Card and sends you (the current logged in user) five emails that have the data inserted for any tokens, even if you are not the “From” email sender. You can open each of the emails to see how they look and forward any of the test emails to staff who need to see the email before it is sent.
The blue “View Sent Activity” button is used to see when this email has been sent to the recipients of this Library Card. It will show the date, the user who sent the email, and the number of emails sent. Since the criteria of the Library Card as well as the number of people matching the criteria can change, this number may vary between instances.
When you are certain that your email is ready to send, click on the blue “Send Emails” button. You will be asked to confirm before any emails are sent.
Every email sent by the AMS is stored on the recipient contact’s profile, including blast emails from the Reporter, under the Email History tab. Any attachments sent with the original email are included. If you need to find out whether a particular contact received a particular blast email, this approach can take less time than using the Reporter’s “View Recipients” function.
More information on Email History can be found in the Contact Profiles chapter of this guide.