
The Program Codes tab lets you view, edit and add as many program codes, also known as HotKeys, as needed for the selected event. This section will cover the program codes fields that are relevant to conferences and individual events. Any other fields will be covered in the Money Dictionary chapter of this guide. But let’s remember that program codes represent a complete set of business rules on the processing of entitlements and purchase transactions. They link price codes to the general ledger in accounting, trigger letters of acknowledgement and create meeting materials.
Program codes are required for any meeting or event which requires registration and/or payment, whether the meeting is a complex conference, a series of related events that take place over time like workshops, or a single event. All of the program codes function in the same way for each of those scenarios. We will explore program codes in this section beginning with the more complex example, a sample annual meeting, and make note as to where there are differences for other events. For those clients that use their own conference setup rather than the Conference Module, know that the basic concepts and field descriptions below hold true for your association except when noted.
For those associations using the Conference Module, Conference Program Codes are specific to Meetings made up of multiple events. The meeting and its events must be created before program codes are created for any of those events, including the registration event. Registration event program codes must be created before registration can be opened.
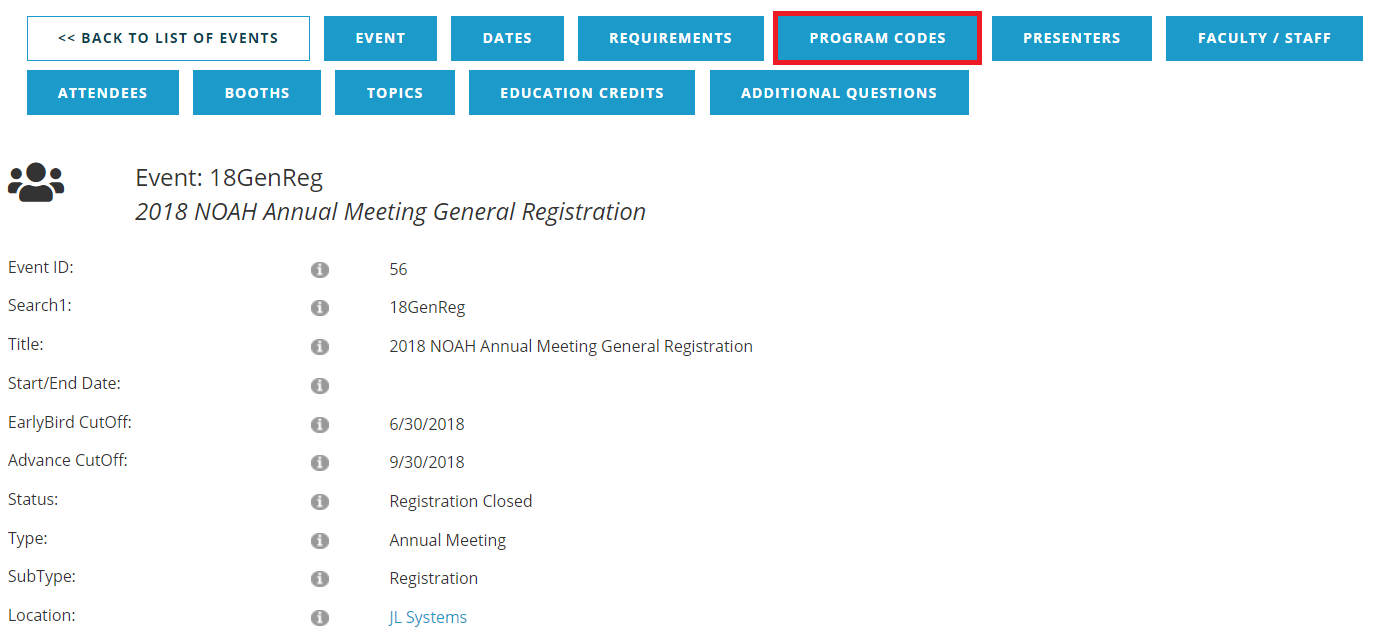
There is more than one way to access program codes in the system, but when dealing with an event’s program codes it is best to access them directly from the event in this tab. From the meeting’s events list, select the event for which you want to add or edit program codes. We will start with our sample annual meeting’s registration event.
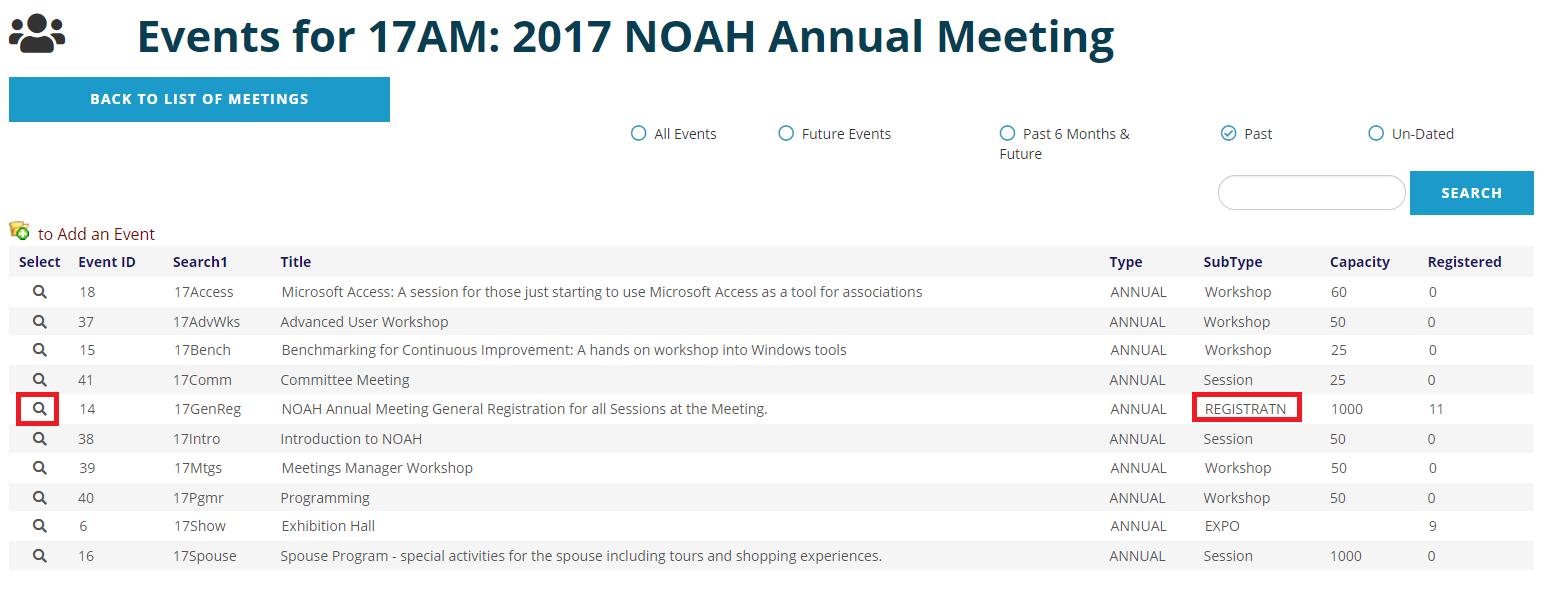
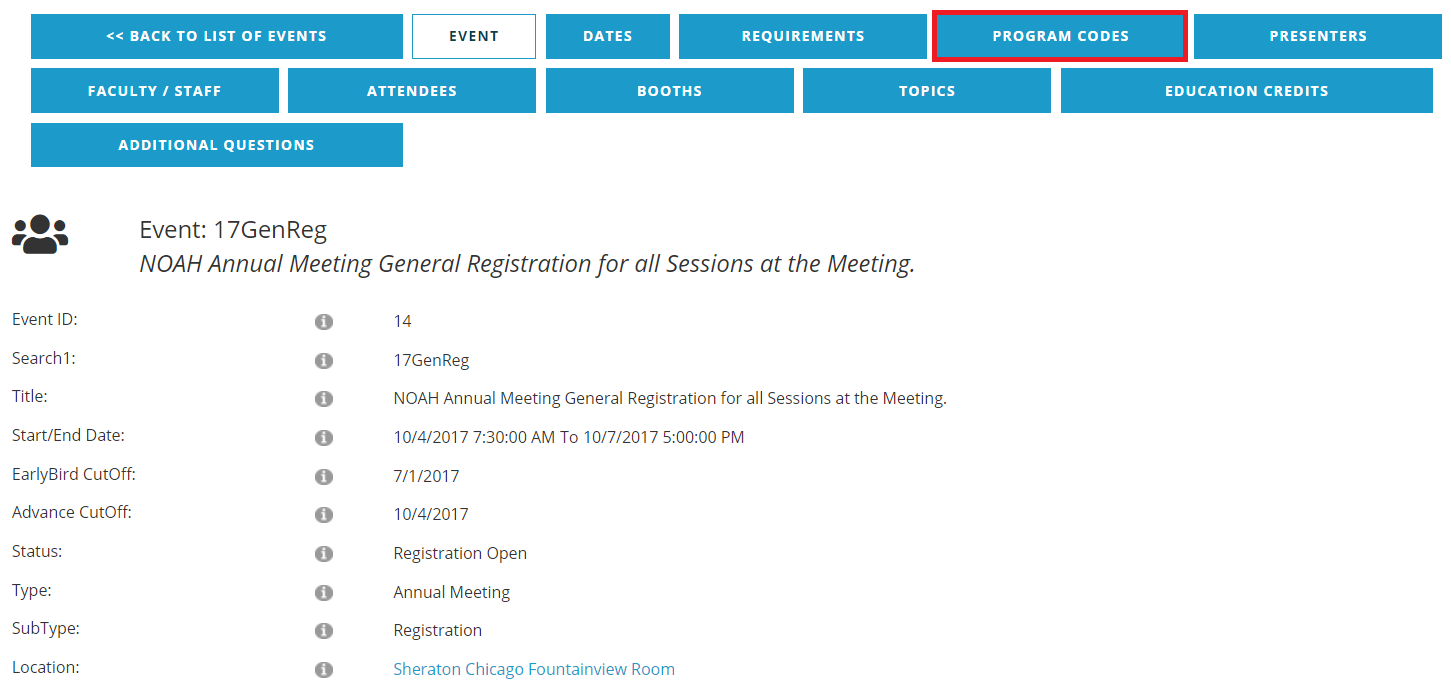
Then click on the Program Codes tab, as seen in the next screen shot.
You will then see the grid of program codes for selected event.
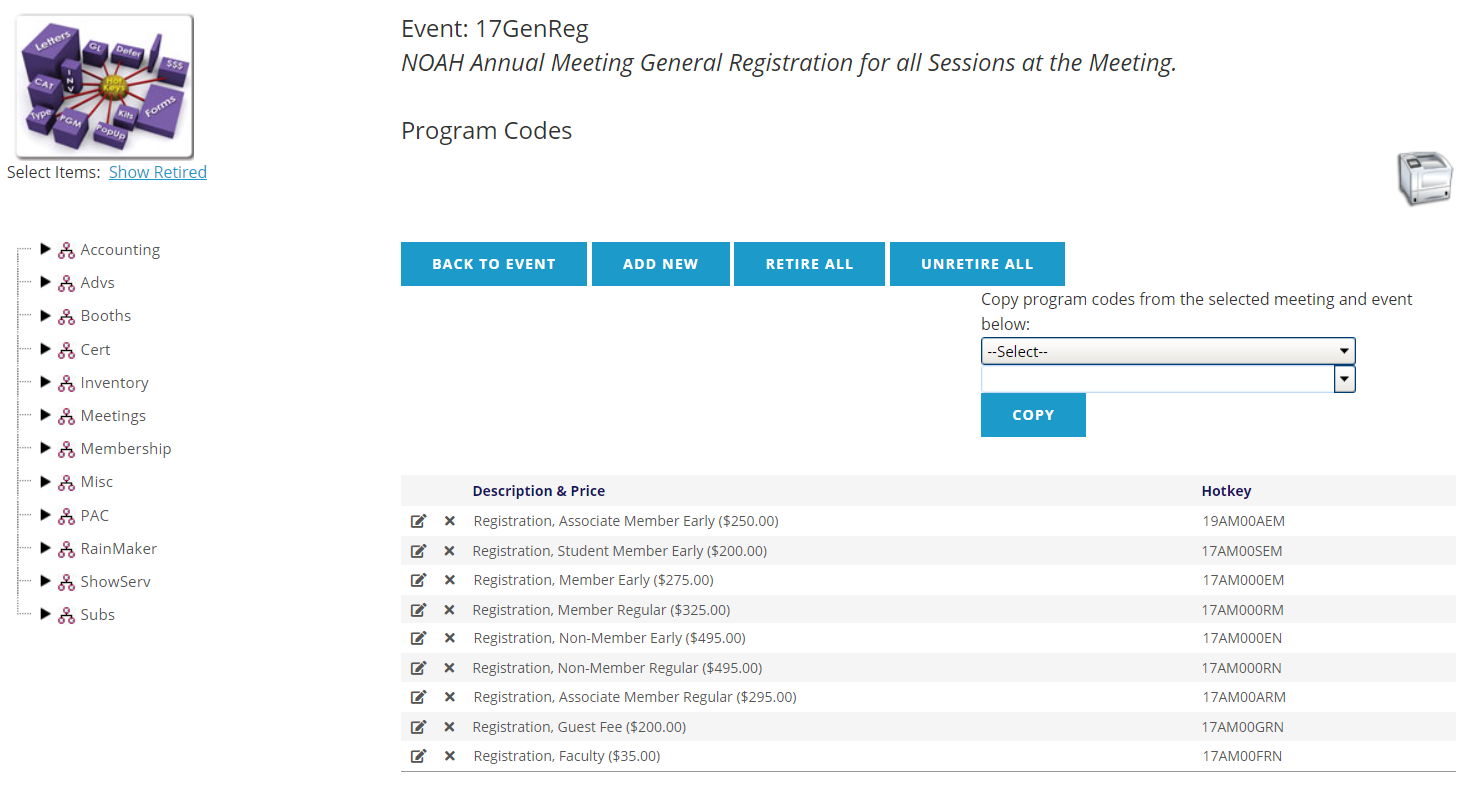
The tab menu goes away, as you have technically been taken to the Money Dictionary where all program codes live, but getting there via the event is the best approach.
You can use the blue Back to Event button towards the top of this screen to get back to the event page and all of its tabs. Click the blue Add New button to add a new program code.
The blue Retire All and UnRetire All buttons are unique to the event view into program codes. AMS users are trained to retire all of the program codes for a meeting or event after it has taken place so that staff do not accidentally use those program codes for a different meeting. These buttons allow you to quickly retire them all, or if a mistake has been made, you can un-retire them all.
You can click on the  printer icon seen above and to the right of the program code grid to view the standard Program Code Reports.
In this view, you can also see the grid that displays each program code’s Description & Price and HotKey, and can access Edit and Delete functions.
Program Code data fields can be viewed and edited by clicking on the  edit icon. The view in the following screen shot is the same for both viewing and editing an existing program code, and for the Add New function.
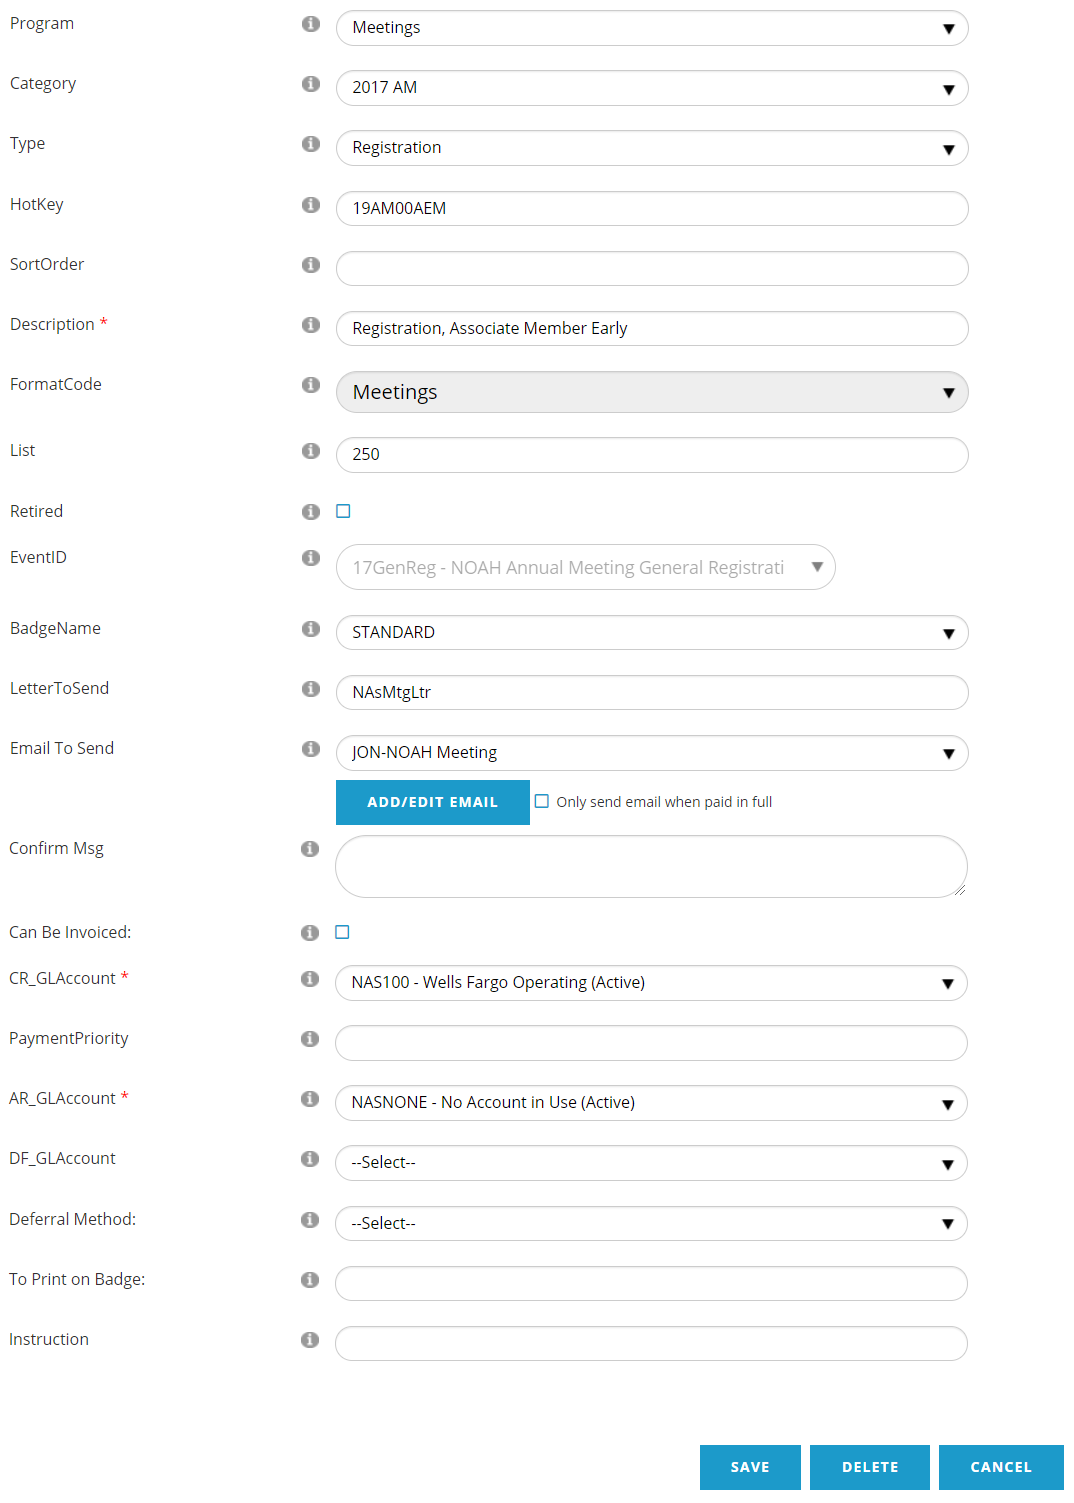
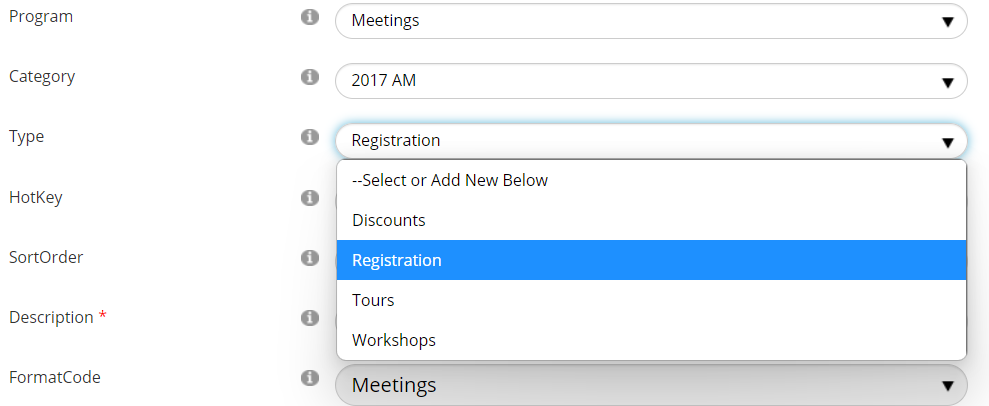
As is the case with all Program Codes, Program, Category and Type are used to create the display tree for locating each program code when adding it to the AMS shopping cart when staff create manual invoices. The only purpose of these fields is to create the display tree for organizing your program codes, and you can create each branch as you wish. A Client Admin can help you decide the best values for each branch, and can change or create new values.
Program is top level branch of the tree. It is typically the broadest category of fees, and often is the department or program area within the association. In our example we use Meetings for the Program.
Category is second level branch of the tree, underneath Program. It typically is set to the particular meeting or series of recurring events.
The Type field is the third level branch of the tree, underneath Program and Category. You can organize the program codes as you see fit under the Types that pertain to your meeting. Common choices are shown in the example below.
Conference Module HotKeys
The HotKey field is a text field and is the unique identifier for each program code. Each HotKey is comprised of up to 13 characters that determine what options are made available to those making purchases via your website, based on factors determined by your association as set up in your Dictionary and the data in your contact’s records. Each HotKey must be unique, so you should never duplicate a combination of characters that already exists anywhere in the AMS, not just in other meetings and events.
If you are using the Conference module for online registration, use the following rules for creating your HotKey values.
The first two characters of the HotKey should be the last two digits of the year in which the conference will take place. Since our sample event is a 2017 Annual Meeting, all HotKeys for this meeting begin with “17.”
For the next characters, anywhere from one to six of them are available according to your needs. But usually at least the next two are used to represent the meeting in a way that distinguishes it from others in the system. This is why in our example, the registration HotKeys all begin with “17AM”, where AM stands for Annual Meeting. One could alternatively use “17CONF” where CONF is used as an abbreviation for Conference, rather than an acronym approach. It is very important that staff understand your association’s use of these characters in order to consistently comply with them to prevent problems with your data, and to make them easier to copy for future meetings.
The last five characters of the HotKey are reserved for specific purposes and are read by the Conference module from right to left when it determines what registration options to display to the online registrant. Together, we set the exact pattern and values you will be using so that the module will know how to locate the exact fees to be displayed and charged based on the registrant’s individual data when you first begin using the Conference module.
Position 1 is the character at the end to the far right. This position is used to define whether the registrant is a member or a non-member of your association. So this character is usually either M or N. It is recommended that you create program codes for both cases, even if your fee is the same for members and non-members, so that status and sales reports will differentiate between the two categories. You would only omit non-member fees if non-members cannot register to the particular event.
Position 2 is the character second from the far right and is used to designate whether the registration is E for early, R for regular, or O for onsite. Some associations use L for late instead of O for onsite. If no early bird or onsite registration is needed, use R in this position in all program codes. Some associations use these identifiers even when the price is the same for all time periods, in cases when it is valuable to track such information for statistical or marketing purposes. If you have put a date in for early bird pricing for an event, be sure you have early bird and regular program codes. Otherwise, when you are in the date range set for early bird and there are no codes with that E, registration will appear to be closed.
Position 3 is the character third from the far right and is most often used for Member Type when pricing is determined based on the particular member types in your organization. For example, R for Regular, E for Emeritus, and S for Student.
Positions 4 is the character fourth from the far right and varies from one association to another as it is used to cover any other needed grouping distinctions. For example, in cases where registrants are able to purchase certain days of a conference rather than the whole schedule, this field could be used to indicate how many or which days have been purchased.
Position 5 is the character fifth from the far right is open for customization and its use will depend on what your particular association has defined.
Many associations use just the first two or three positions, but don’t skip any of the five positions for Conference HotKeys. Use a zero (0) in any of these positions that go unused so that the HotKey format stays intact. This approach gives you the flexibility to make changes in future years in the most efficient way possible. The system allows you to copy program codes and edit them, and that feature is particularly relevant for annual meetings and conferences. Establishing all five HotKey positions from the beginning of their use is critical for future needs. There is more information on this copy feature later in this section.
Clients tend to have this setup in a custom manner to support a variety of pricing options. Note that the Conference module will be looking for the same HotKey patterns every year/event and you must the similar HotKey for the module to function correctly. To ignore the position value, use a 0 (zero) in it's place; so if you have an X or Y in position 5 for one event, and for the next event you want to ignore that difference, create the HotKeys with a 0 (zero) in position 5.
Event HotKeys
The HotKey patterns for single events follow a less rigid format than those in Conference. The Events module is used to present events in either a dashboard or calendar format, and processes registration through its own page. Examples of single events are education courses, webinars, networking events and board meetings. The main determination of a single event is that it is a single gathering or occurrence, versus a conference that has an itinerary of events.
The HotKey field is a text field and is the unique identifier for each program code comprised of up to 13 characters, though it is common to need fewer than 13 characters for single events. The HotKey will determine what pricing options are made available to those registering to the event. The patterns are based on factors determined by your association as set up during your configuration and the data in your registrant’s records. As part of the setup of your HotKey pattern was configured based on the expected pricing options that could occur across all future events. As your configuration needs change, if you need more pricing options then we must re-configure your HotKey pattern with you.
Each HotKey must be unique, so you should never duplicate a combination of characters that already exists anywhere in the AMS, not just in other meetings and events. The rules that follow demonstrate the typical configuration for single events and best practices for HotKeys, while your association’s current configuration may differ.
The first two characters of the HotKey should be the last two digits of the year in which the event or series of events will take place. For example, if a Legislative Day is taking place in 2018, “18” should be the first two digits of all of that event’s HotKeys. If a workshop is one in a series that takes place throughout the calendar year 2017, the HotKeys for the event should start with “17.”
You can then use the next few characters to differentiate between types of events. Try to use as few as you can to save room for the pricing options that follow. Examples to use are “LG” for Legislative Day, “01NL” for January’s Networking Lunch or “0110LW” for January 10th’s Live Webinar.
The last two to three characters of the HotKey pattern are reserved for the pricing options you offer. Not all events have to offer all of the pricing options available, you need only create program codes and HotKeys for the exact options available for the specific event with which you are working. These characters are programmed into your configuration, which may differ from the examples that follow, and require our modification if they need to change.
The first character of the two is always the character second from the end. This position is used to define the pricing in effect the day that the person is registering. The system supports up to three time ranges by default, which are typically called Early Bird, Regular or Advance, and Late or Onsite. Thus the values in this position are typically E, R and O.
The last character at the end is used to specify the membership type when an event’s pricing varies by membership type. Even if the price is the same for members and non-members, we recommend creating a program code for each case so that you can get quick counts of each from the event registration reports. If non-members cannot attend the specific event, then do not create a program code for that category.
If your pricing is simply member/non-member, then the final position will be either an M (Member) or an N (Non-member).
If you need to differentiate the pricing of an event by specific member types, we will together come up with a list of values that correspond to your Membership Dictionary. Examples would be P for Professional, S for Student, R for Retired, and so on. We can also use numbers when letters would be duplicated or confusing. If you have compound values in your membership types, such as M1, M2 and M3, we can use two characters to differentiate the pricing, leaving one less HotKey position for your use.
Once we have configured the pricing rules above, they can then be used based on the pricing of the specific event with which you are working. If the particular event is simply Member/Non-Member, then you would use an N or M at the end. Then if another one is by member type, you would specify the alpha-numeric value for each member type. The main thing is to configure the AMS for all possible pricing options, then each event uses only those that are valid for the event.
The following are examples you might create based on the standard setup described above:
Or if the event has specific member type pricing:
Sort Order is a text field that lets you order the program codes in the tree within the same Type.
The Description field is a required text field. Enter a meaningful but short description of the item pertaining to the program code here. This will be used by the shopping cart and will appear on all invoices. Some examples of meeting registration descriptions are:
Registration, Member Early Bird
2022 Annual Meeting Registration, Member Early Bird
Member Registration, Early Bird
2022 Annual Meeting Member Registration, Early Bird
Format Code is a drop down field that will default to the selection of “Meetings” when the option to Add New program code has been selected from within a meeting or its event. Note that this is a field that cannot be edited after its program code has been created, so when you are adding a new program code for a meeting or event it’s a good idea to check this field and make sure “Meetings” has been selected. More information on Format Codes can be found in the Money chapter of this guide.
The List code field is a numerical field where you enter the price that corresponds to the program code. Enter the numbers for the price with no commas or dollar signs. You do not need to use decimal places unless the price includes cents.
If a member contacts you because they aren’t being given the correct registration price on the website for their membership status, make sure their contact record in the AMS has the correct membership folder, and that it is the same account that they are using to login and register online.
The Retired check box is used when you no longer wish to use the selected program code with new transactions. Program codes can be unretired if you need to activate them, and can still be used on an invoice created manually by staff. There is more information on this in the Money chapter of this Guide, but in any case, retiring and un-retiring program codes should be done in consultation with a Client Admin.
The EventID field is hard coded and cannot be changed here, as you have selected an event already to access the program codes tab. To verify which event you are working on, look for the event ID above all of the program code fields.
Badge Name is a drop down field used to specify the type of badge you wish to create based on the registration fee. The AMS includes a badge designer for you to create badges, refer to the Meetings Dictionary chapter of the user guide for more info. Examples of types of badges are Standard, Speaker, Exhibitor, Sponsor and Guest, as seen in the next screen shot.
Letter to Send is used when confirmation letters are generated and sent to registrants as a batch process. This functionality is setup in conjunction with the development of the confirmation letter if used by your association. The specific letter code used for meetings is then entered in this field.
Email to Send is an optional drop down field that allows you to select from a list of email messages so that anyone that makes a purchase with this program code will be sent a registration confirmation immediately upon checkout. While a receipt for the transaction is automatically generated and sent to the Bill to recipient (the person logged in), the email selected within the program code is sent to each person registered in the transaction.
This is especially useful in cases when one person on your staff, or one of your members, processes and pays for multiple registrations. The registrants, who wouldn’t otherwise know they have been registered, can get the email you selected within the program code.
The blue Add/Edit Email button allows you to edit the email that you selected in the Email to Send field, or add one if an email that you need isn’t otherwise available. The next screen shot shows you the view once this button is clicked, but the fields and functionality are described in the Program Codes - Email to Send section of the Money section of this knowledge base.
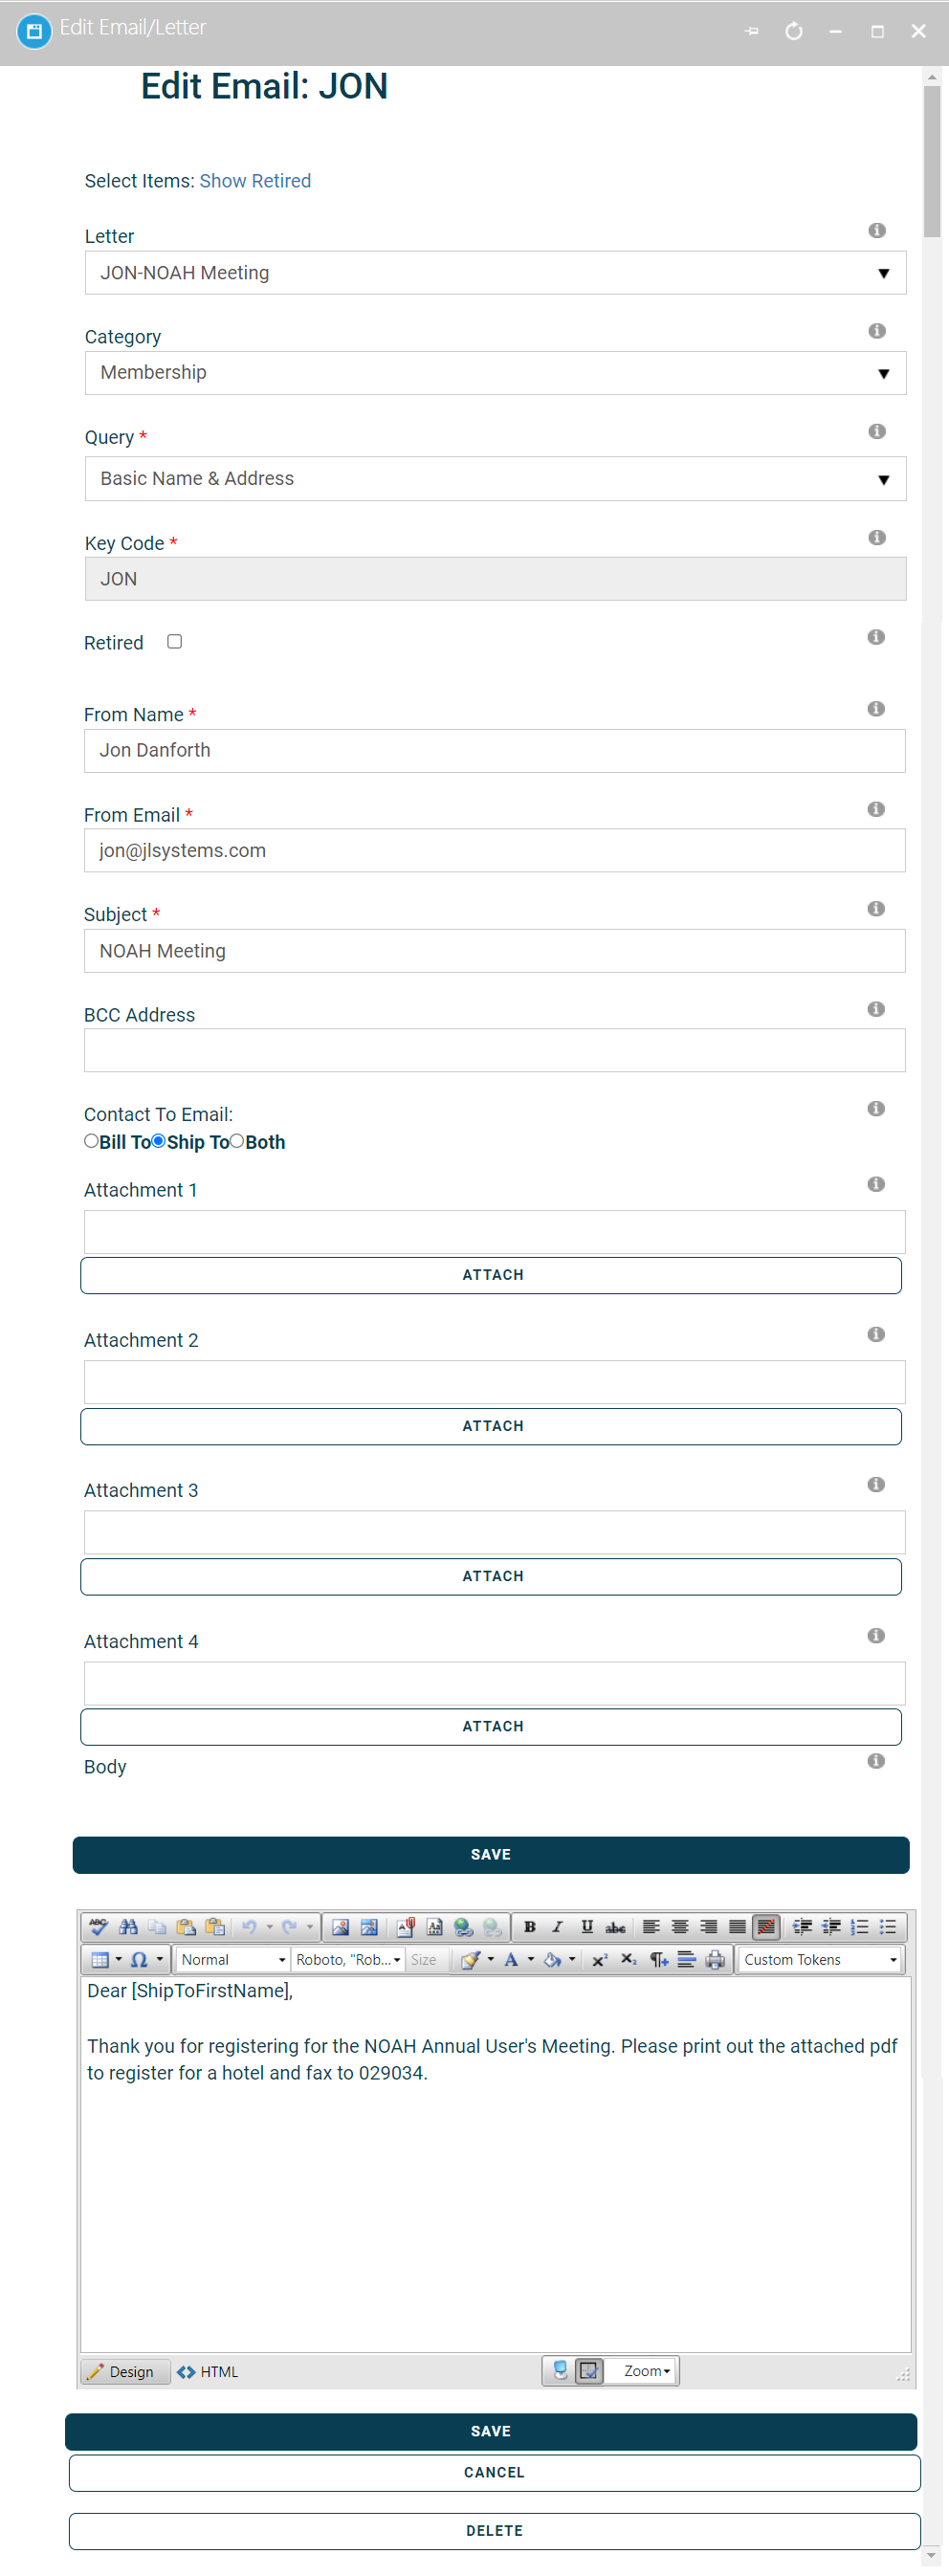
Next to the Add/Edit Email button in the program code fields there is a check box to Only send email when paid in full and checking this box does exactly that. It keeps a confirmation email, usually meant for those who are fully registered, from being sent when any amount of money is still owed for registration. Once full payment is received, this email is automatically sent by the system to each registrant whether the final payment is made online or processed by staff.
Confirm Message is a text field. Any text typed into this field will show up as is on the shopping cart invoice upon checkout. The formatting for this field is set in the system email for shopping cart emails and should only be changed by a Client Admin. Use of the enter key in this field is not recognized when the text is displayed on the invoice.
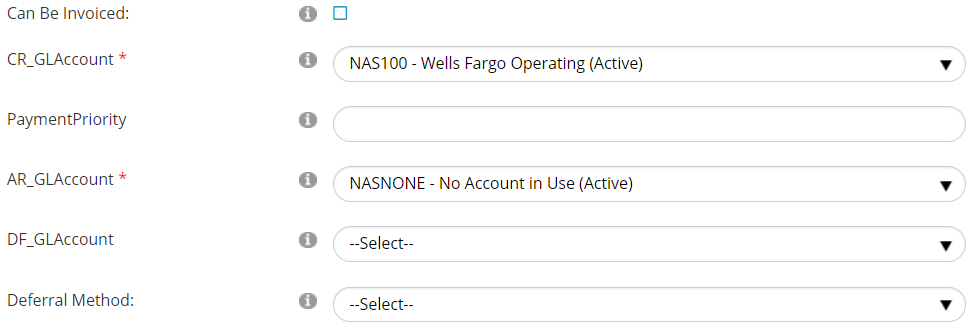
Can Be Invoiced is a box that when checked allows the registrant that purchases the registration linked to this particular program code to invoice themselves rather than pay up front. If immediate payment is required make sure this box is unchecked.
The CR_GL Account, Payment Priority, AR_GL Account and Deferral Method fields are based on your association’s financial rules. Those that are authorized to set up and select these fields can find more information on them in the Program Codes section of the Money chapter.
To Print on Badge is a text field. Any text typed here will print as is on badges that are set up to include the data in this field. Your association can use this field to print customized text on the badges worn by anyone who registered via this program code. For example, for any of your program codes that correspond to early bird registrations, this field could be populated with the words “I got an Early Bird discount!” (Quotation marks are not required and will be printed on the badge if they are typed into this field.) Then each attendee who purchased an early bird registration would then have that sentence printed on their badge in order to help promote the availability of Early Bird discounts.
At the bottom of the screen are three blue buttons which allow you to Save, Delete or Cancel. Click the blue Save button to save changes or click the blue Cancel button if no changes are to be made, or changes are to be discarded. Clicking the Delete button will delete the entire program code if it has never been used.
COPYING PROGRAM CODES
It can take a lot of work to get event program codes figured out and entered into the system. The system gives you the option to Copy Program Codes from a prior event. This is very handy when an event occurs from one year to the next with identical or similar pricing structures as it saves you the trouble of creating every program code from scratch each year. You will still need to edit the copied program codes to change descriptions, fees, GL codes and anything else that may differ in the new event.
Let’s imagine that it is the year 2018 and our sample 2017 conference has already taken place. The time to open registration for the equivalent conference in 2018 is approaching, so someone on your staff has created a meeting for it in the AMS. Once a registration event has been created within that 2018 meeting, you can copy all of the 2017 registration event’s program codes into the 2018 registration event at one time.
From the 2018 registrations event’s main screen, (not the 2017 event’s main screen!) select the Program Codes tab.
Above the right side of the program codes grid you will see Copy program codes from the selected event below: above two drop down fields. Click in the upper field first, and select the meeting that has the program codes to be copied. In our sample case, we want to copy codes from 17AM-2017 NOAH Annual Meeting for our 2018 NOAH Annual Meeting
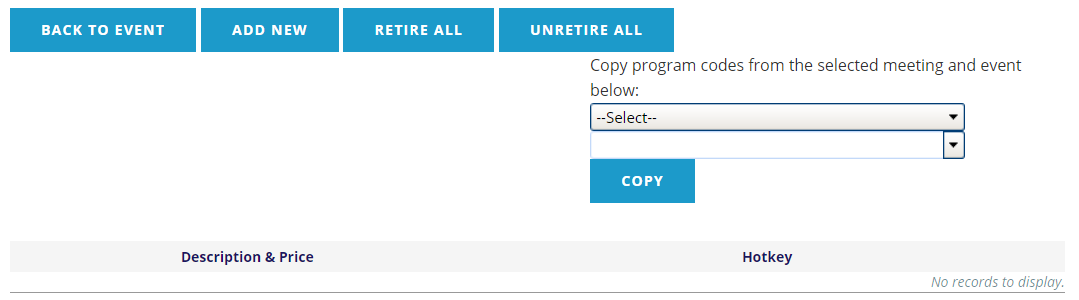
Then in the next drop down field, you will be given a list of the events that are part of the meeting you just selected. In this case we will select “17GenReg” since we want to copy the registration program codes used in 2017 and edit them for use in 2018.
Once you have selected both the Meeting and its Event that contains the Program Codes you wish to copy, click on the blue Copy button under those drop down fields and the box seen in the next screen shot will appear.
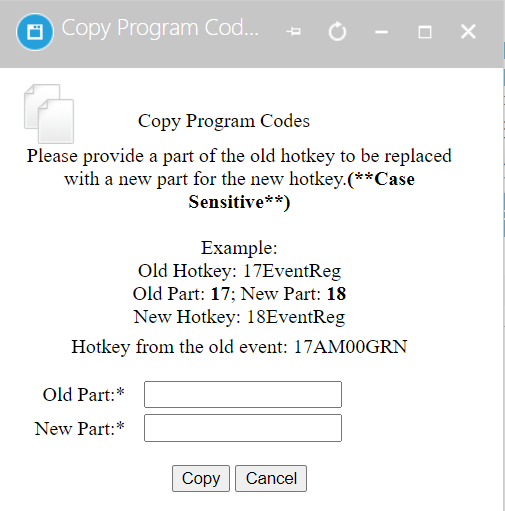
There are just two fillable fields here that are case sensitive. Old Part refers to the part of the old HotKey that needs to be replaced in order to work for the new event. In the sample case above, 17 has been entered in the Old Part field because the 2017 event HotKeys are being copied, and since they all begin with “17,” those digits should not be carried forward into the HotKeys for the 2018 event. The New Part field has been completed with “18” so that each 17 will be replaced with an 18. All the other characters in each HotKey will be unchanged by the system’s copying process. For example, “17AM00GRN” will become “18AM00GRN” when copied into the 2018 registration event’s program codes, and so forth for every other copied program code so that the new event follows the rule that each program code have a unique HotKey. Once the Old and New Part fields are properly filled out, select the blue “Copy” button to copy all of the selected event’s program codes. You can also click the blue “Cancel” button if you aren’t ready to complete the process. It can take some time for this function to complete, especially if there are a lot of program codes being copied. Do not click anywhere during this process, wait until it has finished.
Once all of the HotKeys have been copied over with the New Part included you can delete any of them that you no longer need and add any new ones, making sure they also start with 18. You can also edit the copied program codes on an individual basis to reflect price changes, modified descriptions, and any other updates. All these edits should be entered before registration is opened.
All HotKeys from the selected event will be copied over, whether they include the “Old Part” data you entered or not. Any HotKeys that happen to inadvertently lack the “Old Part” in our sample case would be copied, retaining the exact same pattern, without the update to begin with “18,” in the 2018 registration event and this will cause major data problems with the new event. Those that duplicate without any updates must be edited to be unique and, and in accordance with the new event’s HotKey patterns. In our sample case it would be wise to scan the list in the new 2018 registration event after completing the copy function, and edit any that do not begin with “18”. This approach also ensures that the same problem can be avoided when copying what are now the “new” program codes in the future.