
To add a new Event to an existing meeting, click on the  folder icon at the top left of the meeting grid. To edit an existing event click on the
 magnifying glass for that event, then click on the Edit button at the bottom of the page.
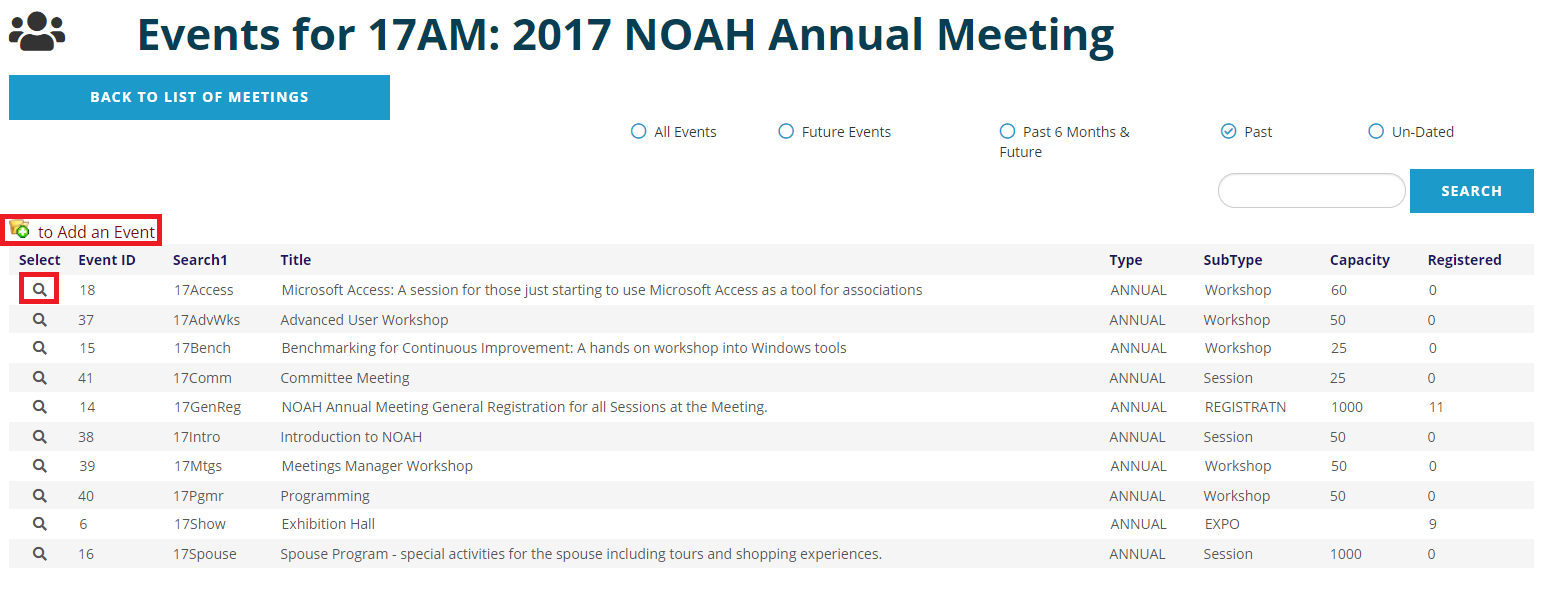
When creating or editing a selected event, the following screen will be displayed.
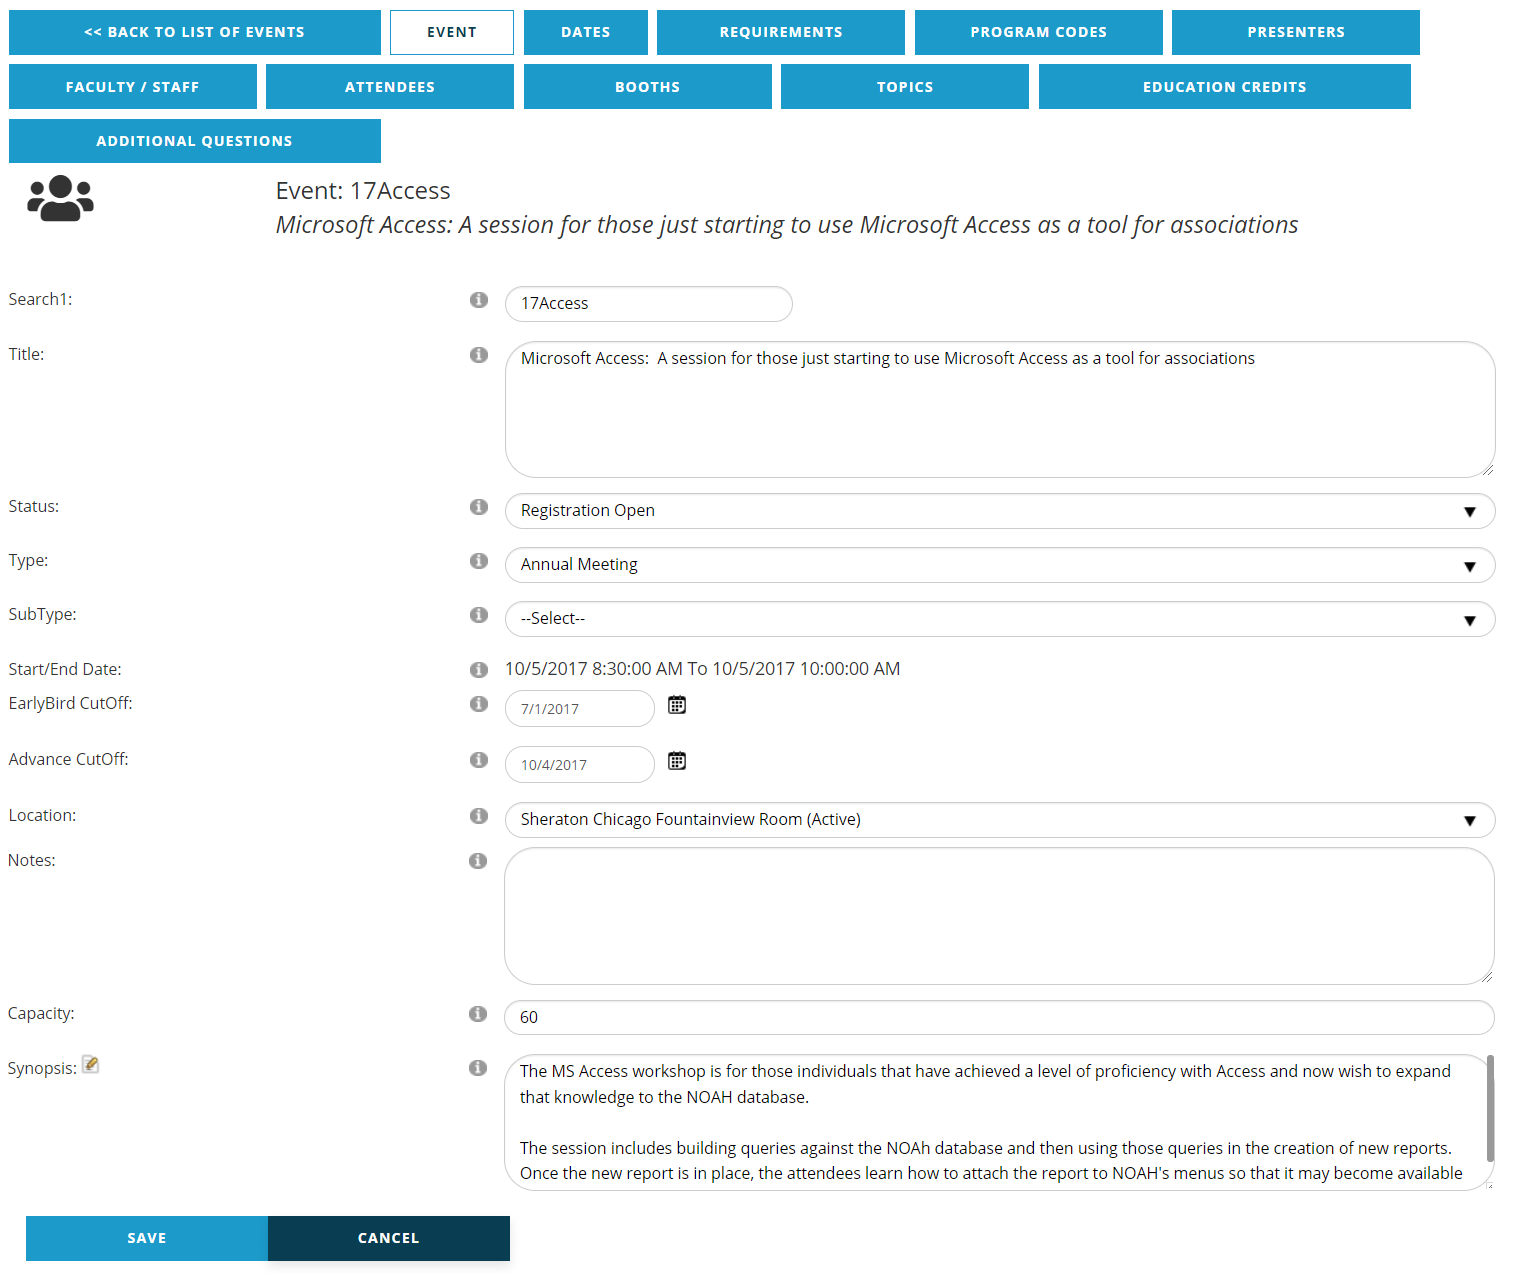
The Event ID will be assigned by NOAH. (Note that this field does not appear when you are adding a new event.)
Search1 is the 10 character Event Code which should always start with two numbers for the year of the event, followed by a brief alphanumeric sequence (with no spaces) that is a good abbreviation for the subject of the event. For example, to set up an Event Code for Session A of an Annual Meeting, use 15AM from the Meeting ID to start the code, followed by SESA to represent Session A. Session B for the same meeting should therefore have 15AMSESB as its Event Code, to consistently maintain the format.
In another example, if your 2016 Annual Conference has the Meeting ID 16AC, it works well to begin each Event Code with 16AC. The opening banquet could be assigned 16ACBANQ. The ninth seminar at the conference could have 16ACSEM09 for its Event Code.
The Title is a field for the official public title of the event. It should be words rather than abbreviations, as it usually gets displayed on the website with registration information. Continuing the examples from Event Codes, the banquet could have the title 2016 Annual Conference Opening Banquet. Title can be more descriptive, as your attendees will see it in multiple places.
Start/End Date field lists the dates and times the actual event will begin and end, per the data from the Dates tab, which will be covered later in this chapter. If the dates are not completed, you may proceed and come back later to view this field once data from the Dates tab is available.
The Early Bird CutOff and Advance CutOff date fields are relative to fees for an event, not when the actual event happens. One is optional and one is required. Note that the availability of these fields allows for a greater degree of customization on your end to suit your association’s needs. These fields can be used in different combinations for each of your events to allow for further flexibility.
It is imperative that these fields be set up prior to beginning Registration. Note that these fields can be different for other events within the same meeting. For example, if there is a Site Visit, Tour or Performance event you may elect to have different discount and/or registration deadlines than general registration as needed.
Early Bird CutOff is a date field for Early Bird discounts. If you offer an Early Bird rate, enter the date in this field that is the last date the discount is available. When properly set up via program codes, this field will determine when to automatically change the price to be charged at various dates during registration. The price will change as of midnight Eastern Standard Time after the Early Bird date has expired. If you do NOT want to offer an Early Bird rate, enter a date that is already in the past. DO NOT LEAVE THIS FIELD BLANK.
Advance CutOff is a required date field that serves one or two purposes depending on how you price an event. If an Early Bird discount is associated with the same event, this field can correspond with the 2nd price point. But whether you offer Early Bird pricing or not, the date for this field should always be set for a second and important purpose, to cut off online registrations on your website. This date is usually very close to the date the meeting is to take place so that you can switch from online to on-site registration. This prevents registrations from falling through the cracks as you move from your office to the event location.
In the example below, the Early Bird CutOff is on Jan 6, and the Advance CutOff is on Jan 20.
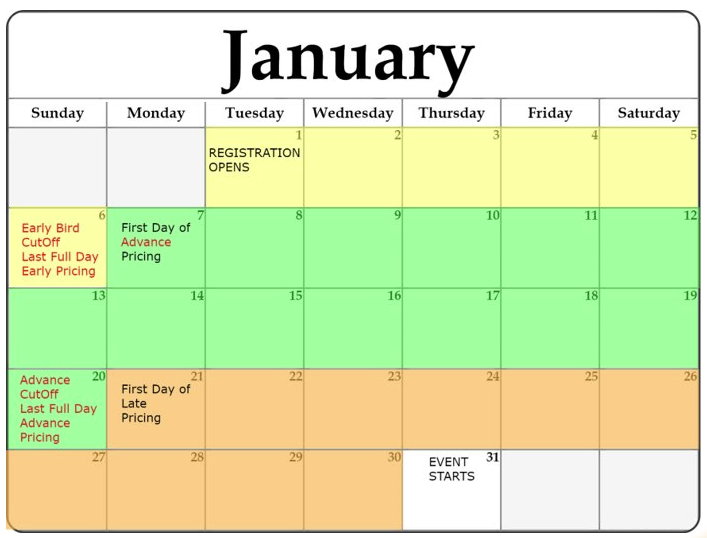
Anyone registering before the Early Bird CutOff date gets that rate. After that, they would get the Advance rate, until the Advance CutOff date. After that, they would get the Late pricing. How you refer to your rate isn't as important as the fact that there are 3 different pricing windows based on these 2 dates, before them, between them, and after them.
If you wish to offer a fourth price, such as a onsite registration rate, we can configure your registration to change the pricing rather than turn off online registration.
The Status field is where you designate whether the event is open or closed to online registration. This field has a drop down menu which lists the choices from the customized dictionary entries created on your end. Some example Statuses are Conference Held, Conference Cancelled, and Conference Wrap Up Completed. Two Statuses that must be created are Registration Closed and Registration Open, as the latter is required to activate registration on your website, and used in concert with the “On the Web” check box described elsewhere in this chapter.
The Type field is a parent, and its children are its SubTypes. For example, events within an annual meeting could each have the Type Annual Meeting, and then a SubType of General Session, Workshop, Luncheon, Site Visit, Social Event or Training Session, to name just a few.
Note that for any meeting that will have online conference registration, you must create a general registration event for the meeting with the SubType Registratn. You can only have one Registratn event, and it will drive all primary registration fees charged online.
If the meeting involves sponsorships, a sponsor event should be created.
For an exhibit hall, a separate Exposition event must be created to track booth sales and personnel. There will be more information on the booth dashboard in the Booth tab section of this chapter.
For a series of events, such as training courses of a given series over the course of a calendar year, you might create a Type and Subtype of Training Courses/CEU Courses, or Training Courses/Online Webinars.
Location is a drop down field customized through the Meeting Dictionary and should be populated whether the event has a physical location or takes place on the phone or online. For meetings with multiple events you can identify a general location, like a hotel name for those meetings that allow registrants to choose which events they will attend. Or, the field can be further customized to allow a certain room to be assigned per event, such as “Ballroom 2” or “Room 301.” This approach is required when there are multiple events occurring simultaneously, and you have your attendees pre-select sessions they want to attend. It also comes in handy if you slot presentations and/or give credits for events attended. It also can work in concert with capacity limits as needed.
Room Size is available if you need to know the absolute maximum capacity of the room where the event will be held. It is an optional field for staff purposes only, and represents the total number of people allowed in the room.
The Notes field is where you can enter additional information about the event which can be displayed online and in program guides.
Capacity is where you can set a maximum number of participants allowed to register for the event as needed. Online registration will not allow registration beyond the number entered, but staff can override this in the AMS. If the Capacity is unlimited then leave this field blank, as entering zero would mean 0 capacity not allow any registrations to be processed.
The Synopsis box is an HTML editor so that the detail information for the event can be entered and show on your website when a user hovers over the event in dashboards and calendars. Click on the  edit icon next to Synopsis to add more descriptive information regarding the event’s content.
Optionally, you may see Optional URL. This is a URL that overrides the normal registration link. This can be directed to a landing page or another site.
Below all of these fields are the blue Save and Cancel buttons. Be sure to use Save if you’ve made any changes. Use Cancel if no changes have been made, or to discard any edits made.
The other Event tabs provide multiple options to further customize your event setup. Note that in the top left of the tabs menu there is a button to click to go Back to List of Events. This takes you back to the list of all events for the meeting you selected to view or edit.