
When you open the Matrix Editor, the top section of the screen is where you setup the Matrix (an evaluation or test) to go with an event. Generally, you would not create a new matrix, but clone an existing one and update it for your needs.
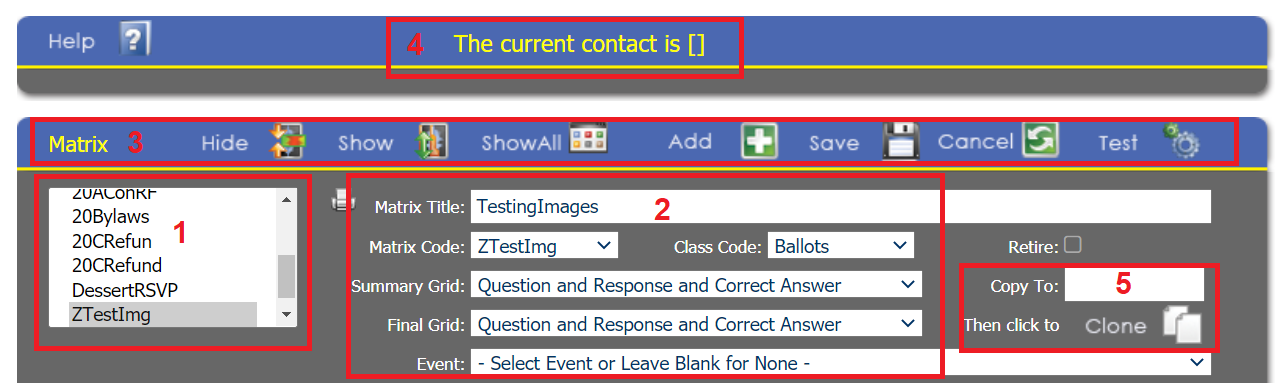
Several areas highlighted in the screen shot above a explained below.
In area 1, you will see all of your existing Matrixes. Clicking on one will show it's information to the right in area 2. Here you can view/update information about your Matrix:
- Matrix Title- This is the title of the Matrix and is typically similar to the event that it's tied with and if it's and evaluation or a post test.
- Matrix Code- This is the related code for this Matrix and can't be changed.
- Class Code- This is a code to classify this Matrix. Options are
- Ballots
- Exams & Quizes
- Exams & Quizes with grading hidden
- Guidelines
- Guidelines Preamble and Restart Point
- Surveys
- Summary Grid & Final Grid- define the display of the Matrix Grid (submitted questions and responses) and the options are:
- None- do not display a grid.
- Question and Response and Correct Answer- show the question, the user's response, and the correct answer.
- Question and Response and Correct/Wrong Discussion Text- show the question, the user's response, the correct answer, and extra explanatory text to be shown after the question has been answered. The actual text is set in the Matrix Information section.
- Question and Response- show the question, the user's response.
- Question Answer- show the question, and the correct answer.
- Event- The event that this Matrix is associated with. All Matrixes must be tied to an event.
The menu above in area 3 has several buttons, the significant ones are
- Save- saves your changes. NOTE: this only saves changes in this section about the Matrix. The sections beneath this have their own save buttons that must be used to save changes there.
- Cancel- discards any changes you've made here.
- Test- Opens a window to test this Matrix. It uses the contact highlighted in area 4, which is the current contact who's profile you have viewed.
Finally, area 5 is where you can clone and existing Matrix. In the Copy To field, you would enter the new Matrix Code, that you want to create a copy of from the currently selected Matrix. Click the Clone icon to start the copying process. NOTE: after cloning, you will still be on the Matrix you cloned from. Make sure you switch to the new Matrix you just cloned to make updates.
ZTestImg is the initial Matrix example that you can copy from to create your first Matrix.
When creating your Matrixes, you will want to have a naming scheme to follow for your Matrix Codes, similar to using the two digit year plus an identifier for a meeting (such as "21AM").