
The Report Wizard is the AMS's doorway to reports throughout the system. You view the report groups from the AMS Menu under options such as:
Meetings, Registration, Confirmation Letters
or from
Money, Financial Reporting, Accounts Receivable
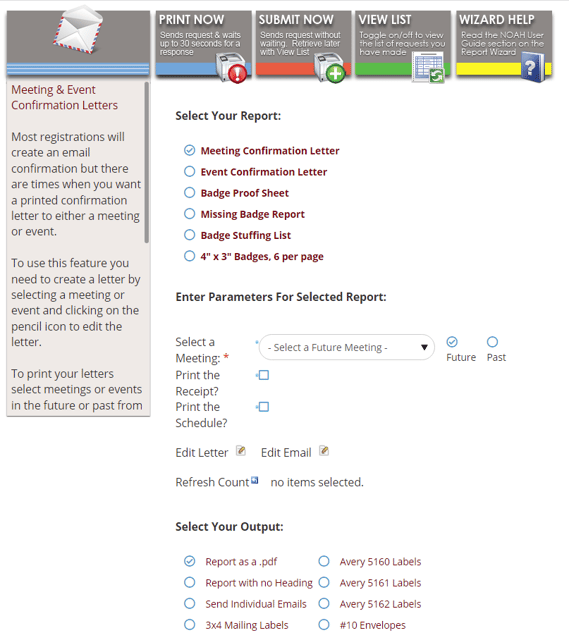
On the left side of the page there are two help panels. The top one is an icon that you can click to open the pages in the Reports help library that pertain to the reports available on this page. The text panel below the icon provides immediate help and some tips on how to use the page.

Across the top of the page are various printer buttons. The PRINT NOW button sends a request to the Report Distribution Server (RDS) via a job queue in the database. Multiple instances of RDS are running on a separate computer from the AMS and Website. One of the instances will pick up your request from the job queue and run your report, export and/or email. Because there are multiple copies of RDS running in parallel, your request is usually finished within 5-10 seconds. The AMS, however, will wait for up to 30 seconds for RDS to do its thing. NOTE: Because the RDS is shared across clients, performance can be impacted by large jobs submitted by multiple clients.

During the time the AMS is waiting, the PRINT NOW button will change to an animated RUNNING… button to let you know something is going on. The page will also have a light film over it to keep you from wandering off.
If the report is long running or there are a lot of jobs waiting in the system, you will time out on the wait and the system will release you to do other work.
The second printer button submits your request and immediately releases you to do other work. This is helpful when you want to submit a gaggle of reports before going to a meeting, lunch or home. It is also helpful when you need to run reports over and over with slight changes to the criteria. In response to clicking the button you will just get an immediate “submitted…” message with the job queue number.
Every requested output is saved on the system and is available to you to download. The list can get quite long. If your PRINT NOW times out, the report is still available on the VIEW LIST. If you use the SUBMIT NOW button, when you come back your requests will be on the VIEW LIST.
At any time you may click on the third printer button to view the history of your requests. The list is in reverse order with the most recent request on top. Click the button a second time to close the list.
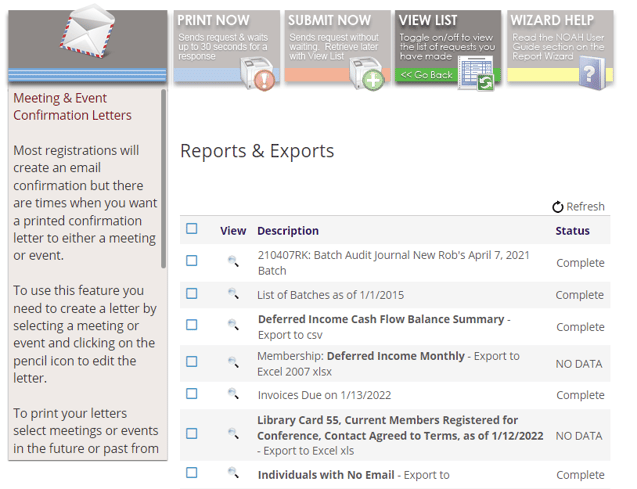
The column in the far right of the grid tells you the status of your request. Most common status codes are OPEN, NO DATA and COMPLETE. If you see a job staying OPEN much too long or see a status of ERROR, please contact support so we can check what is going on.
NOTE: If your job stays in OPEN, submitting it again won't make it run faster. Jobs are in a queue shared across clients and are processed in order of submission; submitting the same job over and over will just fill up the queue and slow processing for everyone.
To see a request, just click on the magnifying glass icon on the row you want. It will then pop-up on your screen. If the output is a MS Excel spreadsheet it may be intercepted by your local computer as being a dangerous document. MS Excel has the capability of holding computer code behind the spreadsheet and thus can be the carrier of a worm or virus. If you know and trust the source, you can hold down the crtl key to let your computer know it is okay to open the document. DO NOT do this with any document or source you do not know or trust. A virus can ruin your day; a worm can ruin your life.
To do some housekeeping and purge your list of old reports and exports that you either no longer need or that could be dangerous due to their old data, just check the box in the left column and click on the REFRESH icon. If you want to clear the list, check the box in the heading which will automatically then check every box in the list and click on the REFRESH icon.
You also can access your list of reports using the  button at the top of every screen.
The last button is the help button that brings up this section of this knowledge base.
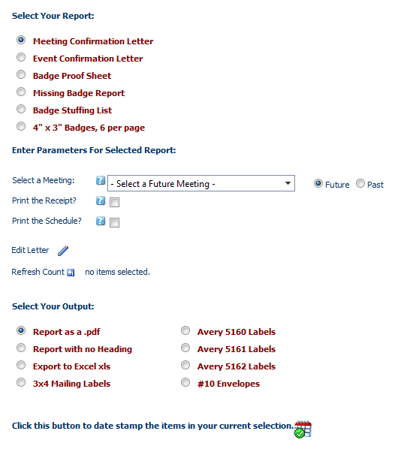 The middle of the page is the action area where you communicate your wishes to the report wizard. Most commonly the area contains a radio button list of output options. You may select any option but only one at a time.
Some options have parameters to be passed to RDS and used to filter the massive amount of data in the database down to just what you want to see.
If there is a letter involved then there will be a pencil icon to let you edit the text in the body of the letter to fit your needs. Letters usually have a list of data fields from your files that can be used to personalize the letter to the contact. We don’t do “Dear Member” letters anymore!
Most letters and emails will also give you a count of how many will be created. At any time you can click on the icon next to Refresh Count to update this count. Most of the time the AMS will refresh the count for you.
When working with reports the output option is usually just a Report as a .pdf. But if you are working with letters you may see many more options as shown in the example above. There are even more options such as .xls and .xlsx and Window Envelopes.
Some products are part of a series of products such as a series of Membership renewal letters. Others may be a small part of a larger body of products such as this week’s meeting confirmation letters for a registration that spans many weeks. To keep track of all this for you the system wants to know when you are finished with the work at hand. Since it cannot see your printer and doesn’t know if everything is cool, it wants you to send a signal when it is safe to close the batch.
The AMS closes the batch by writing an entry to each contact’s Date Stamps tab in their profile. You can see these date stamps there and to reprint, just delete the date stamp and run the report request again. Click the  calendar icon at the bottom to Date Stamp the currently selected batch after running the report and you are satisfied with the output.
Items that are associated with a purchase may alternatively be date stamped in sales history. So sometime you have to go to the Sales History tab in the contact’s profile to clear the date stamp.
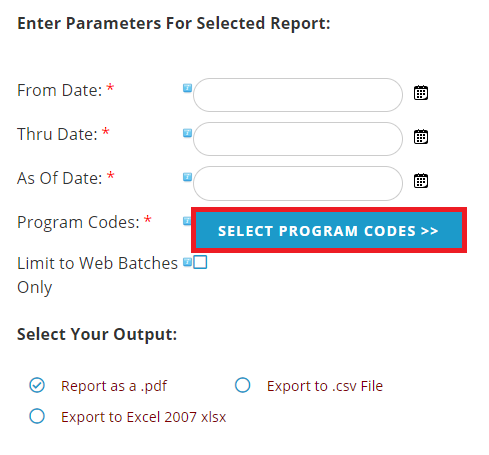
Some reports have extra pages to help you get to just the data you want. An example are the Sales History reports series under Money >> Financial Reporting. The Sales History by HotKey report lets you pick the exact sets of HotKeys for which you want to see sales.
To open the second page there is a button on the first page that says Select Program Codes >>. This opens a new page when you can select the specific HotKeys from your Program Code Tree. You will see options for Active or All (includes retired values) Program Codes.
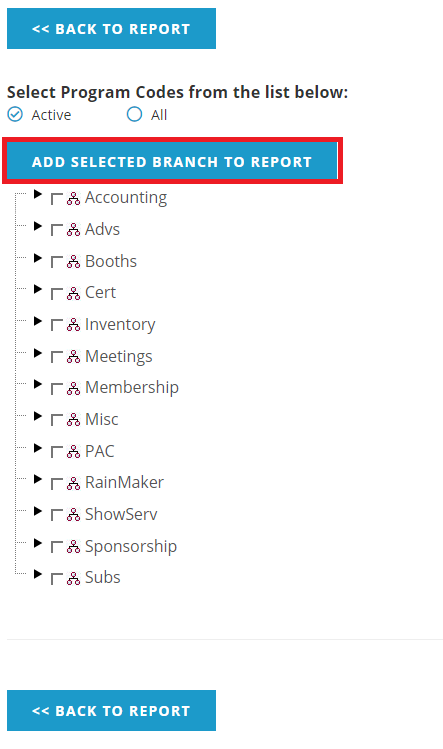
Once you have selected the desired options (i.e. HotKeys), click the Add Selected Branch to Report (NOTE: this step is commonly missed) which will show the select HotKeys in a table when you can use the  Delete icon to remove ones you don't want and a Clear the Selected HotKeys button if you want to make a different selection.
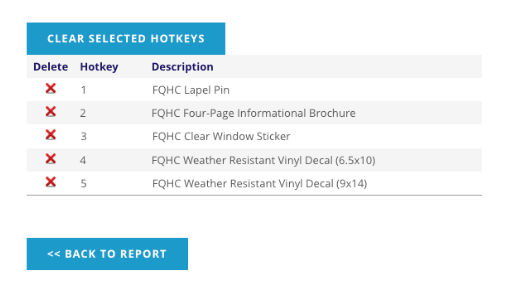
When done selecting, use the << Back to Report button to return to the initial report screen where you can submit the Report.