
 The Add Contact button above the Profile header invokes a wizard used to create a single, unlinked contact of any type. Use this wizard when adding an organization for which you will not also be adding linked individuals in the same process, or adding an individual that is not affiliated with any of your existing organization contacts.
If you wish to add a company and its linked individuals at the same time, proceed to the Add Company section.
If you wish to add an individual to an existing company, search for and select the desired company. Once selected, click on Employees under the Profile drop down menu, then refer to the Add Company section.
Remember that it’s always a good idea to run a search before adding a contact to see if it is already entered. A duplicate search will always be part of the save process for adding a contact, but it can save time to search for it first.
Once the Add Contact button has been clicked, the form to add a new contact then loads based on the configuration settings you have in place for this particular form, which are managed via the NOAH System Configuration module.
The following screen shot shows the fields that typically appear once Contact Type has been selected as Individual.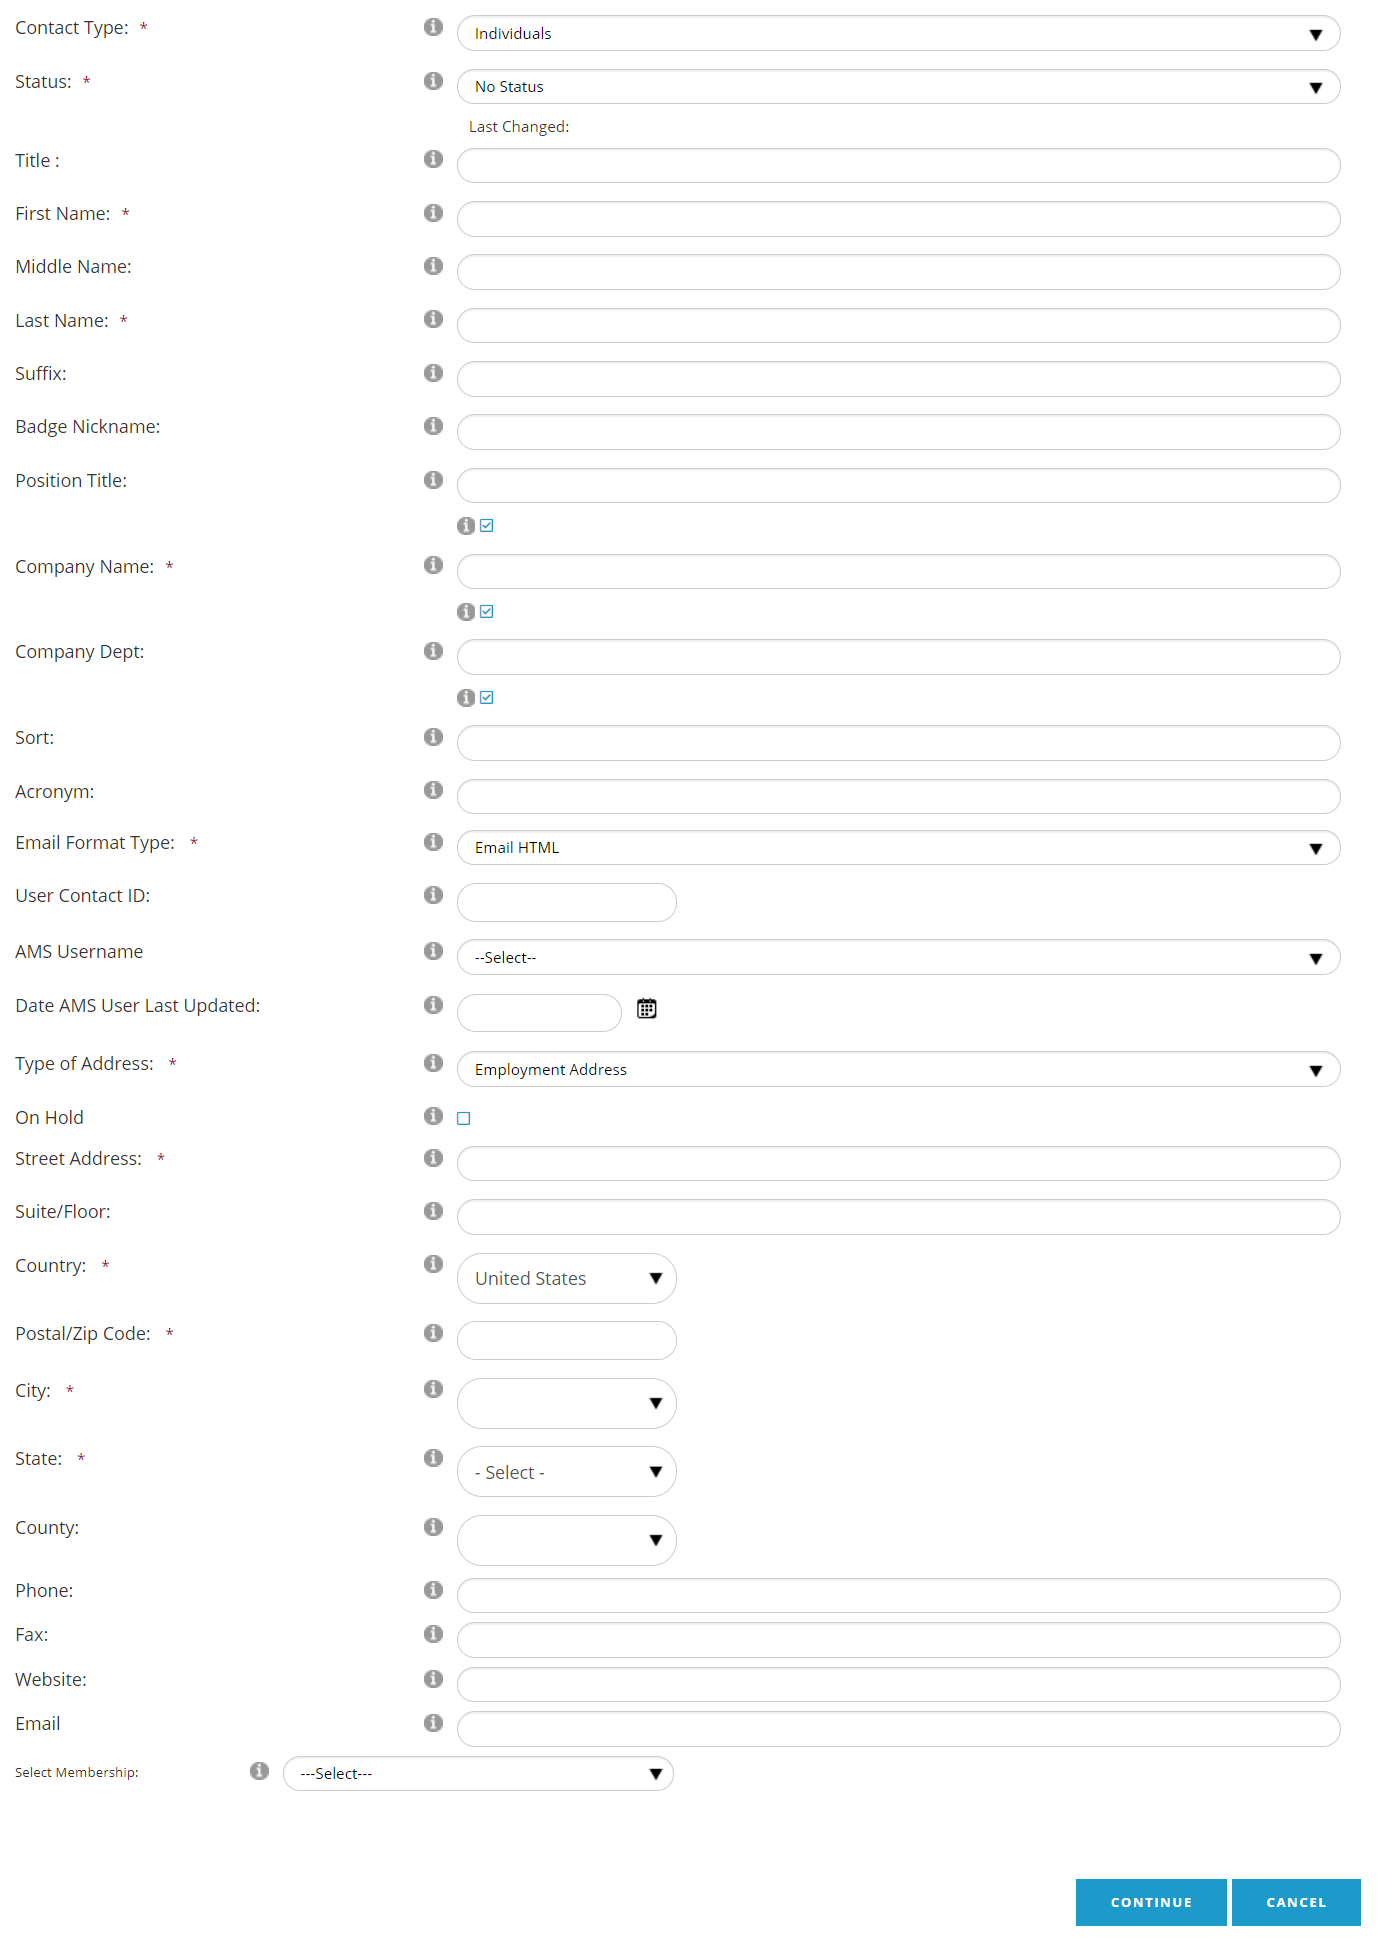
All fields with a red asterisk (*) are mandatory, others are optional. Many of the fields, including the drop down field values, can be set to default values. All of those settings can vary by the contact type. Once you choose the contact type you wish to add, the form will then load those particular settings. A Client Admin at your organization can change and manage this form, including the field names, default settings, mandatory designations, and help text availability.
Also note that when a person creates a new record through your association’s website, the web form can have different data entry requirements than this one. For example, you may need to occasionally add a contact in the AMS even though you don’t yet have a corresponding email address, but if a contact signs up on your website, an email address can, and should, be required by that form.
As you enter data in each field, use the Tab button to move to the next field. Please note that sometimes the next field is a check box that applies to the field immediately above it.
Help text is available for fields by hovering over the  . The system defaults for these fields can be changed by a Client Admin.
Contact Type will appear with a default selection, such as Individual, but has a drop down menu populated with standard and, where applicable, customized types. Make sure the correct contact type is selected before proceeding, as the form's fields may change for each type.
The Status field is for administrative aspects of a contact record other than membership, benefits and entitlements. For example, Active Contact, To Be Purged, Accounting Hold, and Deceased are standard options for an Individual contact record’s status, and customized options can be added as needed to the Contact Status dictionary by a Client Admin.
If there are no administrative issues with the contact, which is usually the case when adding a contact for the first time, the default status setting, in this case “Active Contact,” can be selected. Note that standard reports in NOAH will not include records with the status of “Deceased” and “To Be Purged.”
Badge Nickname is a field to be used when an Individual wants his or her name to appear differently on the name badges your association provides than what appears in the First Name field. For example, if Robert Jones goes by that name on all records and documents, but wants his badge to read Bob Jones, his First Name field would be filled out with Robert, Last Name with Jones, and Badge Nickname would be entered as Bob.
Position Title is where an individual’s job title can be entered. If a person is affiliated with more than one company you may prefer to indicate the position title in each respective work folder. See the Work Folder section below for more info.
Company Name and Company Dept are used as needed to more easily direct mail to Individual Contacts at bigger companies, or universities.
Sort or Organization Sort is a field you can use to enter something other than the official, legal company name when needed, to make sorts and reports that incorporate Company Name more efficient. For example, if the company name has been entered as “The ABC Company,” you can add “ABC Company” to this field, thus factoring out “The” in future sorts.
The On Hold check box should be checked when the contact’s address has been deemed to be a bad address, or when entering a new record with an incomplete address. An alert message appears on the contact’s profile upon subsequent logins to your website prompting the contact to update their address. If either the contact or staff updates the address, it is automatically taken off of hold.
Country is usually set to United States as a default, but has a drop down menu for other options. Depending on the country selected, different rules for state/province and postal codes may apply.
The Postal/Zip Code field comes next because the AMS is programmed to automatically populate the corresponding City, State and County names into those fields once a U.S. zip code has been entered. That pre-filled data can be overwritten when necessary.
Phone, Fax, Email and Website are, when entered, auto set to be the key of each respective communication type.
Select Membership allows you to add a membership fee (with the option to generate an invoice and/or process a payment) to the contact’s shopping cart as part of the Add Contact process. To process them as a joining member, select the fee from the Select Membership field’s drop down list. Upon saving the contact, you will be redirected to the Shopping Cart to proceed with processing a member invoice for the contact. If the contact is not adding a membership, then skip this field. The membership fee drop down can be hidden in the configuration settings if desired, so if you are not viewing this on your screen, it has been disabled by your association.
Once you have entered the contact’s information and clicked on the Continue button, the database is scanned to look for a duplicate entry already in your database. This duplicate check can be made up of as many different rules as you wish to create, and can contain compound information. For example, the system could first look for the email address entered and if a match is found, consider the corresponding record a duplicate. If an email match is not found, the system could then look for the contact’s last name along with the city and state or city and zip code.
If a duplicate is found based on your system’s rules, there is no override. You will receive a message that the record appears to be a duplicate and you will not be able to add the record. You can then run a search for the contact based on the data you entered in order to find the record already on file. Keep in mind, it may be marked To Be Purged but still exists in your database. If you wish to modify the rules in place for verifying duplicate records, please contact support, as this is an area of the system can not be modified by a Client Admin.
If the new contact is not a duplicate, it is added to the database along with any address and communications information you enter. You are then brought to the contact’s summary screen which displays the contact’s information based on the data entered, or the Shopping Cart if you selected a membership fee.